A long, conversational swapping of anecdotes between Editor-in-Chief Keith Recker and Cheryl Alters Jamison sparked an idea. Would this beloved observer of the Santa Fe food scene and veteran cookbook author tell her life story through recipes? The answer was, of course, a delicious hell yes!
A Memorable Recipe
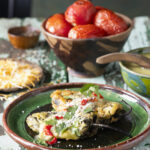
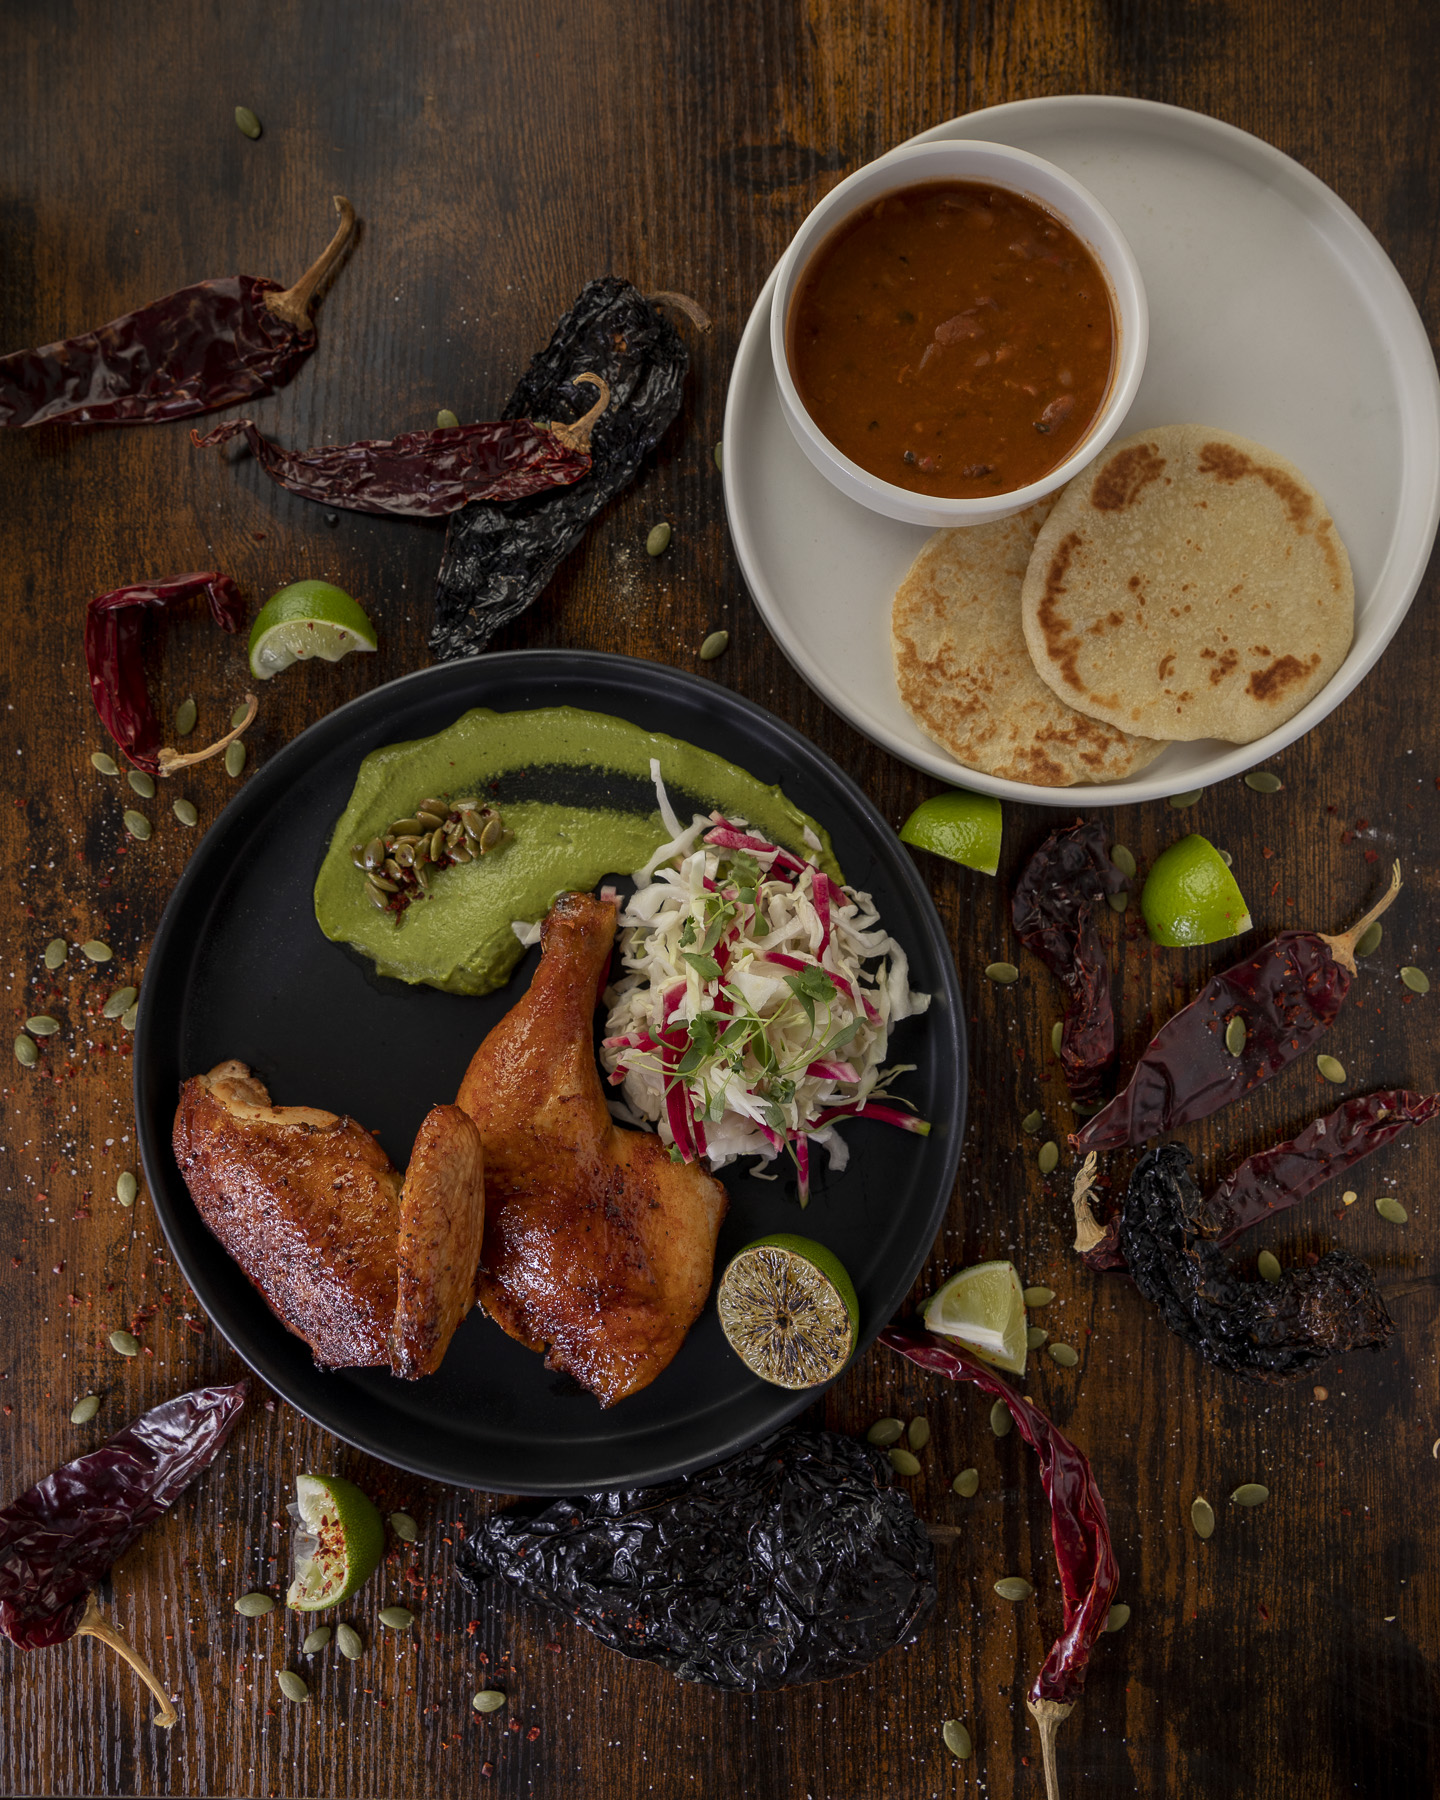
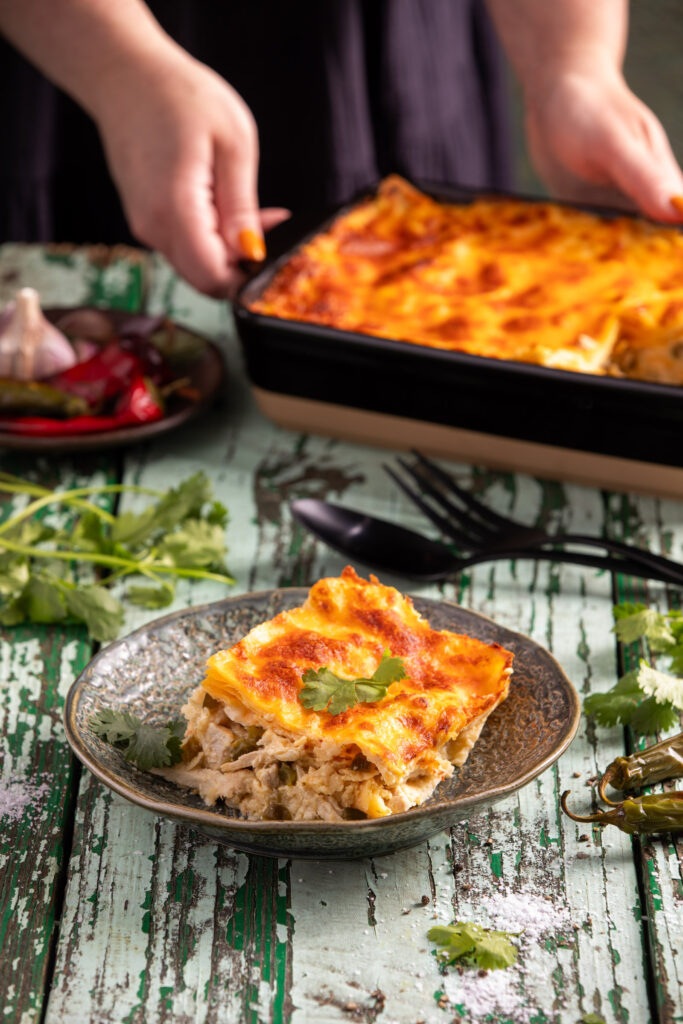
Green Chile Chicken Enchilada Casserole changed my life. I don’t mean that statement in a hyperbolic “Oh wow, these are awesome!” kind of way. What I mean is that a chance encounter with a recipe for the New Mexican classic literally focused me on moving to Santa Fe more than five decades ago.
I was growing up in Galesburg, IL. The town, 1,000 miles northeast of Santa Fe, sat at the crossroads of two major railroad lines, best known as the Burlington Northern and the Atchison, Topeka and Santa Fe. The railroads recruited Mexican immigrant employees early in the 20th century. Over time, as some of those workers stayed on, families opened cafes specializing in tacos and enchiladas, generally filled with beef and mild seasonings to appeal broadly to the local population. In junior high, my friends and I started to frequent one of these places in particular. Today, just about every town in that part of the world has a Mexican-owned café, and a taco truck or franchise or two, but Galesburg was one of the only small downstate communities where I could have discovered this kind of food in the mid-1960s.
I hadn’t been too wild about the meatloaf-and-Swedish-meatball cuisine more common to central Illinois in that era. I was fully simpatico, though, with putting seasoned beef into these newly found tacos and enchiladas, topped with a drizzle of salsa. My experience, though, was limited to this one simple style of antojitos.

Interest in the Kitchen
I had been fascinated with cooking since I was a small child, when I had the good fortune to grow up playing in my great-grandparents’ half-acre garden. Granny and Granddad would let me help them pick string beans, corn, tomatoes, and a beloved leaf lettuce called Black Seeded Simpson, and then turn the produce into simple dishes.
My parents carried on the tradition in a small way, with a couple of rows of tomatoes as well as the leaf lettuce. I found I could use those ingredients to top the tacos and enchiladas I was now trying to duplicate at home, however poorly. Some fried taco shells had made it to the local grocery store shelves. I mixed something called “taco seasoning,” probably mostly salt and cumin, into ground beef to flavor my attempts at the dish. Corn tortillas came in a can—a can—like an oversized tuna can! The tortillas resembled rawhide in texture, but I warmed them into submission for something akin to enchiladas.
This was well before the numbers of cookbooks on every conceivable food topic exploded, and before the internet was even a gleam in anyone’s eye, so I had few resources to support my new-found culinary interest. My home, like most at the time, had a Betty Crocker Cookbook, a Joy of Cooking, a few mimeographed church and PTA recipe collections, and a box of index cards with family favorites. I eagerly scoured newspapers and magazines for the occasional new “Mexican” recipe idea. It was in this vacuum of food knowledge that “green enchilada cassarole [sic]” gobsmacked me.
The Unexpected Cookbook
I came home one day from high school and greeted my father, who was sorting the mail at the kitchen table. He opened a manila envelope from our Illinois congressman, and said the booklet inside would be more appropriate for me than for him. He slid across the table The Republican Congressional Cookbook. It seemed an effort to humanize these men (and it was all men, though some at least credited their wives for their recipe) who “make speeches and pass laws.”

I eagerly flipped through the book, seeing pea pods and water chestnuts from Hawaii, and Rocky Mountain trout from Colorado, but also oddly out-of-place Shrimp de Jonghe from Arkansas, and Poulet Michel with Armagnac from our congressman. The recipe from New Mexico stopped me cold. Here was something wondrous, layering tortillas, lots of gooey cheese, and shredded chicken, rather than the beef I then assumed was in all Mexican or Southwestern-style dishes. What I couldn’t get over though, was that it used a whole can of something described as green “chili.”
Passion for the West
Because of our many family vacations in the Rocky Mountain West, I already was dreaming of moving to this part of the world, once I had any control over my destiny. No longer, however, was it going to be good enough to move to Colorado or Wyoming. I was not only going to live in the mountains, but in the state where people ate food loaded with this new-to-me green.
I still stumbled mightily on my way to pepper proficiency. Attempting to absorb everything I could about this cuisine, I came across a recipe that further excited me—chiles rellenos. I knew just enough to be dangerous. I understood that green in a can wouldn’t cut it for a dish of stuffed chiles, so I stopped in a grocery store where I had seen some fresh chiles. What I didn’t understand, though, was that what I had purchased much more picante jalapeños.
You might think I would have been tipped off to a problem by the mountain of grated cheese and vat of batter, I had assembled, in contrast to my six little chiles. I was not deterred. I fried those things up, and served them to my tender-palated family. The horrified reaction of my parents and sisters is family legend. If I could just get myself to New Mexico, I was sure I could figure out this world of chiles.
Making a New Dream
As I was finishing graduate school in arts management at the University of Illinois, I was in need of an internship, my intended stepping stone to moving westward. As it turned out, nothing in my field was available where I wanted to be. My program director came up, though, with an offer that was just what I was looking for, and he enthused that it would be working with an up-and-coming hotshot in the arts. It turned out to be in Oklahoma City, which, ultimately, I rationalized was halfway to the Rockies, making frequent visits west much easier. The hotshot was a guy named Bill Jamison, who indeed was a rising star in the field. He rose so fast that we were only in the same place at the same time for a few months, before he was offered a Santa Fe-based dream job.
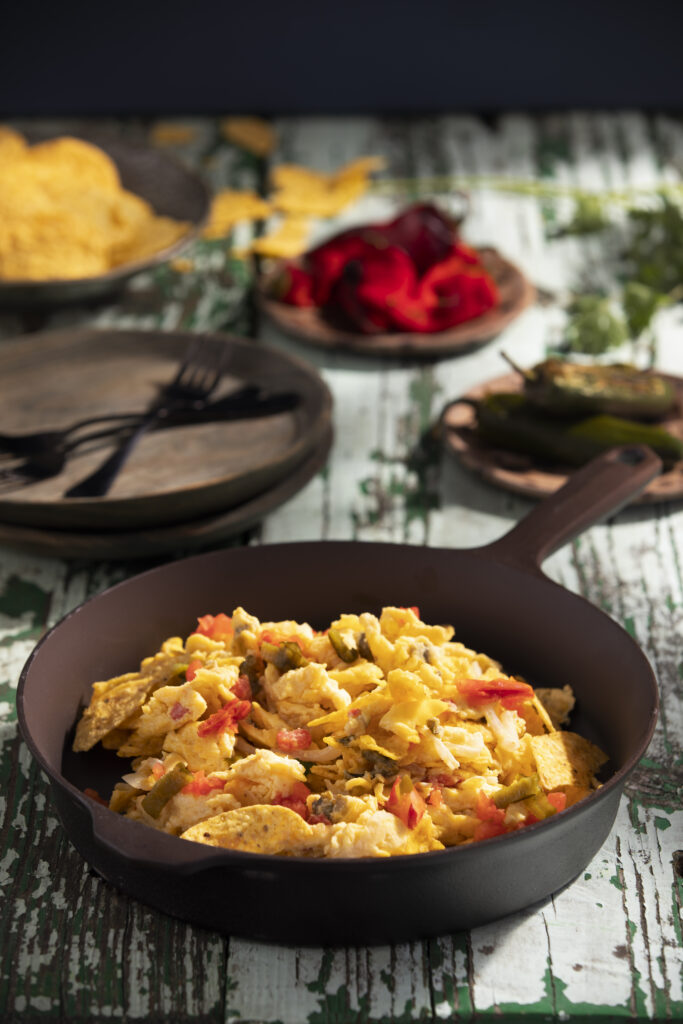
Accepting an invitation with friends to visit Bill in Santa Fe, I finally had the opportunity to dig into some of the New Mexican food I had been reading about for years. I reveled in the red and the green in popular places of that time like Guadalupe Café, The Shed, and the Pink Adobe. At the Pink, I had a pie epiphany as well, tasting Rosalea Murphy’s lard-crusted apple creation, which took me back to my great-grandmother’s pies. We had drinks at this amazing already-venerable Canyon Road bar, El Farol. Bill surprised me too by whipping up a stellar chile-enhanced breakfast scramble. It all furthered my determination to find a way to move here—for the food though, not the guy.
Moving to New Mexico
It took a couple more years, but eventually Bill offered to hire me again, this time in a Santa Fe arts job. I celebrated by taking myself back to The Shed, where I tempted fate by wearing a white suit to eat red chile cheese enchiladas. I moved here in August of 1980. The timing was especially fortuitous, in my mind, because it was green chile season. No longer would I have to depend upon cans of the stuff.
Like real New Mexicans, I could buy a big Santa sack of it roasted, then put it in the freezer to use throughout the year. I was a little overly enthusiastic, because I had a 40-pound bag for just me, and a freezer so small I referred to it as a freezette. I had to peel and seed all of the pods right then, to make the chile much smaller in volume. For months, the freezer couldn’t even hold ice cube trays, for all the chile crammed into it. It was my first step, however, to becoming a resident of the Land of Enchantment. It also was a step toward wanting to know everything I could about the foods of this glorious place.
A Life-Changing Moment
I had no inkling yet that I would eventually marry that guy who hired me twice, or that we would shift from our arts careers to writing about the foods of the American Southwest and Mexico. That came as a result of wanting to put people straight on the important differences between food here and elsewhere, of the strong Indigenous identity of the food to this day, and as a way to celebrate the extraordinary chile that had captivated me in print so many decades ago. Forty-some years after settling here, I remain enchanted with New Mexico and its distinctive food, ever thankful that the Green Chile Chicken Enchilada Casserole came into my life.
Make Cheryl Alters Jamison’s Life in 5 Dishes at Home
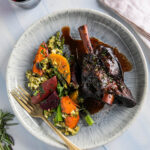
Green Chile Chicken Enchilada Casserole changed my life. Yes, a life-changing casserole! Over the years since I found The Honorable Manuel Lujan, Jr.’s recipe for enchilada casserole, my version has evolved to this one. I did have the opportunity, some years after I moved to New Mexico, to meet Mr. Lujan. He was astonished to hear how his recipe (really his wife Jean’s) had altered my future.
In an era of Iceberg, the ruffly Black-Seeded Simpson leaf lettuce my grandparents grew was a revelation. An heirloom still prized for its large lime-green leaves, it’s a beauty, tender but with more character than the mesclun lettuce blends common today. The greens were bathed in a dressing made with bacon fat, kept at the ready in a stovetop stoneware crock. We would pluck radishes and scallions from the garden’s rich black soil at the same time as the lettuce.
If I’d only known, back in the 1960s that I had invented the jalapeño popper! I had no understanding back then of any difference between jalapeños and New Mexican green chiles. Here’s what I really intended to make on the fateful evening described above.
When I made a trip to Santa Fe in 1977, the guy my friends and I were visiting whipped up breakfast,” Alters Jamison explained. “It was more Tex than New Mex, a sensational scramble of eggs with chiles, cheese, and tortilla chips, my introduction to migas. Eventually, I married the cook. Once we got our own flock of chickens, migas began to show up on the menu most weekends.
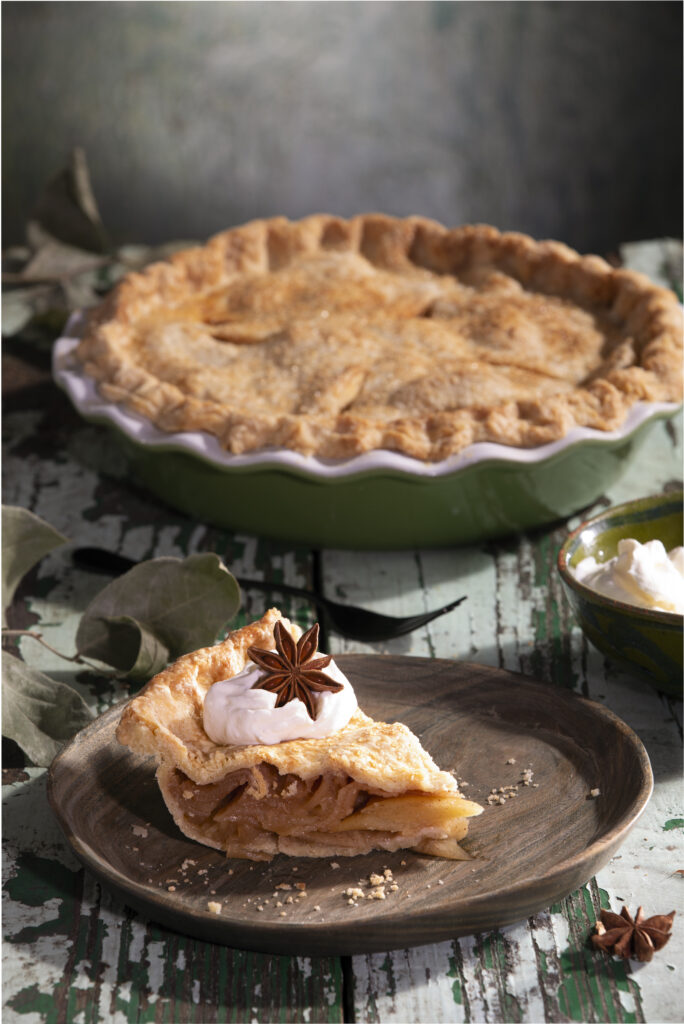
The homemade apple pie of my early childhood was enveloped in a flaky lard crust. After my grandmothers retired from baking, my mom—and it seemed like everyone else—succumbed to the ease of grocery store freezer-section pies. For holidays, a local bakery pie might come to the table. None had the flavor and texture of the old days, but I didn’t know what was missing. On my 1977 visit to Santa Fe, I was treated to dinner at the venerable Pink Adobe. The combo plate was satisfying, but the pie dazzled me. Cinnamon-scented apple slices were surrounded by the crust of my childhood. I discovered that lard was the secret adding flakiness and an elusive savoriness to the crust. Most pie recipes say it’s fine to substitute a store-bought crust but it’s not fine. Go to the effort to make your own and find yourself transported.
Recipe and Story by Cheryl Alters Jamison / Styling by Merrie O’Donnell and Keith Recker / Photography by Dave Bryce

Subscribe to TABLE Magazine‘s print edition.