Home Blog Page 118

Vegan Chocolate Cake (With Tea & Tarot Cards)

0
Chocolate cake served in a plate alongside tarot cards and a cup of tea

“In this house we have chocolate cake for breakfast!” That’s a line from Practical Magic, one of my favorite movies. It inspires us to think about a very ordinary food in an unexpected way. Instead of seeing foods as very specific to times of day, or even times of year, the idea of chocolate cake for breakfast seems like a radical notion. Everyone knows chocolate cake is reserved for desserts only. Preferably after you’ve eaten all your green vegetables. Well, I’ve never been a fan of living life in an expected way, so I was determined to transform chocolate cake into a breakfast food.

Chocolate Cake Can Be Magical

Now I regularly (at least twice a week) enjoy chocolate cake, with tea and tarot cards, for breakfast. I love starting my day on a comforting and happy note, while getting some guidance from my cards. Chocolate cake and tarot conjure up a whole mood, an atmosphere, and I can’t recommend that magical pairing enough. You’ll find yourself much more receptive to magical guidance when you have delicious chocolate cake in your mouth.

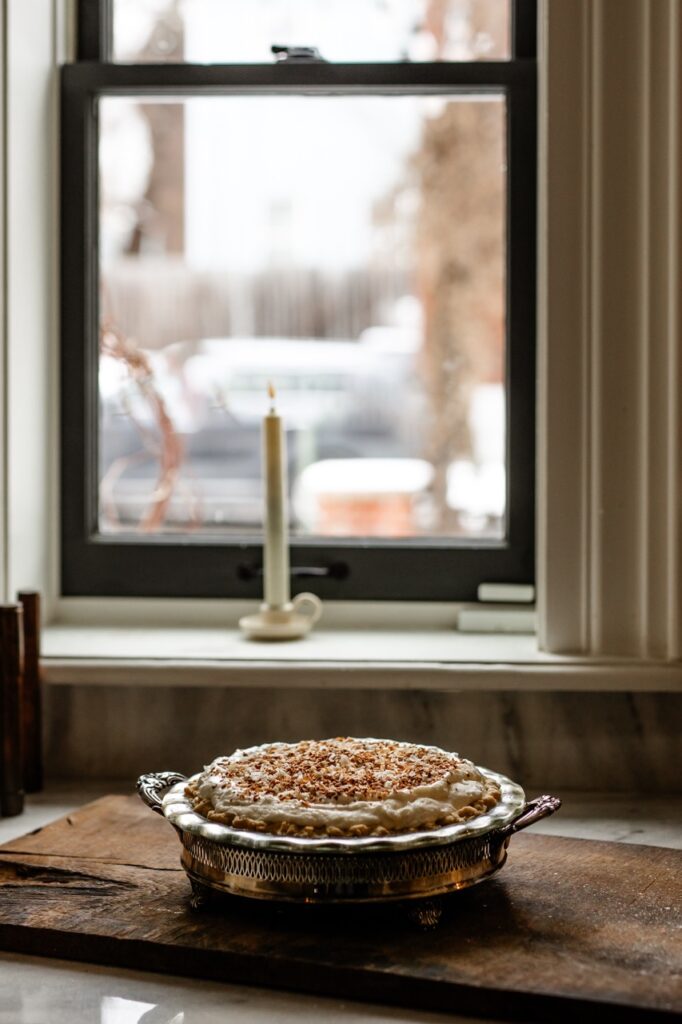
In creating this recipe, I wanted to transform what chocolate cake could be. I didn’t want the standard airy-overly-sweet variety, so I worked on it until I came up with something filling, not too sweet, and very magical. I bake the cake into little bundtlettes, because aren’t little personal cakes a magical notion, too? But the recipe can easily be baked in a loaf pan, muffin pan, or 8” round. Feel free to bake this recipe into whatever shape your heart desires.

Print
clock clock iconcutlery cutlery iconflag flag iconfolder folder iconinstagram instagram iconpinterest pinterest iconfacebook facebook iconprint print iconsquares squares iconheart heart iconheart solid heart solid icon
Chocolate cake served in a plate alongside tarot cards and a cup of tea

Vegan Chocolate Breakfast Cake Recipe


  • Author: Joseph Cuevas

Description

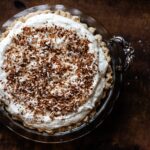
Enjoy with a cup of tea and a spread of tarot cards.


Ingredients

  • 2 cups all purpose flour
  • 1/2 cup cocoa powder
  • 1 1/2 tsp baking powder
  • 1/2 tsp sea salt
  • 1 cup unsweetened soy milk & 1 tbs apple cider vinegar
  • 1/2 cup blended silken tofu
  • 2/3 cup sugar
  • 2/3 cup vegan butter melted
  • 2 tsp vanilla extract
  • Whipped cream & berries for garnish


Instructions

  1. Preheat oven to 350F and spray your bundtlette pan with nonstick baking spray.
  2. Mix together the soy milk and vinegar. Leave for about 5 minutes to thicken and form a vegan buttermilk.
  3. In a bowl whisk together the flour, baking powder, sea salt, and cocoa powder.
  4. In a separate bowl whisk together the sugar, melted butter, buttermilk, vanilla extract, and tofu. Make sure all the sugar has dissolved.
  5. Pour the dry ingredients into the wet ingredients. Mix with a rubber spatula. Don’t over mix.
  6. Spoon into your bundtlette pan.
  7. Bake for 23-28 minutes, or until a toothpick inserted comes out clean.
  8. Let cool before removing them from the pan.
  9. Top them with whipped cream and berries.

Notes

  • If your chocolate bundtlettes are domed on their base, you can take a kitchen towel, or paper towels, and carefully press them down to be more flat while they are still warm and in the pan.
  • I use the Nordic Ware Bundtlette pan. It yields six good size bundtlettes.
  • If you are soy free, you can use unsweetened vegan yogurt in place of the tofu, and a different plant based milk instead of soy.
  • Bake with intention! I’m a firm believer that the energy we put out, will be in the food we prepare. So bake this recipe thinking about how much you will enjoy having them for breakfast!

Story, Recipe, Styling and Photography by Joseph Cuevas

Subscribe to TABLE Magazine’s print edition.

Brussels Sprouts with Pomegranate Seeds and Venison Jerky

0
Roasted to perfection, these tender and flavorful Brussels sprouts make a delightful side dish, featuring a harmonious blend of earthy flavors and a hint of sweetness, complemented by a subtle smoky undertone.

Who says healhy food has to be boring? This recipe comes to us from Cory Hughes of Fig & Ash, who shared his Thanksgiving recipes based on the mind of “warm, nourishing, stick-to-your-ribs kind of food,” he serves up at his own holiday table. These tender and flavorful Brussels sprouts make a delightful side dish, with a hint of sweetness complemented by a subtle smoky undertone.

Why Venison Jerky?

Well, because beef jerky can be a little boring! But there are also many health benefits to venison jerky. Free-range venison offers has more protein and less fat than other red meats, along with and ton of vitamins and minerals. When venison jerky and brussels sprouts join forces, you get one of the most nutrient-rich, delicious side dishes you can imagine.

Print
clock clock iconcutlery cutlery iconflag flag iconfolder folder iconinstagram instagram iconpinterest pinterest iconfacebook facebook iconprint print iconsquares squares iconheart heart iconheart solid heart solid icon
Roasted to perfection, these tender and flavorful Brussels sprouts make a delightful side dish, featuring a harmonious blend of earthy flavors and a hint of sweetness, complemented by a subtle smoky undertone.

Brussels Sprouts with Pomegranate Seeds and Venison Jerky


  • Author: Cory Hughes

Description

Roasted to perfection.


Ingredients

Scale
  • 1/2 lb Brussels sprouts, bottoms off, split in half
  • 1 tbsp kosher salt
  • 1 tsp fresh cracked black pepper
  • 4 tbsp extra-virgin olive oil
  • 1 tbsp roasted garlic
  • 1 tsp sherry vinegar
  • 3 tbsp pomegranate seeds (fresh is great, or buy them frozen)
  • 1 ½ oz finely diced venison jerky


Instructions

  1. Place the cut Brussels sprouts in a mixing bowl and toss with olive oil, salt, pepper, and roasted garlic. Place on a baking tray in a 425-degree oven for 10-15 minutes.
  2. You’re looking for signs of golden brown, and some tenderness in the Brussels sprouts.
  3. Put the Brussels sprouts in a mixing bowl, toss with the sherry vinegar and pomegranate seeds, and place in a serving bowl.
  4. Top with the venison jerky and some more freshly cracked black pepper.
  5. Serve while hot.

Recipe by Cory Hughes / Photography by Dave Bryce / Styling by Keith Recker 

Subscribe to TABLE Magazine’s print edition.

Apple Tarte Tatin with Homemade Puff Pastry

0
Apple Tarte Tatin with Homemade Puff Pastry served on a plate along side a plate of butter and apples

Executive Pastry Chef Selina Progar shares a perfect autumnal apple tarte tatin recipe for apples that welcomes the evening or morning weather chill. This recipe takes two days, so on those days when it’s dark and cold and you feel like you have nothing to do, roll up your sleeves and take a crack at this recipe.

What is Apple Tarte Tatin? 

A tarte tatin is an “upside down” tart made up of pastry baked on top of caramelized fruit. The Tatin sisters, Carolien and Stéphanie Tatin, who ran the Hôtel Tatin in Lamotte-Beuvron, France in the late 19th century, invented it and served it in their hotel. The tarte Tatin was the signature dish, and it’s now popular all over the world. The tarte Tatin is a cousin of the upside down cake, except that rather than using cake, tarte Tatin uses a pastry base. Special tools you’ll need to make it are a pastry brush, a 6-inch pan or 6 inches cast iron skillet, and a rolling pin.

Print
clock clock iconcutlery cutlery iconflag flag iconfolder folder iconinstagram instagram iconpinterest pinterest iconfacebook facebook iconprint print iconsquares squares iconheart heart iconheart solid heart solid icon
Apple Tarte Tatin with Homemade Puff Pastry served on a plate along side a plate of butter and apples

Apple Tarte Tatin With Homemade Puff Pastry


  • Author: Selina Progar
  • Yield: 1 small cast iron pan 1x

Description

Turn that frown right-side up with this upside down treat.


Ingredients

Scale

For the tartin:

  • 6 apples, your choice
  • 1 stick butter, melted
  • 1 cup brown sugar
  • 1 tsp cinnamon

For the puff pastry dough:

  • 1 cup bread flour
  • 4 oz pastry flour
  • .5 oz salt
  • 4 oz butter, soft
  • 9 oz water, cold

To roll-in:

  • 1 cup + 2 oz butter, pliable but still cold
  • 2 oz bread flour


Instructions

For the tartin:

  1. Prepare the cast iron skillet by lightly rubbing 1 tablespoon of the butter on the bottom and sides, then laying a 9 inch parchment circle in the bottom. The parchment should be coming up the sides. Using 1 more tablespoon of butter brush the parchment, then sprinkle with 2 tablespoons of the cinnamon brown sugar.
  2. Preparing the apples: Peel the apples, and slice them with either a sharp knife or a mandolin to about the thickness of a quarter from the top to the bottom (you want the seed star) of 2 apples. Remove the seeds from the stars and set those slices aside. Continue with the remaining 4 apples cutting them the same way. The pieces that do not have the core set those aside. The pieces with the core, cut just the core out (cutting them into half pieces).
  3. Arranging the apples: Arrange the apples with the seed stars first. Place one star in the center, then shingle the remaining apples around the edge. Overlapping each other. Brush that layer with butter and sprinkle with 1 large spoon of sugar.
    Then using the remaining rounds and halves of your apples do two layers of apples (use the half pieces to lift up the edges, as it tends to crown in the center), brush with butter, and sprinkle with sugar. Repeat until you have run out of apples or have reached the very top of the pan. Brush the top layer with butter and sprinkle with sugar.
  4. Wrap the pan entirely in foil, and bake at 375 degrees for 3 hours in a nonconvection oven. 2 hours with convection. Add more time as needed until the apples are deep caramel brown.
  5. Let cool, stovetop, for 1 hour, then place in your fridge overnight to set the butter.
  6. Prepare the puff pastry, or thaw store bough puff pastry. Roll out slightly on a floured surface, and cut slightly larger than the size of the pan you used for the apples.
    Bake using instructions on the recipe.
  7. Once the puff is baked and cooled so you can touch it, place the baked puff pastry on top of the apples and place back in the oven at 350 degrees for 15 minutes. Remove from oven, and carefully flip over the pan onto your serving tray. Remove parchment paper.
  8. Serve with ice cream.

For the puff pastry:

  1. To prepare the dough, place the flour, salt, butter, and water in the mixer with the hook attachment and mix at low speed until a smooth dough has formed.
  2. Shape the dough into a rectangle the size of a half sheet tray. Line a sheet tray with parchment paper and lightly dust with flour. Transfer the dough to that sheet tray, plastic wrap the tray (This will prevent skin from forming on the dough), and refrigerate for 1 hour to 3 hours
  3. To prepare the roll-in, Place the flour and butter in the mixer with the paddle attachment until smooth. Be sure there are no clumps in the butter but do not whip the butter.
  4. Transfer to a sheet of parchment and form a rectangle 1 cm thick. And about the size of a quarter sheet tray. Cover with plastic wrap and refrigerate until firm but still pliable. **Do not allow to become hard*** about 15 minutes.
  5. Now we are going to lock in the butter to the dough.
  6. Take the dough from the fridge and unwrap it. Turn the dough out onto a lightly floured surface and slightly roll out. Not much bigger than it already is. Using a bench knife or bowl scraper, keep the edges very straight and the corners squared off. As close as you can get to a rectangle. Now dust all the flour from the dough. If you leave excess flour, the dough will not stick to itself, leaving air pockets and uneven lamination.
  7. Place the butter pad in the dough to the right side leaving 1-2 centimeters of space from each end. Fold the left half of the dough over the butter and pinch the dough together. Be sure to really seal the edges. Using the rolling pin, slightly roll it out longways. To connect the dough and butter.
  8. Cover the dough with plastic wrap and let set it aside on your counter for 30 minutes. This is to bring the butter and dough to the same temp. Do not refrigerate this step.
  9. Now we are going to administer a 4 fold. Roll the dough out in the long ways direction. Once it is rolled out to about 2 centimeters thick, rotate it 90 degrees, So the long seam is facing you. Fold the right side to the center but slightly greater than halfway, fold the other side to meet it in the ‘middle’ making sure all the lines line up perfectly, fold the entire thing in half again. Press the rolling pin down on the dough. And gently roll in the longways. Let chill for 30 minutes.
  10. Repeat that 2 more times for a basic puff pastry. Repeat 5 total times to create a traditional millefeuille.
  11. Rest dough overnight to allow the gluten to relax. Cut the dough into 4 equal parts. Wrap the other pieces. Either refrigerate and use in 3-4 days. Or freeze in chunks or roll out the sheets, separating them with parchment paper and wrapping well.
  12. Take the 1/4 piece of dough and roll out to the thinness of 1- 2 centimeters.
  13. Cut the size of puff pastry you want by cutting straight down, not to saw the dough as that will “smear the layers.”
  14. Be sure to cut the puff pastry to a size that you can evenly weigh down.
  15. Preheat the oven to 350 degrees, If you have a convection setting, set it to 325 degrees
  16. Take a 9 inch round or 10 x 10 inch square of puff pastry and lay it on a parchment-lined sheet tray. Lay another sheet of parchment on top. Followed by another sheet tray. On top of that sheet, tray rest something heat resistant and heavy. Like a heavy Pyrex pan, cast iron skillet or ceramic pot. By weighing down the tray you are stopping the dough from puffing up. You can absolutely do this, but not for a tart tartan. This method can be used for a traditional Voulevant. Bake for 20, CAREFULLY check the color of the puff pastry, and reassemble the weights and bake for an additional 20 minutes or until it is golden brown.
  17. Remove from oven and cool.
  18. Flip the apple tart tatin over onto the puff pastry. Place back into the oven for 15 minutes to heat the apple through. Top with ice cream and serve.

Notes

This recipe is done over two days.

The puff pastry dough can be rolled out, rolled up in parchment, wrapped with plastic wrap, stored in a freezer bag, and frozen for up to 6 months.

Recipe by Selina Progar
Styling by Keith Recker
Photography by Dave Bryce

Subscribe to TABLE Magazine’s print edition.

Kids Coven: Leftover Halloween Candy Ideas

0
Six little girls dressed in black costumes with a skeleton behind them.

When a costumed coven of young sorceresses convenes, magic ensues… and we are reminded of how rich with fantasy and imagination this season is for children. After chatting with and photographing a gaggle of gal-ghouls in a costume of their choice, we incorporated their favorite Halloween candy into sweet treats that even adults can’t resist.

This year, instead of tossing excess candy in the trash or letting it take up space in your cabinets, get creative with these leftover halloween candy ideas.

Leftover Halloween Candy Ideas

Fiona, Favorite Halloween Candy: Reese’s

A little girl in a witch costume next to a plate of quick bread

What costume are you wearing this Halloween, Fiona? Construction worker with friends!

Pretend that the added bananas make this Peanut Butter Cup Banana Bread recipe just a tad bit healthier…

Freya, Favorite Halloween Candy: Twix

Stylish portrait of model in editorial fashion setting with dramatic lighting

Freya, would you rather drink apple cider or eat a caramel or candy apple? Apple Cider.

Snag a few Twix Bars from your little one’s Halloween bag (we won’t tell!) and whip up this no-bake cold cake.

Fauna, Favorite Halloween Candy: Snickers

Creative fashion portrait featuring nature-inspired styling and modern design

Fauna, would you rather be a princess or a witch? A witch.

Give in to an ooey gooey craving with our Snickers Cookies (Levain Bakery Style) recipe.

Scarlet, Favorite Halloween Candy: Hubba Bubba

Bold editorial portrait with striking red tones and expressive styling

Haunted houses… YES or EEK, too scary, Scarlet!? Yes!

You can chew the gum for a moment of super sweetness, followed by a less flavorful, stiff wad of gum to give your jaw a workout, OR… you can infuse your favorite vodka, and create a surprisingly delicious spritz. (Obviously, this one is for the grown ups.)

Amira, Favorite Halloween Treat: Candied Apples

Elegant fashion portrait with soft lighting and contemporary styling

Would you rather be a princess or a witch, Amira? Princess.

If you haven’t had a candied apple in a while, you’ll be surprised at the smile they put on everyone’s face.

Halloween-themed table setting with decorative seasonal styling

More Treats Made with Leftover Halloween Candy

Rum Pecan Candy Corn Blondies

Simple Fudgy Peppermint Patty Brownies

Monster Rice Krispy Treats

Halloween Candy Bark

Rum Buttermilk Butterfinger Cake

Story by Jordan Snowden / Photography by Laura Petrilla / Shot on location at Barebones Productions Blackbox Theater

Subscribe to TABLE Magazine‘s print edition.

Cookie-Jar Sugar Cookies

0
A close-up of rosemary decorated sugar cookies with green icing and powdered sugar.

Everyone needs to have a sugar cookie baking experience. The fun of mixing and rolling out the dough, selecting the perfect cookie cutter, and decorating them afterwards, all while getting flour everywhere. It’s a core childhood memory for many of us. Plus, the simple flavor of a sugar cookie is one almost no one can deny. They’re sugary sweet with a crunchy, crisp finish. These Cookie-Jar Sugar Cookies are those delectable bites you remember from your youth with a hint of orange and vanilla. Be sure to involve little hands in this process for family memory-making. Starting kids in baking early can lead them to life long passions and allows for recipes to pass down through generations.

An older pair of hands rolls out cookie dough while young hands play with a snowflake cookie cutter.

What is Shortening?

Shortening is a solid fat that bakers use to tenderize and add a rich flavor to different desserts. It is typically made from a blend of vegetable oils and hydrogenated fats. Shortening has a high melting point, which helps to create that flaky and tender texture in pastries and cookies that we all love. It also helps to prevent baked goods from becoming tough or dry.

Print

clock clock iconcutlery cutlery iconflag flag iconfolder folder iconinstagram instagram iconpinterest pinterest iconfacebook facebook iconprint print iconsquares squares iconheart heart iconheart solid heart solid icon
Rosemary shaped and decorated sugar cookies sit on a brown table sprinkled with powdered sugar.

Cookie-Jar Sugar Cookies


  • Author: Leah Hohman, Adapted from Better Homes and Gardens
  • Yield: 24 cookies 1x

Description

A simple sugar cookie is just what you need during the holidays.


Ingredients

Scale
  • 2/3 cup shortening
  • ¾ cup sugar
  • 1 egg
  • ½ tsp vanilla
  • ½ tsp grated orange peel
  • 2 cups sifted enriched flour
  • 1 ½ tsp baking powder
  • ¼ tsp salt
  • 4 tsp milk


Instructions

  1. Sift flour, baking powder and salt into a bowl. Stir to combine.
  2. In a large bowl, use a mixer to cream shortening and sugar.
  3. Add egg and beat until fluffy.
  4. Add vanilla and grated orange peel. Beat until blended.
  5. Add dry ingredients and milk. Beat until just combined.
  6. Divide dough in half. Wrap tightly and refrigerate for 1 hour.
  7. Preheat oven to 375 degrees.
  8. Remove one portion of dough from fridge and roll out to 1/8 thick.
  9. Cut into shapes.
  10. Place on greased or Silpat-covered cookie sheets.
  11. Sprinkle lightly with sugar.
  12. Bake for 12 minutes or until edges start to turn golden.
  13. Repeat with second portion of dough.

Recipe by Leah Hohman, Adapted from Better Homes and Gardens / Photography by Katie Long

Subscribe to TABLE‘s print edition

Gingerbread Cookies

0
A pile of gingerbread cookies decorated with white icing and red bulb sprinles.

Indulge in the warm and comforting aroma of freshly baked gingerbread cookies. These traditional treats are perfect for the holiday season, with their spicy flavor and festive shapes. Whether you prefer traditional gingerbread men or creative designs, these cookies are sure to delight your senses and bring a touch of holiday cheer to your home. You could even bake the dough in larger sheets to make your own gingerbread house from scratch. Just don’t forget the icing and gumdrops for decoration!

Two adults help a young boy roll out gingerbread dough with a rolling pin on a brown table coated in flour.

How to Bake Walls for a Gingerbread House

When baking gingerbread house walls (or even a roof), it’s essential to use a sturdy cookie cutter and to roll out the dough to a consistent thickness. You’ll want your walls to be about a 1/4-inch thick when rolling them out. When baking, cook until the edges are lightly browned, ensuring they are firm enough to hold their shape. Allow the walls to cool completely before assembling the gingerbread house to prevent them from crumbling. For extra support you can also consider using a toothpick or slender dowel rod to reinforce the corners.

Animal shaped gingerbread cookies decorated with powdered sugar sit on a brown table coated in powdered sugar.

Print

clock clock iconcutlery cutlery iconflag flag iconfolder folder iconinstagram instagram iconpinterest pinterest iconfacebook facebook iconprint print iconsquares squares iconheart heart iconheart solid heart solid icon
A pile of gingerbread cookies decorated with white icing and red bulb sprinles.

Gingerbread Cookies


  • Author: Leah Hohman, Adapted from Better Homes and Gardens
  • Yield: 30 cookies 1x

Description

Let your imagination run wild while shaping and decorating these Gingerbread Cookies.


Ingredients

Scale
  • ½ cup shortening
  • ½ cup sugar
  • ½ cup light molasses
  • ½ tbsp vinegar
  • 1 beaten egg
  • 3 cups sifted enriched flour
  • ½ tsp baking soda
  • ½ tsp cinnamon
  • ½ tsp ginger
  • ¼ tsp salt


Instructions

  1. In a bowl, sift together flour, baking soda, cinnamon, ginger and salt.
  2. In a saucepan, bring shortening, sugar, molasses, vinegar to a boil. Let cool.
  3. When cool, beat in one egg.
  4. Stir in dry ingredients and mix well. Turn dough out into airtight container and chill until firm.
  5. Preheat oven to 375 degrees.
  6. Roll out to desired thickness.
  7. Use the cookie cutter of your choice to create circles or other shapes.
  8. Place on greased or Silpat-covered cookie sheets.
  9. Bake 12 to 15 minutes.

Recipe by Leah Hohman, Adapted from Better Homes and Gardens / Photography by Katie Long

Subscribe to TABLE‘s print edition

French Meringue Cookies

0
A plate full of French meringue cookies in snowflake shapes and topped with cherries amongst a table full of cookies.

Create delicate French Meringue Cookies in the shape of festive snowflakes. These light and airy treats are a perfect combination of crisp meringue and a touch of vanilla or almond extract. The classic French technique of whipping egg whites with sugar until stiff peaks form creates a melt-in-your-mouth texture. While we opt for the snowflake shape, note that you can pipe the meringue into anything you prefer. To stick with the holiday theming try making ornaments, candy canes, and other picturesque ideas.

Snowflake meringue cookies with cherries on top sit in front of a window and beside a cup of tea.

Why Do You Have to Let Meringue Cookies Cool for So Long?

Meringue cookies require a lengthy cooling process (usually around 1 to 2 hours) to ensure a crisp and airy texture. After baking, the meringue will appear set, but it is still quite soft and moist inside. Allowing the cookies to cool in the oven with the door slightly ajar helps to gradually release the moisture and dry the cookies out. This prevents the meringue from becoming chewy or sticky instead of crunchy. Without this step you’ll miss out on the best part of our French Meringue Cookies, the texture.

Print

clock clock iconcutlery cutlery iconflag flag iconfolder folder iconinstagram instagram iconpinterest pinterest iconfacebook facebook iconprint print iconsquares squares iconheart heart iconheart solid heart solid icon
A pile of French meringue cookies sit on a brown table dusted in powdered sugar and topped with cherries.

French Meringue Cookies


  • Author: Leah Hohman, Adapted from Baker Street Society

Description

These light and airy cookies decorate the holiday table beautifully.


Ingredients

Scale
  • 3 large egg whites, room temp
  • 1/4 tsp cream of tartar
  • 200 g granulated sugar
  • 1/8 tsp salt
  • 1/2 tsp vanilla or 1/4 tsp almond extract


Instructions

  1. In a stand mixer, whip egg whites and cream of tartar in until foamy but not firm.
  2. Add sugar in six portions, waiting 15-20 seconds between each addition.
  3. Mix until stiff peaks form, about 5 minutes.
  4. Add vanilla or almond extract and salt and whip for just a few seconds more.
  5. Preheat oven to 200 degrees.
  6. Cut parchment paper to line cookie sheets.
  7. Using a star shaped cookie cutter, lightly trace stars into the parchment paper.
  8. Pipe meringues using the star shapes as a guide.
  9. Bake for 1 hour.
  10. Turn oven off, and allow meringues to cool in the oven for 1-2 more hours.
  11. Remove and let cool completely.
  12. Store in an airtight container for up to one week.

Recipe by Leah Hohman, Adapted from Baker Street Society / Photography by Katie Long

Subscribe to TABLE‘s print edition

White Christmas Coconut Pie

0
A pie with a creamy white coconut filling and toasted coconut top.

Bring a little of the winter season inside with the White Christmas Coconut Pie. This twist on a classic dessert features a flaky pie crust and a luscious coconut filling with a light and airy meringue. The combination of this creamy center along with a homemade whipped cream and toasted coconut on top creates a truly irresistible treat. Imagine eating a slice of this pie as you sit beside the fire and watch the snow fall down on Christmas Eve.

A pie with a white coconut filling and toasted coconut on top sits underneath a window that has a candle in it.

Is Meringue Hard to Make?

This pie recipe uses a homemade meringue recipe that folds into the coconut filling. Normally, meringue is thought of as hard to make. But, if you have patience and keep an eye on your mixing, it’ll turn out perfectly. For our meringue we use egg whites, cream of tartar, and sugar. These ingredients help speed up the process and create stiffer peaks that hold together better. Another tip we suggest is to start whipping the ingredients on low to gradually incorporate air before speeding up. With all these tips, you’ll be making a meringue worthy of praise in no time.

Print

clock clock iconcutlery cutlery iconflag flag iconfolder folder iconinstagram instagram iconpinterest pinterest iconfacebook facebook iconprint print iconsquares squares iconheart heart iconheart solid heart solid icon
A pie with a creamy white coconut filling and toasted coconut top.

White Christmas Coconut Pie


  • Author: The Gooderham Family Kitchen

Description

White as winter snow and packed with a coconut filling.


Ingredients

Scale
  • 1 tbsp gelatin
  • ¼ cup cold water
  • ½ cup sugar,
  • 4 tbsp all-purpose Flour
  • ½ tsp salt
  • 1 ½ cups milk
  • ¾ tsp vanilla
  • ¼ tsp almond extract
  • ½ cup whipping cream, whipped until stiff
  • 3 egg whites
  • ¼ tsp cream of tartar
  • ½ cup sugar
  • 1 cup moist shredded coconut, more for toasting
  • Store-bought pie crust


Instructions

For the Pastry Shell:

  1. Choose your favorite store-bought pie crust. Bake according to instructions and let cool.

For the Filling:

  1. In a clean bowl, whip together egg whites, cream of tartar, and sugar until stiff peaks form. Set aside in cool place.
  2. In another clean mixing bowl, whip cream until stiff and carefully fold into mixture. Refrigerate.
  3. Toast a few tablespoons of shredded coconut and set aside to cool.
  4. Soften 1 tbsp gelatin in ¼ cup cold water
  5. In a saucepan, stir together sugar, flour, salt, and milk.
  6. Stir over low heat until it boils for one minute.
  7. Remove from heat and add softened gelatin. Stir until dissolved.
  8. Let cool. When partially set, beat with a rotary beater until smooth.
  9. Add vanilla and almond extract and beat until just combined.
  10. Fold in 1 cup of moist shredded coconut.
  11. Carefully fold whipped cream into mixture.
  12. Carefully fold meringue into mixture.

To Assemble:

  1. Spoon mixture into pie shell.
  2. Chill about two hours until set and serve cold.
  3. Garnish with toasted coconut.

Recipe from the Gooderham Family Kitchen / Photography by Katie Long

Subscribe to TABLE‘s print edition

Must-See Shows at New York Museums This Fall

0
Three Alvin Ailey dancers in front of a work of art at the Whitney, a New York museum
Photo courtesy of the Whitney Museum of American Art

If you’re planning to be in Manhattan this autumn, there are several blockbuster shows at New York museums you should put on your list. And—even if you weren’t planning a trip—perhaps you’d like to reconsider!

Must-See Museum Shows in New York This Fall

Elizabeth Catlett: A Black Revolutionary Artist and All That It Implies / Brooklyn Museum 

Until January 19, 2025

The more than 200 works in this landmark show serves to celebrate the Black woman artist Elizabeth Catlett (1915-2012), who has previously not received the attention she deserves. Both prolific as an artist and deeply political, Catlett shined a light on racial violence and class inequality, often using her artworks as a record of and mouthpiece for her activism. Although she was born in the States, she moved to Mexico in the 40s, and used her work to show the world the plight of Black and Mexican women.

Steve McQueen / Dia Chelsea

Until January, 2025

Filmmaker Steve McQueen (12 Years a Slave, Occupied City, and Blitz) does more than simply make movies. He has, for over 30 years, explored the many possibilities of film and what it can achieve. The common theme is power relations, and he looks at what it means to live within and outside of (or even opposed to) hierarchical structures. The show at Dia Chelsea brings together three works about the African diaspora, including Sunshine State, which involves the artist’s father and an examination of racial stereotypes and identity.

Edges of Ailey / Whitney Museum of American Art

Until February 9, 2025

Choreographer Alvin Ailey’s full legacy—his life, his choreography, his influences—gets an extravagant treatment. The exhibition includes archival materials, artwork, live music and dance, photographs, and more. There is an immersive component on the fifth floor, and a series of performances in the theatre on the third floor. Rarely-displayed items include notebooks, performance footage, drawings, poems, programs, and interviews. (A montage of Ailey’s dances will also be shown on loop.) Artists whose work is included in the exhibition include Jean-Michel Basquiat, Faith Ringgold, Kara Walker, and Rashid Johnson.

Bella da Costa Greene: A Librarian’s Legacy / The Morgan Library

October 25, 2024-May 4, 2025

The Morgan Library and Museum, one of New York’s most fascinating repositories of historical artifacts, turns 100 in 2024. As part of its celebration, it is presenting an exhibition celebrating its first director, Belle da Costa Greene, who helped bring together the uncommonly great collection of books and manuscripts, first for the private library of the namesake (J. Pierpont Morgan), and transformed his holdings into a public institution in 1924. The exhibition follows Greene’s own story and her career, illustrated by rare books, medieval manuscripts, and related ephemera.

Story by Stephen Treffinger / Photo courtesy of the Whitney Museum of American Art

Subscribe to TABLE Magazine’s print edition.

Kimchi Fried Rice

0
Kimchi Fried Rice served in a round brown bowl alongside forks and spoons

When we asked for a Meatless Monday recipe to share with TABLE readers, our friends at Nak Won Garden, Yang-Suk Biondi and Christina Biondi, answered with this wonderful Kimchi Fried Rice. Their answer came with a proviso. “The great thing about this recipe is that you can add any meat that is leftover in your fridge. Bacon, ham or spam (yes spam) or generally any pork product are great additions to this dish.” But…it’s good with only veggies as described below, too!

Some Tips for Making Kimchi Fried Rice

You should be sure the kimchi is well-fermented so its flavor doesn’t get lost in the other ingredients. If you’re up for an extra challenge, making your own kimchi and fermenting it to your desired flavor is easier than you might think! But, if you are one of the people that rolls your eyes when you see what you think is an easy recipe adds five days for fermentation to the cook time, no sweat. Fried rice is a tried and true easy weeknight dinner, that’s also great because you can use leftovers for it. Freshly cooked rice can be too sticky. Day-old rice, which has dried out a bit, works best for frying.

Print

clock clock iconcutlery cutlery iconflag flag iconfolder folder iconinstagram instagram iconpinterest pinterest iconfacebook facebook iconprint print iconsquares squares iconheart heart iconheart solid heart solid icon
Kimchi Fried Rice served in a round brown bowl alongside forks and spoons

Kimchi Fried Rice


  • Author: Nak Won Garden

Description

An easy, fun Meatless Monday dish.


Ingredients

Scale
  • 2 cups of fermented kimchi with its juices, finely chopped
  • Vegetable bullion (or beef or chicken, if you choose)
  • 2 cloves of garlic puréed or finely chopped
  • ½ tsp of soy
  • 1 tsp of toasted sesame oil
  • 2 eggs fried or scrambled depending on preference
  • ¼ cup onion finely diced
  • ¼ cup of any veggies in your fridge finely diced
  • Scallion and toasted sesame for garnish to taste


Instructions

  1. In a non-stick skillet add kimchi, veggies,  onion and garlic on medium heat sauté until all ingredients are fragrant and onions are translucent.
  2. Add rice and seasonings (bullion, soy and sesame oil) and stir constantly with a spatula to break up the rice coat each grain with seasoning, and add salt to taste if needed.
  3. Create a well-add scrambled egg if desired and stir constantly until it is incorporated.
  4. Serve hot and add a fried egg if desired.
  5. Garnish sesame seeds and scallions to taste

Photography by Dave Bryce
Styling by Rafe Vencio
Napkins by Kim Seybert
Glasses by Esteban Prieto
Bowl by Alisher Rakhimov

Subscribe to TABLE Magazine’s print edition.

Create a free account, or log in.

Gain access to read this content, plus limited free content.

Yes! I would like to receive new content and updates.

Table Magazine wants to know your location.

TABLE Magazine operates regional sites - Knowing your location helps us route you to the appropriate site for the best experience.