Home Blog Page 120

Kicking Our Feet Up for a Staycation at The Fifth Avenue Hotel

0
The outside entrance of Fifth Avenue Hotel.

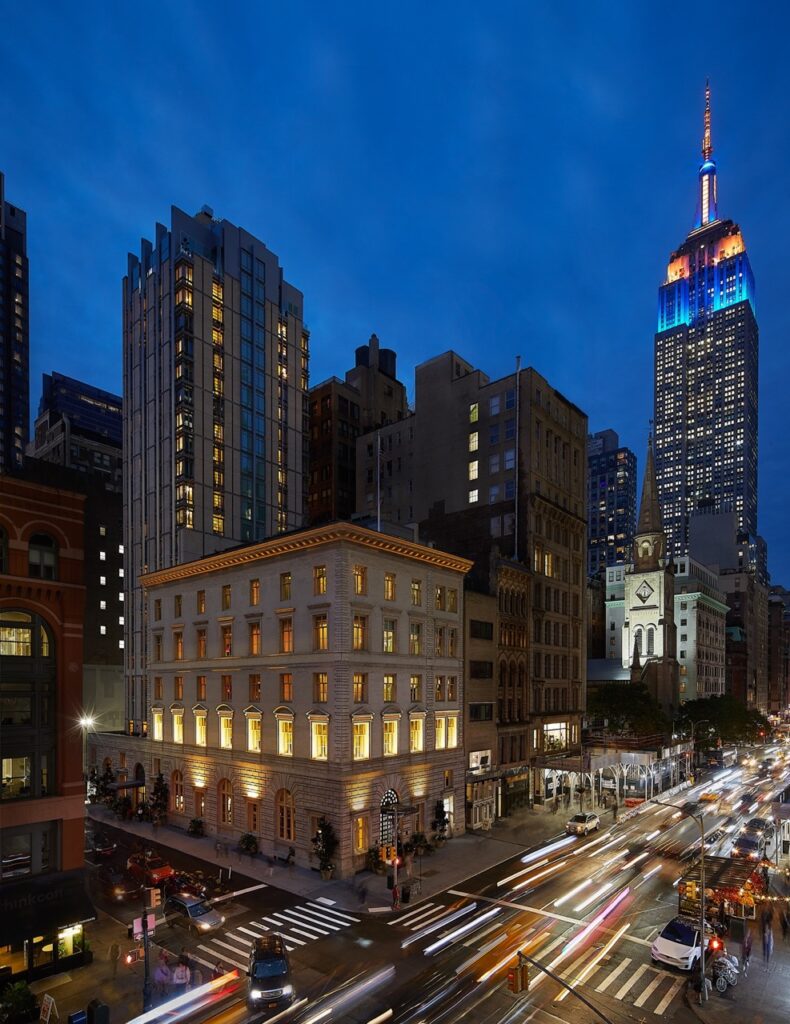
New York is all about reinvention. Its neighborhoods rise and fall in popularity, only to be reborn as something else. In the process, historic buildings magnetize towards repurposing. They end up as condos or hotels. So it is with Nomad, the area to the north of Madison Square Park and home to Fifth Avenue Hotel.

The outside door of Fifth Avenue Hotel with large windows.

Taking a Staycation at The Fifth Avenue Hotel

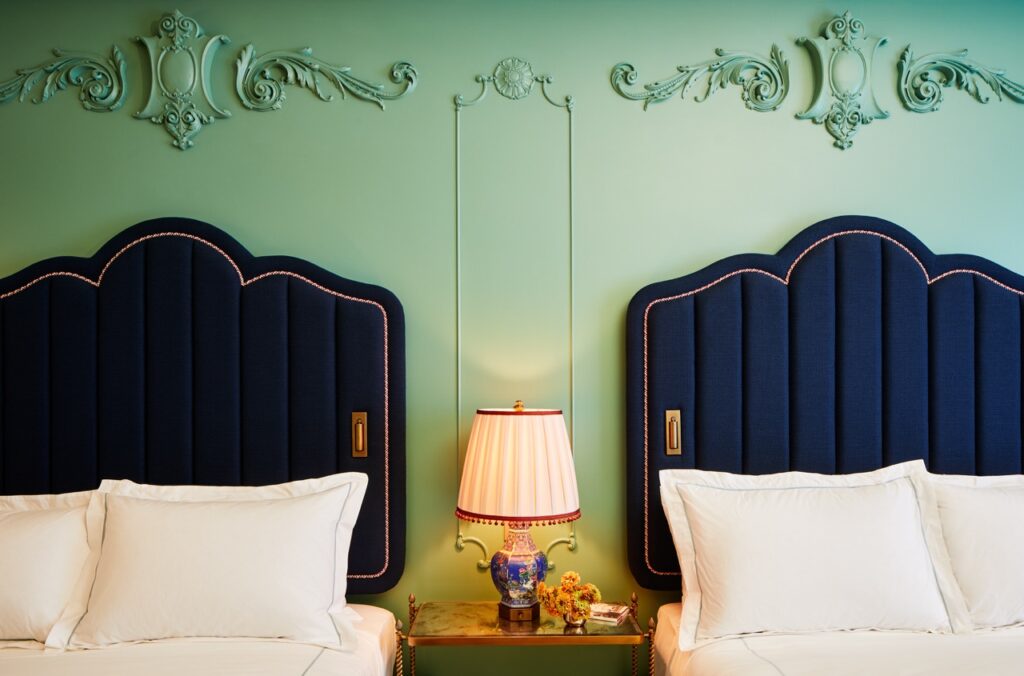
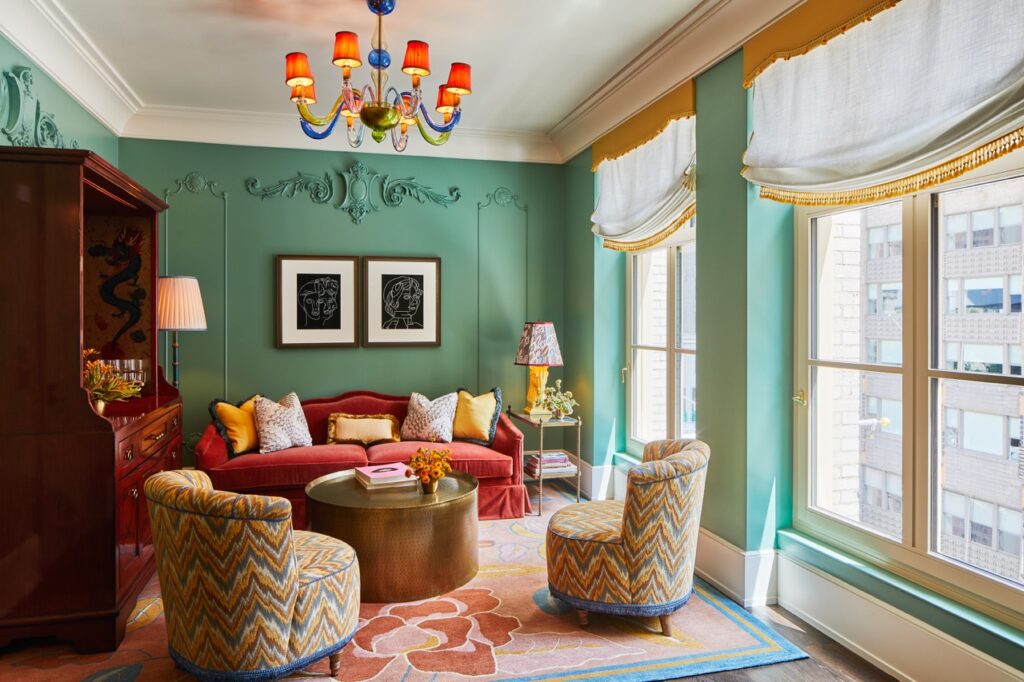
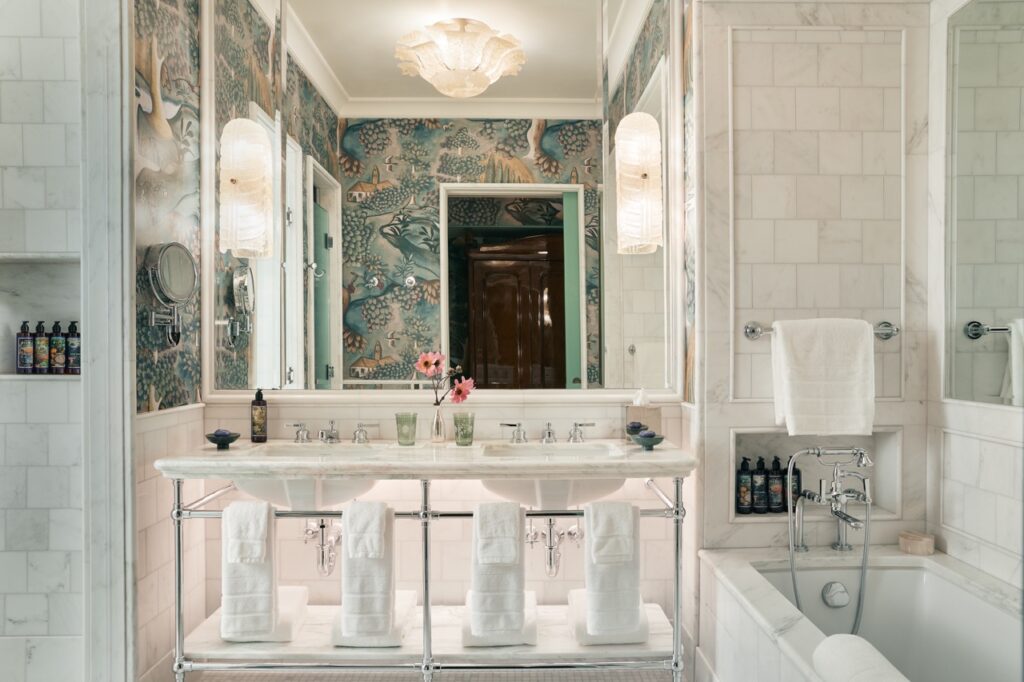
In what was originally the Second National Bank, a five-story Renaissance-style palazzo built in 1907 and designed by McKim, Mead, & White, the glitzy new Fifth Avenue Hotel bucks the trend of bland, blond and ivory luxury hotels. In interior designer Martin Brudnizki’s, spaces are luscious and lavish, filled with a confident meeting of texture, hue, and pattern. Rare is the surface that isn’t painted a rich color, inlaid, gilded, covered with exotic-patterned wallpaper, or decorated with an elaborately hand-knotted rug.

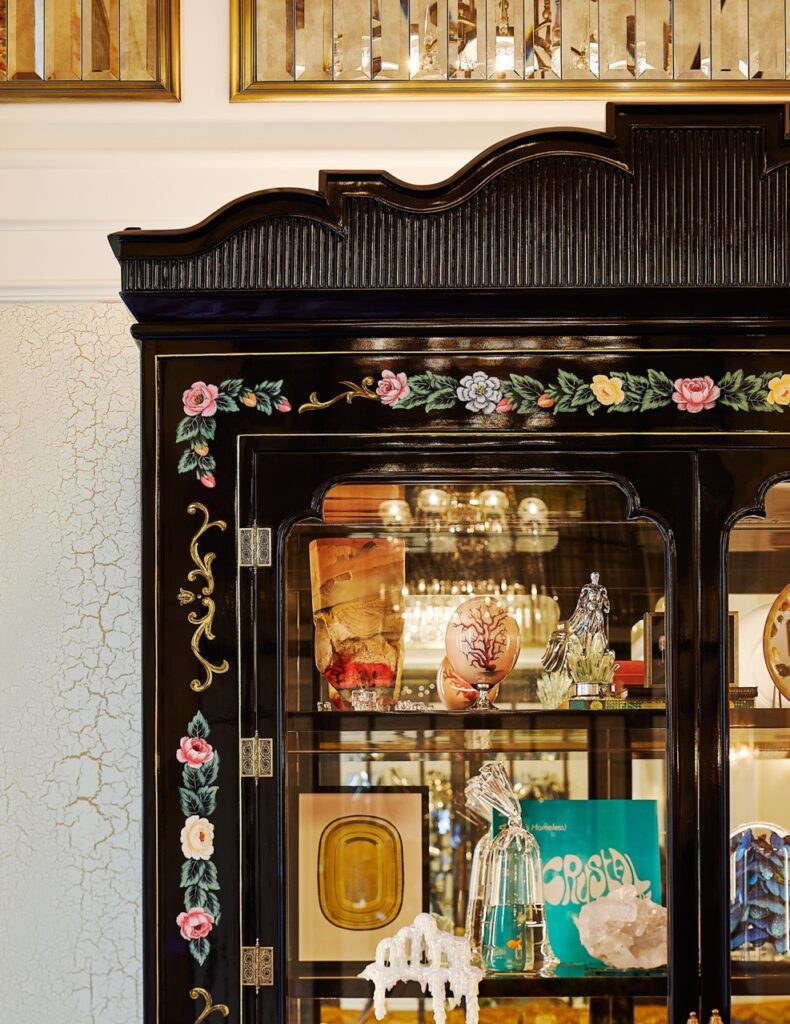
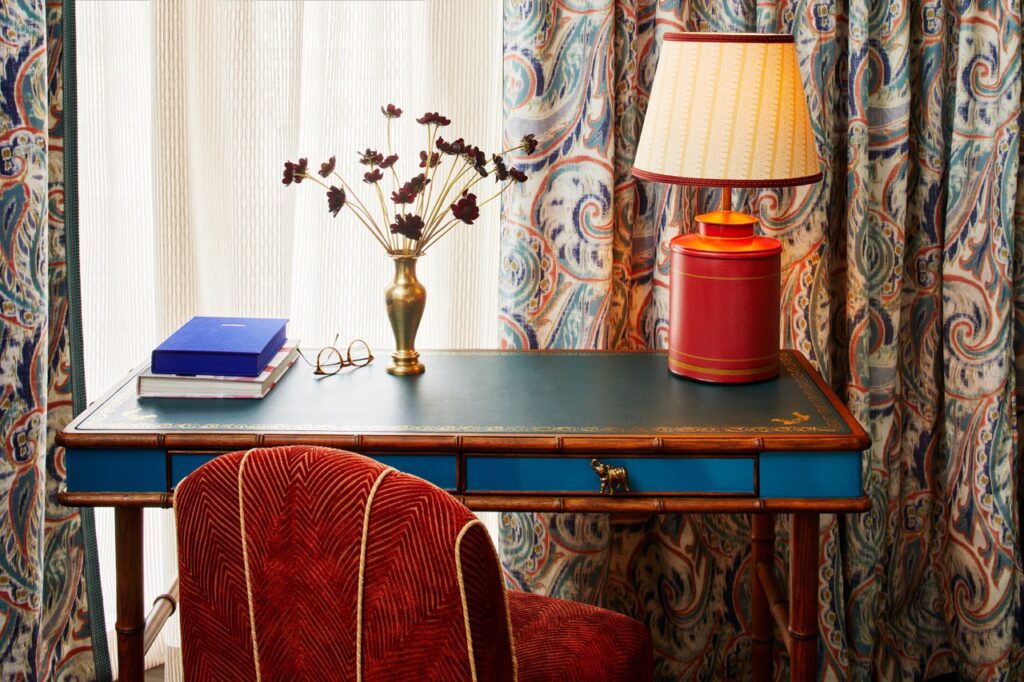
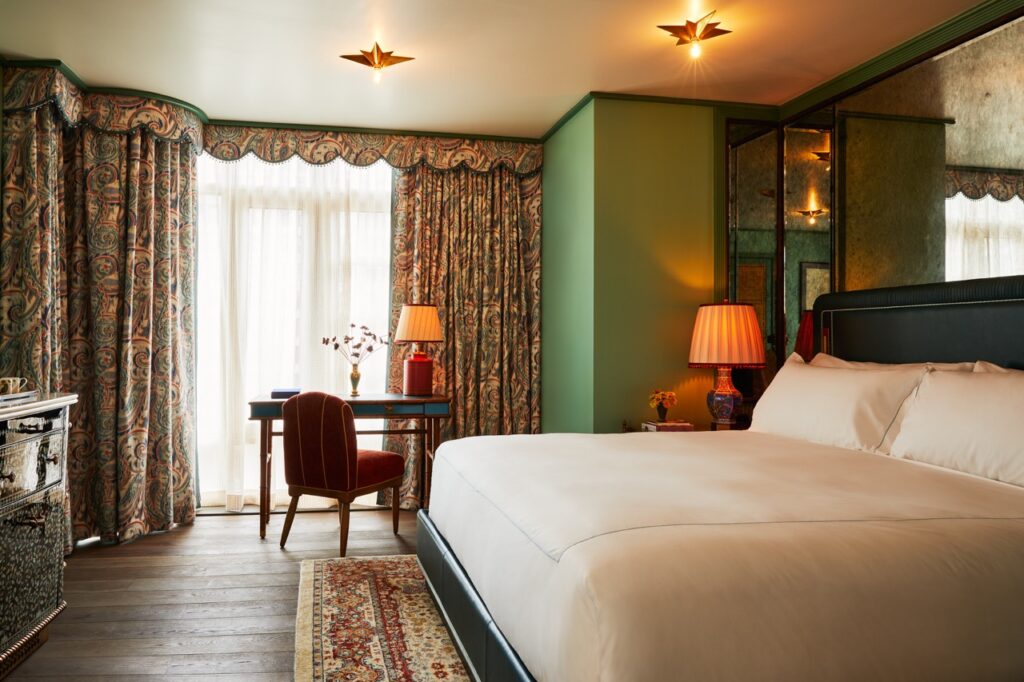
The 153 rooms manage that difficult balance between resembling something out of a Henry James novel and being modern and comfortable, while the public areas have that vibe that makes you feel as if you’ve arrived, although your destination is nothing like what you imagined.  

A large bed in a modern hotel room.

The History of Nomad

The area has a history of attracting high society and creative types, as it does today. Located on what was formerly swampy hunting ground, Madison Square Park opened in 1847. And although the area had originally been filled with dark and narrow row houses, it was soon surrounded by mansions—including the residences of Teddy Roosevelt and Edith Wharton.

A luxury property, also called the Fifth Avenue Hotel, existed on the west side of the park from 1859 to 1908. (It was the first hotel in the US with elevators!). The hotel’s guests include the likes of Mark Twain and numerous presidents including Abraham Lincoln, but, it eventually closed and demolished, but a number of other hotels sprang up nearby.

The site of the current Fifth Avenue Hotel, a couple of blocks north, was originally the home of Mrs. Charlotte Goodridge, a prominent society figure during the Gilded Age, when the area was a hub for the literati—including Oscar Wilde and Charles Dickens. The current former bank building required a 10-year restoration, including the addition of modern amenities. A 24-story glass tower designed by Perkins Eastman and PBDW Architects was also added.  

A dining space with many tables with white table cloths.

What Awaits Inside

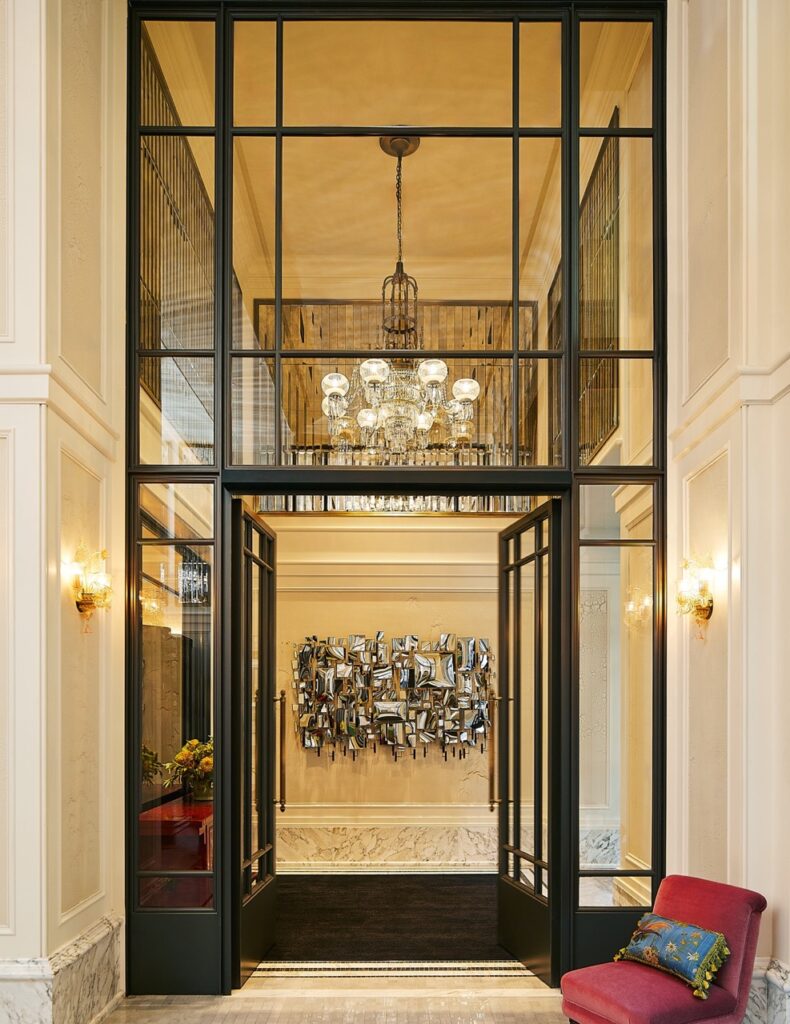
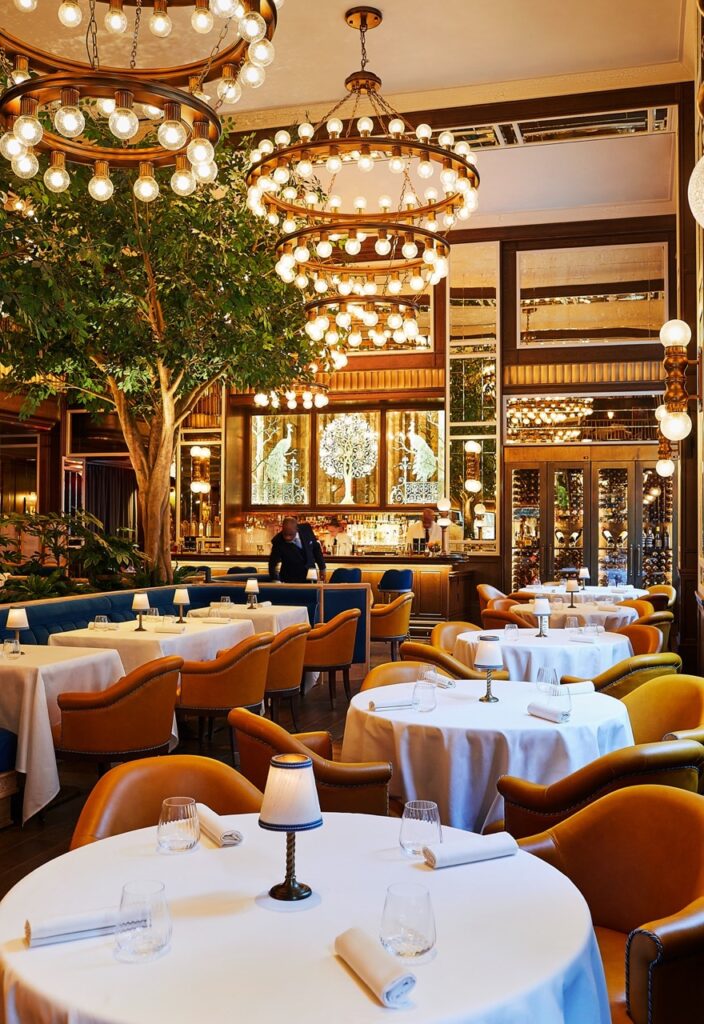
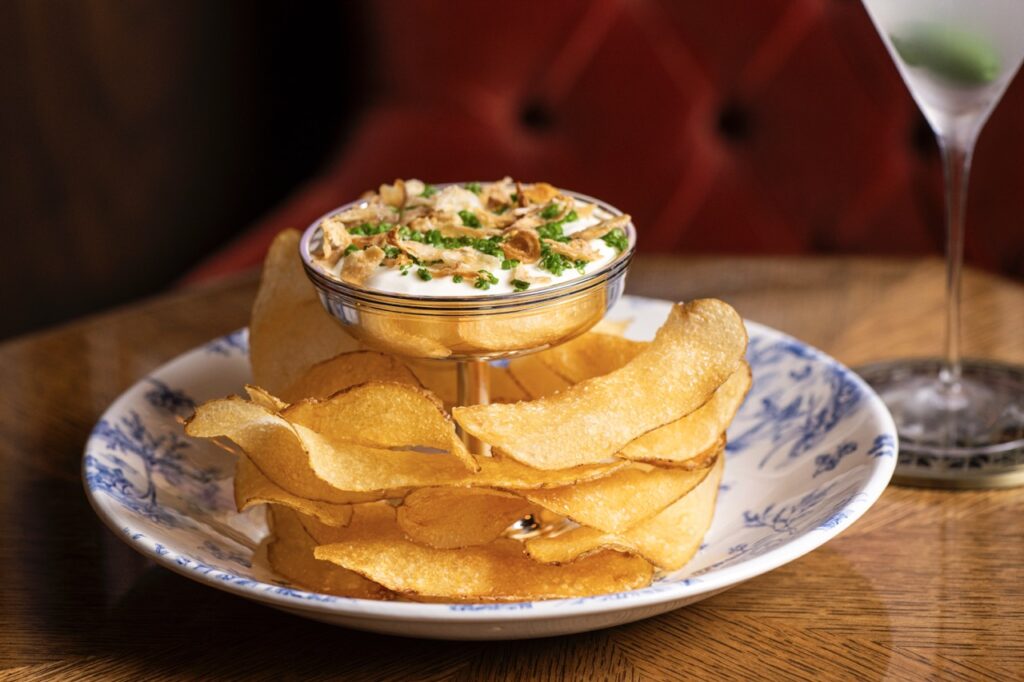
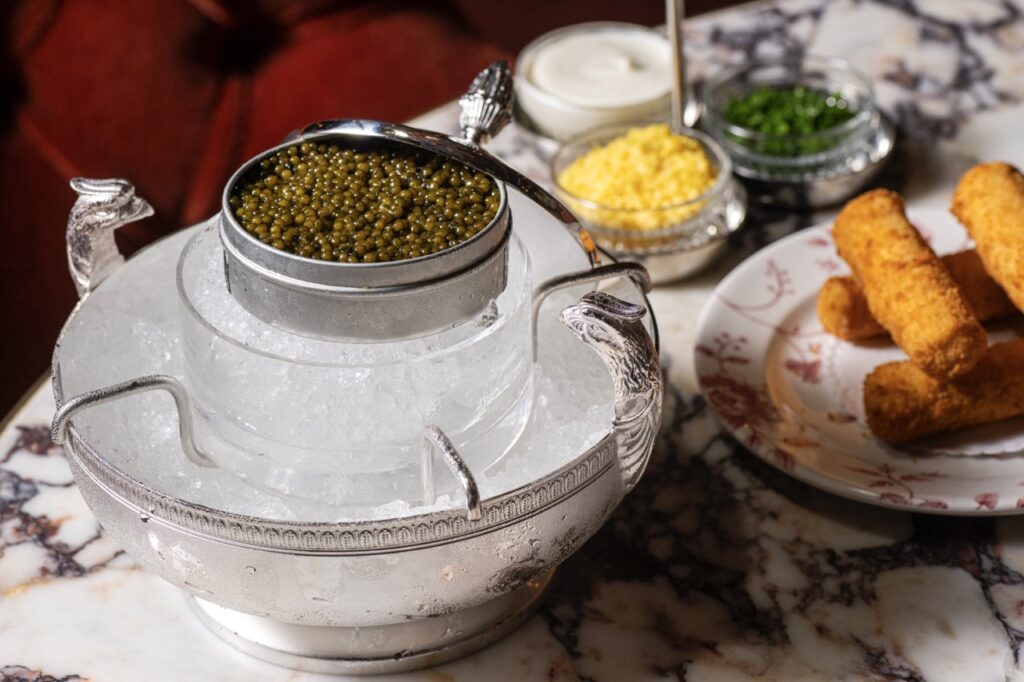
As you enter the hotel, a dazzling mix of faceted mirrors, burled wood panels, and a huge tapestry by artist Pae White await—it takes your eyes a moment to adjust to it all. The restaurant, Café Carmellini, is a cozy yet opulent mix of dark wood, mustard-colored leather, and blue velvet, while it’s seemingly infinite lightbulbs in chandeliers, sconces, and table lamps fill the space with an inviting atmosphere that’s convivial yet intimate and sexy.

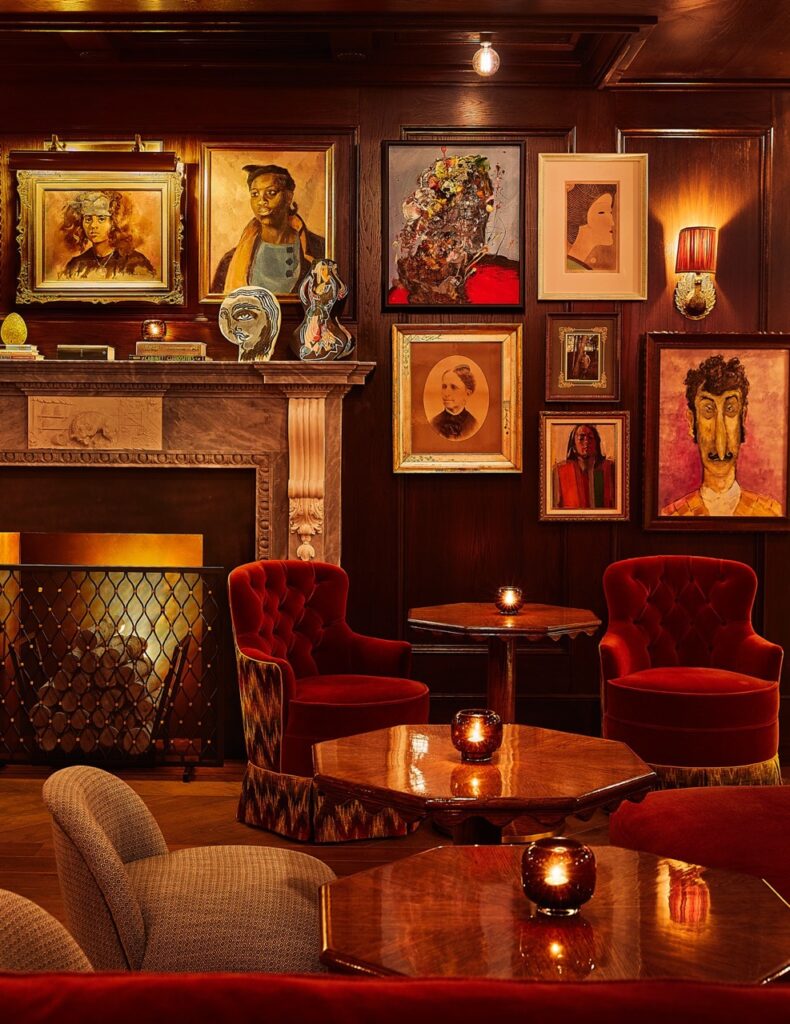
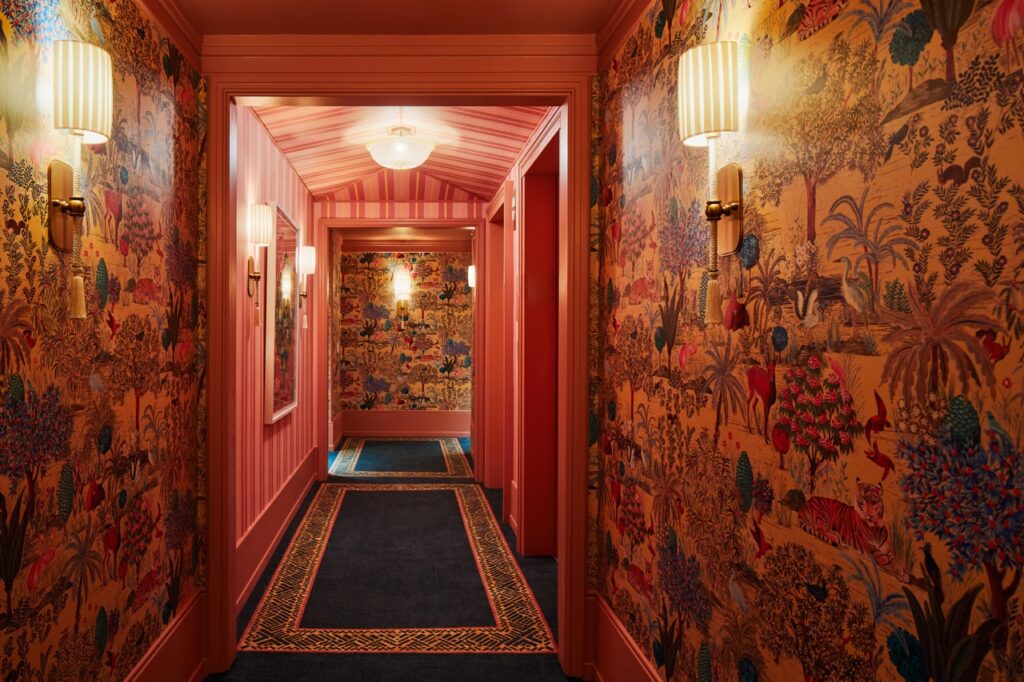
Afterwards, head to the dark and moody Portrait Bar for a destination-named cocktail, such as the “Oaxaca”, which contains Oaxacan gin, Empirical Ayuuk, Contratto aperitif, lime sherbet, hibiscus, and chocolate. If you can still walk, the journey to your room will take you through dimly-lit, rosy-colored corridors clad in a mix of striped and tropical papers with bordered blue carpets underfoot. 

The nighttime outside view of the Fifth Avenue Hotel skyline.

Restaurants Near Fifth Avenue Hotel

If you’re in the mood to actually leave the hotel, there are several exquisite restaurants nearby, including Eleven Madison Park (Michelin 3-star, plant-based), Scarpetta (refined Italian in a beautiful space), and Junoon (upscale, modern Indian). It’s always worth checking out if there is an art installation in Madison Square Park. (The original Shake Shake location is in the corner of the park in case you have a sudden craving for fries.) Although it isn’t nearby, the reopened Frick Collection, among the best museums in New York, is a must see for anyone coming to visit. 

Story by Stephen Treffinger
Hotel Photos by William Abranowicz
Food Photos by Evan Sung

Subscribe to TABLE Magazine‘s print edition.

Bourbon Honey Purple Potato Pie

0
A pie with purple potatoes and bourbon honey with lattice work over top.

Purple potato pie is a twist on a sweet potato pie, with bright purple custard loaded with familiar fall spices and local honey. Purchase purple sweet potatoes or ube on Amazon or Etsy. You may also find these in the produce section of Asian grocery stores. Or, you can decide to head to your local farmers market where local vendors can sell sustainable produce. Chances are shopping at your local farmers market will increase the quality of your pie. Plus, get the homemade pie crust recipe from pastry chef Selina Progar here!

Print
clock clock iconcutlery cutlery iconflag flag iconfolder folder iconinstagram instagram iconpinterest pinterest iconfacebook facebook iconprint print iconsquares squares iconheart heart iconheart solid heart solid icon
A pie with purple potatoes and bourbon honey with lattice work over top.

Bourbon Honey Purple Potato Pie


  • Author: Selina Progar

Description

Try a different version of sweet potato pie.


Ingredients

Scale
  • Homemade Pie Crust
  • 2 large or 3 medium purple potatoes
  • 1 cup evaporated milk + some to thin out the custard if needed
  • 3 eggs
  • 4 tbsp (1/2 stick) melted butter
  • ¼ cup brown sugar
  • ½ cup local fall honey
  • ¾ tsp cinnamon
  • ¼ tsp cloves
  • ¼ tsp nutmeg
  • ¼ tsp ginger
  • 2 tbsp bourbon


Instructions

  1. Wrap potatoes in foil, and bake until fork-tender and very soft, about 2 hours. Let cool in foil on the counter. Place in the fridge overnight.
  2. Place pie dough in the bottom of your pie pan and chill for 30 minutes.
  3. Lay parchment paper on the pie dough and fill with baking beans or pie weights.
  4. Preheat the oven at 350 degrees and bake for 30 to 45 minutes or until the dough is no longer “wet.”
  5. Cut out fall leaves from pie dough for additional decoration.
  6. While the pie is baking, remove potatoes from fridge and chop.
  7. Place in a food processor, or blender with evaporated milk and blend until smooth.
  8. Remove and place in a bowl, add eggs, butter, and spices and whisk or fold until fully incorporated.
  9. This should be pourable consistency. If it is not, add 1 tablespoon at a time of the additional evaporated milk until proper consistency is reached.
  10. Pour into parbaked pie shell.
  11. Crimp the edges by pinching the dough between your thumb, pointer, and middle fingers or place leaves or braid around the edge of the pie.
  12. Bake at 425 degrees for 15 minutes.
  13. Lower oven temp to 350 degrees and bake for 25 minutes or until the filling is set and no longer moves in the center.
  14. Cool fully before cutting.

Recipe by Selina Progar
Photography and Styling by BurkleHagen

Subscribe to TABLE Magazine’s print edition.

A Pastry Chef’s Best Pie Crust Recipe

0
Two pies with fancy lattice work homemade pie crust.

Chef Selina Progar, one of Pittsburgh’s finest pastry chefs, shared her favorite pie crust recipe and dishes deep about pie with TABLE readers.

Pie crust recipe aside, I was not always a “Pie Master.” About 10 years before I went to culinary school, my friend and I decided to make a pumpkin pie out of a real pumpkin and bake it inside a pumpkin. We looked through cookbooks to learn how to roast the pumpkin. That part went well, but we made a huge mess in the process of pureeing it because all we had was a hand mixer.

We added all of our ingredients (or thought we did) in unmeasured amounts, poured the totality back into the pumpkin, and put it in the oven to bake. Over three hours later, the pie was still fully liquid. I think we forgot the eggs, but I have no idea because we didn’t measure anything. We ended up just spooning it over ice cream and eating it out of a bowl.

I have since gotten a lot better at making pies and baking in general. It’s what I do for a living, and I love it. I’m happy to share my best pie crust recipe with you, as well as three delicious pie recipes.  

A pie crust with lattice work over top.

6 Tips for the Making the Best Pie Crust Recipe

  1. Roll it out ¼-inch thick.
  2. Keep it cold, by taking it in and out of the fridge and working in small batches.
  3. Use lots of flour and use 2 pastry brushes – one for flour dusting, one for egg wash.
  4. Do not overwork the dough, and if you need to form the scraps back together, allow it   to fully chill before reworking it.
  5. Buy fun cookie cutters and pastry rollers.
  6. Egg wash to help the dough stick to itself and create a glossy golden brown appearance.
Print
clock clock iconcutlery cutlery iconflag flag iconfolder folder iconinstagram instagram iconpinterest pinterest iconfacebook facebook iconprint print iconsquares squares iconheart heart iconheart solid heart solid icon
Two pies with fancy lattice work homemade pie crust.

Pie Crust Recipe


  • Author: Selina Progar

Description

The only pie crust recipe you’ll ever need!


Ingredients

Scale
  • 4 sticks butter, cold
  • 4 cups AP flour
  • 1 tsp salt
  • 8 fluid oz water, cold


Instructions

  1. Cut butter into small cubes, and place in the fridge for 30 minutes. Once the butter is cold, add to the flour and salt, and mix by hand or with the paddle attachment of a mixer in first speed.
  2. Mix until the butter is incorporated, and about the size of peas. Add the cold water, and continue to mix just until together. Form into a square, and wrap in plastic wrap and chill for at least 4 hours, preferably overnight.
  3. When rolling out, use plenty of flour, but keep a pastry brush handy to brush off excess.
  4. Place ½ the dough on a floured table and using a rolling pin, roll in all directions evenly until it’s about a ¼ of an inch thick.
  5. Lay down pie pan and cut a circle two inches larger than your pan.
  6. Place this piece of dough in the bottom of your pie pan, then slightly pull the dough up the sides of your dish all the way to the edges.
  7. Place back in fridge for 30 minutes.
  8. Place desired filling in the pie.

How to Make a Lattice Top

Create a lattice using your remaining pie dough! Roll out the dough evenly. Using a pizza cutter, or a fluted pastry wheel cut 1-inch strips of dough, straight and neat. At this point you can cut and use strips or braid or twist for a more elaborate crust. Place the strips back in the fridge for 15 minutes. Dust off the excess flour.

Remove your pie crust recipe from the fridge, and fill with desired filling. Remove strips from fridge. Lay strips vertical over filling with 1 inch in between each piece. Fold back pieces 1, 3, 5, and 7 (if applicable). Lay one piece horizontally over pieces 2, 4, 6. Fold pieces 1, 3, 5, and 7 back over the horizontal piece. Fold back towards you pieces 2, 4, and 6. Lay a second horizontal piece over 1, 3, 5, and 7. Repeat until you have a fully weaved pie.

Crimp the edges and pinch off any excess dough. Brush the pie dough with egg wash to create a golden crust. Follow these steps, and my best pie crust recipe is sure to become yours, too.

Try your new skills on Selina’s recipes for a Blueberry Maple Pie or Bourbon Honey Purple Potato Pie.

Story by Selina Progar
Photography and Styling by BurkleHagen

Subscribe to TABLE Magazine’s print edition.

Blueberry Maple Pie

0
A Blueberry Maple Pie with leave lattice pie crust work on top.

Blueberries can be canned or frozen during summer, and used in the fall as a reminder of summer time. Its traditional appeal makes it a hit at every table it appears on.

What is the History of the Blueberry Pie in America?

Blueberry pie holds a cherished place in American culinary history, rooted in both Indigenous food traditions and early colonial cooking. Long before settlers arrived, Native peoples of North America gathered wild blueberries, using them fresh or dried in dishes like pemmican. These berries, prized for their deep flavor and nutrition, later found their way into European-style baking when colonists adapted familiar pie-making techniques to local ingredients.

By the 18th and 19th centuries, blueberry pie became a regional favorite in New England, where wild blueberries thrived in rocky, acidic soils. Recipes began appearing in cookbooks, often alongside other berry pies like raspberry and currant. The development of commercial canning and the rise of cultivated blueberries in the early 20th century helped the dessert spread nationally. Blueberry pie’s convenience, color, and tangy-sweet balance made it a summertime staple.

Today, blueberry pie is more than a dessert—it’s a symbol of seasonal abundance and American identity. In fact, it is the official state dessert of Maine, where wild blueberries still flourish. With its buttery crust and jewel-toned filling, blueberry pie connects the country’s agricultural heritage with timeless comfort food traditions, remaining as beloved on modern tables as it was centuries ago.

Chef Selina Progar shows us how to make her own Blueberry Pie recipe. Her addition of maple syrup to the filling recalls the berry’s New England roots while also adding the perfect dose of sweetness. Be sure to grab her homemade pie crust recipe to complete your masterpiece.

Print
clock clock iconcutlery cutlery iconflag flag iconfolder folder iconinstagram instagram iconpinterest pinterest iconfacebook facebook iconprint print iconsquares squares iconheart heart iconheart solid heart solid icon
A Blueberry Maple Pie with leave lattice pie crust work on top.

Blueberry Maple Pie


  • Author: Selina Progar

Description

A sweeter blueberry pie.


Ingredients

Scale
  • Homemade Pie Crust
  • ¼ cup of flour
  • 2 tsp lemon juice
  • ½ tsp cinnamon
  • ½ pure maple syrup
  • ½ tbsp maple extract
  • Pinch of salt
  • 5 cups blueberries, fresh, frozen, or preserved


Instructions

  1. Mix together flour, lemon juice, cinnamon, maple syrup, maple extract, and salt in a large bowl.
  2. Fold in blueberries. Set aside until pie dough is ready.
  3. Bake at 375 degrees until the crust is golden and the blueberries are bubbling.

Story by Selina Progar
Photography and Styling by BurkleHagen

Subscribe to TABLE Magazine’s print edition.

Traditional Biscochitos

0
A group of traditional Biscochitos on a brown table surrounded by cinnamon sticks, sugar, and anise seeds.

The biscochito, that spicy, anise-flavored cookie brought to New Mexico by the early Spaniards, is center stage at just about every celebration in the state from wedding receptions to baptisms, and especially during the holiday season.  

Similar to shortbread or butter cookies, biscochitos have their own unique flavor, thanks to crushed anise seeds and hints of orange and cinnamon.  

The History of Biscochitos and New Mexico 

It’s no wonder that in 1979, New Mexico made the biscochito its official state cookie, making New Mexico the first state to have an official state cookie. Clearly, New Mexico has its priorities straight, recognizing these cinnamon sugar-topped treats that practically melt in your mouth.  

Yes, you can find biscochitos for sale in grocery stores and bakeries but ask any local and they’ll tell you the cookies are easy to make. If you’re lucky, they’ll even share their family recipe, often passed down from their grandmother or favorite tia (auntie). 

The secret tip, and don’t try to get around it, is LARD! You can substitute butter but they just won’t taste the same. For an authentic New Mexico biscochito, lard is key. (You’ll find it in the baking aisle, near the cooking oils and shortening.)  

Dealing with the Dough

Biscochito dough is not like many other cookie dough. It’s more like pie crust dough. After mixing all the ingredients together, you will have a crumbly mixture. Dig in with your hands, working the dough into a ball, and keep at it until you have all the loose dough and flour pieces incorporated. 

Refrigerate the dough, then separate into three balls, and roll out on a lightly floured surface. If it still feels crumbly, work the dough a little more. The lard requires kneading. It will be worth it. You’ll see!  

Print

clock clock iconcutlery cutlery iconflag flag iconfolder folder iconinstagram instagram iconpinterest pinterest iconfacebook facebook iconprint print iconsquares squares iconheart heart iconheart solid heart solid icon
A group of traditional Biscochitos on a brown table surrounded by cinnamon sticks, sugar, and anise seeds.

Traditional Biscochitos


  • Author: Cyndy Tanner
  • Yield: 3 Dozen 1x

Description

Try making this New Mexico state cookie at home!


Ingredients

Scale
  • 3 cups all-purpose flour 
  • 1 1/2 tsp baking powder 
  • 1/2 tsp salt 
  • 3 tsp crushed anise seed 
  • Zest of one orange 
  • 1 1/4 cups lard 
  • 3/4 cups sugar 
  • 1 large egg 
  • 1 tsp pure vanilla extract 
  • 1 cup sugar 
  • 2 tsp ground cinnamon 


Instructions

  1. In a medium bowl, sift together flour, baking powder, and salt. Whisk in the crushed anise and orange zest. 
  2. In a separate large bowl, combine the sugar and lard. Using an electric mixer, beat the lard and sugar until light and fluffy, about 3 minutes. Add the egg and vanilla and beat to combine.  
  3. Gradually beat in the flour mixture and stop as soon as mixture is combined. The dough will be crumbly and resemble pie crust dough. 
  4. Using your hands, work the dough into a ball, like you would when making a pie crust, incorporating all the loose pieces of flour mixture. Wrap in plastic and refrigerate the dough for 30 minutes. 
  5. Preheat oven to 350 degrees. Line baking sheet with parchment paper. In a small bowl, combine the sugar and cinnamon for the topping. 
  6. Take the chilled dough and separate it into three balls, roughly the same size. Take one dough ball at a time and work it into your hands, kneading it until it is soft and smooth. If it feels crumbly when you try to roll it out, just knead it a little more until it comes together – the lard needs a little extra help. On a lightly floured surface, roll out the dough to 1/4 inch thickness.
  7. Cut out cookies using a circle or star shaped cutter. 
  8. Place cookies on a lined baking sheet and bake until just barely golden and set, about 10 to 12 minutes (be careful not to overcook!). Let cookies cool for 10 minutes on the pan (they will crumble if you take them off any sooner). While they are on the pan, sprinkle them with some of the cinnamon and sugar mixture. When they’ve cooled for 10 minutes, you can then carefully dunk them into the sugar mixture, place on cookie rack until completely cooled.  

Story by Cyndy Tanner / Photography by Tira Howard

Subscribe to TABLE‘s print edition

Campari Olive Oil Cake

0
A Campari Olive Oil Cake sits on a glass platter as a person sprinkles powdered sugar in a heart shape over top.

This Campari Olive Oil Cake is inspired by a recipe from Melissa Clark (one of our food heroes!) which we found online at The New York Times. We use a combination of blood oranges, grapefruit and lime for our citrus hit but feel free to mix and match. Steeping a bay leaf in the milk adds herbal and slightly floral notes to the cake.   

Tips for Using Alcohol in Baking

Alcohol can add depth and complexity to baked goods, enhancing both flavor and texture. When using alcohol in baking, it’s important to choose the right type for your recipe. For example, strong spirits like rum or whiskey can add a bold flavor, while lighter alcohols like brandy or orange liqueur can provide a more subtle note. In this case, we use Campari for its touch of citrus and its bitter flavor. Keep in mind that alcohol evaporates during baking, so you may need to add slightly more than the recipe calls for to achieve the desired flavor. Lastly, you want to consider the alcohol content when choosing a recipe, as higher alcohol content can affect the texture and moisture of your baked goods.

Print

clock clock iconcutlery cutlery iconflag flag iconfolder folder iconinstagram instagram iconpinterest pinterest iconfacebook facebook iconprint print iconsquares squares iconheart heart iconheart solid heart solid icon
A Campari Olive Oil Cake sits on a glass platter as a person sprinkles powdered sugar in a heart shape over top.

Campari Olive Oil Cake


  • Author: Julia Platt Leonard, Adapted from Melissa Clark

Description

We’re sure you’ve had Campari in your drinks but what about your cake?


Ingredients

Scale
  • 1⁄4 cup unsalted butter (1⁄2 stick), melted, plus more for greasing the pan. 
  • 2 cups all-purpose flour 
  • 1 2⁄3 cup granulated sugar 
  • 1 tsp fine sea salt 
  • 1 tsp baking powder 
  • 1⁄2 tsp baking soda 
  • 2⁄3 cup whole milk 
  • 1 bay leaf 
  • 2⁄3 cup mild olive oil 
  • 3 large eggs 
  • 1⁄3 cup Campari 
  • 1 tbsp grated grapefruit zest 
  • 1 tbsp grated blood orange zest 
  • 1 tsp grated lime zest 
  • 1⁄4 cup fresh grapefruit juice 
  • 2 tbsp fresh blood orange juice 
  • 1 tbsp fresh lime juice 
  • Whipped crème fraiche, whipped cream or powdered sugar, to finish 


Instructions

  1. Preheat oven to 350 degrees. 
  2. Trace a 9-inch springform pan on parchment paper and cut out the circle. Grease the pan and line the bottom with the parchment paper circle.  
  3. In a small saucepan, gently warm the milk with the bay leaf. Remove from the heat, allow to cool, then remove the bay leaf.  
  4. In a medium bowl, whisk the flour, sugar, salt, baking powder and baking soda. Set aside. 
  5. In a large bowl, whisk together the melted butter, milk, oil, eggs, Campari, citrus zests, and citrus juices. Gently fold in the dry ingredients a third at a time, then place the batter into the prepared pan. 
  6. Bake for 45 minutes to an hour. The top should be golden and a bamboo skewer, when inserted, should come out clean. 
  7. Place the cake on a wire rack and allow to cool completely before removing. Gently run a knife along the edges to loosen the sides. Place a large chopping board over the top, invert it to release the cake. Turn the cake over and place on a serving plate.  
  8. Serve with whipped crème fraiche, whipped cream or simply decorate with a light dusting of powdered sugar.  

Recipe by Julia Platt Leonard, Adapted from Melissa Clark
Photography by Tira Howard

Subscribe to TABLE‘s print edition

Pomegranate Prosecco Cocktail

0
A person pours prosecco on top of a pomegranate cocktail in two tall glasses.

A hit of Campari gives this Christmas-y Pomegranate Prosecco Cocktail a welcome red hue and a hint of bitterness that cuts through the creaminess of the prosecco. Jazz it up with pomegranate seeds and you’ll be ready to toast the holiday season in style. Adjust the quantities based on the size of your champagne flute but think roughly 2 parts prosecco to one part Campari.  

Substitutes for Prosecco in our Pomegranate Prosecco Cocktail

If you’re looking for a substitute for prosecco in our Pomegranate Prosecco Cocktail, there are other bubbly options to use and enhance the flavor. Try using champagne and sparkling wine as direct replacements with a slightly acidic taste. Crémant, a French sparkling wine, is a more affordable option with a similar profile. Cava, from Spain, has citrusy notes and a dry finish. There are even Prosecco-style sparkling wines produced by various wineries that can also be used as substitutes. The end product is truly up to what your palate prefers.

A person pours prosecco into a Pomegranate cocktail.

Print

clock clock iconcutlery cutlery iconflag flag iconfolder folder iconinstagram instagram iconpinterest pinterest iconfacebook facebook iconprint print iconsquares squares iconheart heart iconheart solid heart solid icon
A person pours prosecco on top of a pomegranate cocktail in two tall glasses.

Pomegranate Prosecco Cocktail


  • Author: Bob Brady
  • Yield: 1 1x

Description

Get into the holiday spirit with this joyfully red and delicious cocktail.


Ingredients

Scale
  • 1 tbsp pomegranate seeds 
  • 4 oz prosecco 
  • 2 oz Campari 


Instructions

  1. Place the pomegranate seeds in a champagne flute.  
  2. Top with the prosecco and finish with the Campari. 

Recipe by Bob Brady / Story by Cyndy Tanner / Photography by Tira Howard

Subscribe to TABLE‘s print edition

Van Helsing Takes Manhattan, A Bourbon Cocktail

0
A bourbon cocktail with vampire teeth and garlic beside it

This bourbon cocktail brings you a classic a Manhattan with a Halloween twist. We’ve used Wigle Whiskey’s Vampire Bourbon, but feel free to substitute with any red corn bourbon of your choice. One of these bourbon cocktails a day keeps the vampires away thanks to garlic simple syrup and garlic garnish. It might not be a good idea to invite your friends Dracula, Edward Cullen, and Lestat over for a drink when you’re serving this. That party won’t end well. Maybe let the vampires at your party sip on one of our other Halloween cocktails. 

Tips for Making a Bourbon Cocktail 

It’s important to make sure that your flavors are balanced when you’re doing a mixology project with bourbon. This is why we’ve used sweet vermouth and simple syrup here. The strong, smoky taste of bourbon often needs something else to balance it out. This recipe asks for stirring, but it’s also important to know when to shake and when to stir. Shake cocktails that include juice or cream, and stir those that are spirit-forward, like this one.

Print

clock clock iconcutlery cutlery iconflag flag iconfolder folder iconinstagram instagram iconpinterest pinterest iconfacebook facebook iconprint print iconsquares squares iconheart heart iconheart solid heart solid icon
A bourbon cocktail with vampire teeth and garlic beside it

Van Helsing Takes Manhattan


  • Author: Zack Durkin

Description

A cocktail fit for a creature of the night.


Ingredients

Scale

For the Cocktail

  • 2 oz Wigle Whiskey Vampire Bourbon*
  • 1 oz Sweet Vermouth
  • .5 oz garlic simple syrup
  • Garlic clove to garnish

For the Garlic Simple Syrup

  • 4 – 5 medium cloves of garlic
  • 1 cup sugar
  • 1 cup water


Instructions

For the Cocktail

  1. Pour all liquid ingredients into a mixing glass and add ice
  2. Stir for about 30 seconds
  3. Strain into your favorite stemmed glassware
  4. Garnish with garlic clove
  5. Enjoy

For the Simple Syrup

  1. Bring one cup of water to a boil
  2. Quarter garlic cloves and ad to the boiling water
  3. Cook over medium-high heat for 5 minutes
  4. Remove from heat and let cool for 2 minutes
  5. Add sugar and stir until dissolved
  6. Allow garlic to macerate for 30 minutes
  7. Once cooled, pour syrup through a mesh strainer into a storage container and store for up to 2 weeks in refrigerator

Notes

*Vampire Bourbon can be substituted for another red corn bourbon. High rye bourbons can be used as well. Both red corn and rye add spicy notes to the bourbon. This profile emulates the rye traditionally used in a Manhattan.

Recipe by Zack Durkin / Photography by Dave Bryce

7 Simple Ways to Use Halloween Candy in Baked Goods

0
Halloween Candy Bark in various colors with halloween cnady baked in on top.

Have you tried baking as a way to indulge in Halloween candy? With store aisles brimming with Halloween candy, the temptation to rip into one of those colorfully wrapped sugary treats is at an all-time high. Why not treat yourself, and enjoy the sweets in a grown-up capacity? Give those bite-sized bars an easy and delicious upgrade by turning them into brownies, cookies, and cakes. We can’t guarantee the following Halloween candy baked goods will be any lower in sugar content, but they’re definitely high in fun.

7 Simple and Creative Ways to Use Halloween Candy in the Kitchen

Rum Pecan Candy Corn Blondies

Rum Pecan Candy Corn Blondies, three slices sit on three separate green plates. halloween candy

Because sugar and corn syrup are not really flavor profiles anyone brags about anymore, we worked up this blondie recipe with a key ingredient: spiced rum. It elevates the recipe’s components into something brag-worthy indeed. Try it: you’ll like it. Also… a sugar high is likely to ensue. Put some Pink Floyd on the Sonos and let it wash over you.

Peanut Butter Cup Banana Bread

A partially sliced loaf of peanut butter cup banana bread on a brown and white floral plate with a small bowl of whipped butter and a little dish of wrapped Reese's peanut butter cups.

Reese’s are a crowd favorite for Halloween. While it may be hard to find some of them leftover after the holiday, our Peanut Butter Cup Banana Bread is the perfect accompaniment if you do. Soft bites of chocolate and peanut butter combine with moist crumbles of banana bread. Talk about a treat that Elvis would enjoy due to his love for peanut butter and banana.

Fudgy Peppermint Patty Brownies

An aerial shot of four black plates, each with a piece of Fudgy Peppermint Patty Brownies sitting on them. Fudgy Peppermint Patty Brownies recipe

This Halloween candy baked goods recipe is as simple as can be. The only trick is to pour only half the batter into the pan before adding chopped peppermint patties, and then covering them with the other half. Placing whole patties on top about 8 minutes before baking is complete gives just enough time for gentle melting and the gorgeous appearance of a bit of creamy mint.

Monster Rice Krispy Treats

A set of monster rice krispy treat Halloween dessert cookies with candy eyes and candy corn on them

Let your little one’s creativity run wild with these circular Monster Rice Krispy Treats. Your child can help make this recipe from start to finish due to its simple instructions and ingredients. After the treats are baked, use different halloween candies to create your custom monster face such as candy corn and eyes.

Halloween Candy Bark

Halloween Candy Bark

The kids will have a spooky good time in the kitchen helping you create this ghoulish Halloween candy bark recipe. With all the different Trick or Treat goodies and spooky colors, this snack is equally delicious and fun.

Easy Twix Cold Cake (No Bake)

An aerial view of a candy cake with two pieces cut out and put on brown plates

Cookie and caramel create the best no bake dessert. Our Easy Twix Cold Cake contains a Twix-like filling and actual candy bars chopped up on top. It’s sure to satisfy any sweet tooth, even those left after munching on a vat of Halloween candy.

Rum Buttermilk Butterfinger Cake

Three peices of Rum Buttermilk Butterfinger Cake sit on three separate plates. halloween candy

No matter your stance on Halloween candy, this Buttermilk Cake with Rum Buttermilk Frosting transcends any no-sugar illusions you might be harboring. It is delicious and homey, even as it tickles the taste buds in intriguing ways. Who knew that buttermilk and spiced rum could combine in such a delightful way?

Story by Jordan Snowden

Subscribe to TABLE‘s print edition

From Vision to Reality: How a Decor Specialist Can Bring Your Dream Space to Life

0
An interior with a long staircase and a couch on the left side and modern decor.

Creating a beautifully designed space is often more challenging than it seems. Whether it’s transforming a new home, upgrading an office, or revitalizing a retail store, turning a design vision into reality requires more than just an eye for style. This is where a decor specialist becomes invaluable. A decor specialist doesn’t simply design a room; they curate an experience, transforming spaces by blending creativity with technical know-how to bring your dream to life.

How a Decor Specialist Can Turn Your Ideas Into a Stunning Reality

Understanding Your Vision

The first step for any decor specialist is to understand your needs, desires, and aesthetic preferences. This process often begins with a consultation where they learn about your lifestyle, the purpose of the space, and how you want to feel when you enter the room. Do you want a space that feels relaxing, energizing, or inspiring? Are you drawn to a minimalist aesthetic, or do you prefer bold colors and eclectic elements?

With this understanding, the decor specialist can start to build a clear picture of your vision. They will create mood boards, sketches, or digital renderings to give you an idea of what your dream space could look like, offering you the chance to provide input and make adjustments along the way.

Access to a Network of Resources

Another significant advantage of working with a decor specialist is their access to a wide range of resources that may not be available to the average homeowner. From exclusive furniture and fabric suppliers to trusted contractors and artisans, they can source high-quality materials that align with your vision and budget.

A professional decor specialist also stays up-to-date with the latest design trends and innovations, ensuring that your space will feel both timeless and contemporary. This access to industry professionals and materials can make a substantial difference in the final look and feel of your space.

Managing the Project from Start to Finish

One of the greatest benefits of hiring a decor specialist is that they manage the entire project, from the initial concept to the final reveal. This includes overseeing the logistics, handling any unforeseen challenges, coordinating with contractors, and ensuring that deadlines are met. Their role as a project manager ensures that you don’t have to worry about the details, allowing you to enjoy the design process and the final result.

This level of organization and expertise is invaluable, especially when it comes to managing multiple aspects of a project at once. With a decor specialist on board, you can rest assured that your dream space will be executed flawlessly, with minimal stress on your part.

Don’t Forget Personal Liability Insurance

While the creative aspects of design are exciting, it’s important not to overlook practical matters when transforming your space. One critical consideration is to make sure you have personal liability insurance. This insurance can protect you financially if an accident occurs during the renovation or design process. For example, if a contractor or worker is injured on your property, personal liability insurance can help cover medical expenses or legal fees.

Even after the project is complete, this type of insurance provides ongoing protection in case a guest or visitor is injured while in your newly designed space. It’s a small but crucial step to safeguard your home and investment, providing peace of mind as you embark on your design journey.

Expertise in Space Planning

One of the greatest challenges in interior design is optimizing the use of space. It’s easy to be inspired by images on Pinterest or Instagram, but what works in one space might not translate to another. A decor specialist knows how to evaluate your specific space and recommend furniture arrangements, lighting options, and decor elements that fit seamlessly into your home or office.

With their experience, they can foresee potential issues and create solutions that maximize the beauty and functionality of your environment. For example, they can help you avoid common mistakes like choosing furniture that is too large or small for a room, or lighting that doesn’t complement the natural light of the space.

Attention to Detail and Personalization

What sets a professionally designed space apart is the attention to detail. A decor specialist is skilled at incorporating subtle touches that reflect your personal style, whether it’s custom-made furniture, curated artwork, or a carefully chosen color palette that ties the room together.

This level of personalization ensures that your space feels unique and tailored to your tastes, rather than a replication of mass-produced trends. Every corner, piece of furniture, and decorative item is carefully chosen to harmonize with your vision, creating a cohesive and inviting environment.

Final Thoughts

A decor specialist serves as a bridge between your vision and reality. They bring together creativity, technical skill, industry knowledge, and project management to ensure that your dream space comes to life seamlessly. With their expertise, what might seem like a distant vision can become a tangible, well-executed reality—one that will leave a lasting impression for years to come.

If you’re looking to transform your space into something truly special, partnering with a decor specialist is the key to turning your dreams into a beautiful and functional reality.

Photo Courtesy of Rhema Kallianpur


Subscribe to TABLE Magazine‘s print edition.

Create a free account, or log in.

Gain access to read this content, plus limited free content.

Yes! I would like to receive new content and updates.

Table Magazine wants to know your location.

TABLE Magazine operates regional sites - Knowing your location helps us route you to the appropriate site for the best experience.