Home Blog Page 109

Chicken Harissa Gluten-Free Pasta

0
A plate of chicken harissa gluten-free pasta on a white background

TABLE Magazine’s friend, Liz Fetchin, a native Pittsburgher, PR firm director, everyday home cook, and food blogger, shares an easy but delicious chicken harissa gluten-free pasta recipe, free of the top 8 most common food allergens: milk, eggs, peanuts, tree nuts, fish, shellfish, soy, and wheat. Liz’s amazing Octofree® recipes are delectable for all. In this recipe, spicy and creamy chicken harissa pasta blends bold harissa flavors with tender chicken and a rich, satisfying sauce.

Gluten-Free Pasta Isn’t What It Seems

Gluten-free pasta has come a long way regarding texture (al dente and gluten-free are no longer mutually exclusive) and ingredients. While choices were once limited to brown rice or corn varieties, it’s now easy to find beautiful and colorful varieties incorporating healthful ingredients such as lentils, beans, quinoa, and charcoal. We tested different shapes and varieties to arrive at these flavorful, complex, and visually-pleasing dishes for your spring table. We even used dairy alternatives to make the dishes accessible to a wider swath of people with food sensitivities.

Print
clock clock iconcutlery cutlery iconflag flag iconfolder folder iconinstagram instagram iconpinterest pinterest iconfacebook facebook iconprint print iconsquares squares iconheart heart iconheart solid heart solid icon
A plate of chicken harissa gluten-free pasta on a white background

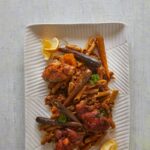
Chicken Harissa Pasta Recipe


  • Author: Liz Fetchin

Description

Skip the gluten, keep the quality.


Ingredients

Scale
  • 8 small carrots, trimmed and peeled
  • 1 zucchini, trimmed and chopped into ¼-inch pieces
  • 1 medium eggplant, trimmed, peeled, most seeds removed, chopped to ¼ inch pieces
  • 5 cloves of garlic, peeled and minced
  • 1 medium yellow onion, trimmed, peeled, chopped to ¼-inch pieces
  • 1/4 cup olive oil
  • 6 oz of tomato paste
  • 1 cup red wine
  • 3 tsp turmeric
  • 5 tsp Spicewalla harissa powder
  • 1 tsp salt
  • 1 tsp black pepper
  • 1/2 tsp cayenne, optional
  • 1 lb chicken thighs
  • 1 lb gluten-free chickpea pasta
  • Juice of one lemon


Instructions

  1. Place all chopped vegetables in a Dutch oven.
  2. Whisk together olive oil, tomato paste, wine, and spices. Pour into the Dutch oven and toss until vegetables are uniformly coated.
  3. Place chicken thighs on top.
  4. Bake covered for 45 minutes.
  5. After 35 minutes, prepare chickpea pasta according to instructions but drain in a colander when still very al dente.
  6. Remove the Dutch oven from the oven. Carefully remove chicken thighs and set aside.
  7. Add pasta to the remaining vegetable and broth mixture.
  8. Add lemon juice. Stir until combined. Place chicken thighs on top and let sit covered for 5 minutes before serving.

Story by Liz Fetchin / Food Styling by Anna Franklin / ⁠Photography by Dave Bryce 

Subscribe to TABLE Magazine’s print edition.

Thyme, Oregano, and Citrus Roast with Cornish Hens

0
A roast of four cornish hens covered in thyme, oregano, and citrus drizzle

Excerpted from Crazy Water, Pickled Lemons by Diana Henry and shared with TABLE readers, this tasty, classic recipe will delight anyone who tastes it.

This really easy, gloriously aromatic dish looks stunning. It uses four Cornish hens to create a juicy, citrusy roast that can steal the show at any gathering you bring it to. This recipe comes to us from Diana Henry’s Mediterranean-inspired cookbook, Crazy Water, Pickled Lemons. Henry focuses on the use of spices, citrus, and a central value of using everything you have in the recipes you make.

What is a Cornish Hen?

Though a hen does refer to a female chicken, Cornish hens do not have to be female. It’s a young, immature chicken that doesn’t weigh more than three pounds. you might balk at the idea that you can use four entire chickens for a roast. But Cornish hens are a smaller chicken than you’re probably picturing. They have an especially flavorful taste, because their meat is more compact in their smaller body. They also cook more quickly, and are great for a dinner party because everyone can get their own Cornish hen to enjoy. Think of the classic, easy rotisserie chicken, but elevated and much, much tastier.

Print
clock clock iconcutlery cutlery iconflag flag iconfolder folder iconinstagram instagram iconpinterest pinterest iconfacebook facebook iconprint print iconsquares squares iconheart heart iconheart solid heart solid icon
A roast of four cornish hens covered in thyme, oregano, and citrus drizzle

Thyme, Oregano, and Citrus Roast with Cornish Hens


  • Author: Diana Henry
  • Yield: Serves 4

Description

An aromatic and delicious meal.


Ingredients

Scale

For the Roast

  • 4 Cornish hens
  • 4 oranges, skin left on, cut into large wedges
  • olive oil


For the marinade

  • Finely grated zest of 1 orange, plus the juice of 4
  • Finely grated zest and juice of 1 lime
  • ⅓ cup balsamic vinegar
  • ½ cup olive oil
  • 6 garlic cloves, crushed
  • Leaves from about 6 thyme sprigs
  • 3 tbsp dried Greek oregano (rigani)
  • Flaky sea salt and freshly ground black pepper


Instructions

  1. Mix all the marinade ingredients together, seasoning with salt and pepper. Put the Cornish hens, breast side-down, into the marinade, cover and refrigerate for a couple of hours, or overnight. Move the Cornish hens around every so often so all the sides get a chance to soak in the marinade.
  2. Preheat the oven to 350 degrees.
  3. Take the Cornish hens out of the marinade and put them into a roasting pan with the orange wedges. Drizzle a little extra oil over the oranges and season them. Roast in the oven for 50 minutes, spooning the marinade over everything as it cooks.
  4. When the Cornish hens are cooked, drain off the pan juices, skim off the fat, and slightly reduce the juices in a saucepan by boiling for a few minutes, until you have something with the consistency of light gravy.
  5. Serve the Cornish hens surrounded by the orange wedges, with the juices on the side.

Excerpted from Crazy Water, Pickled Lemons by Diana Henry (Aster). Copyright © 2002, 2024. / Photographs by Jason Lowe.

Subscribe to TABLE Magazine’s print edition

Delicata Soup with Apples, Brown Butter and Fried Sage

0
Delicata soup, garnished with time, held in the hands of a welcoming cook

Shared (with permission) from Fruitful by Sarah Johnson, this lovely soup is warming and nourishing.

Delicata is a Kabocha-type squash and the two resemble each other in their greyish-green skin and deep-orange flesh. To me, Kabocha and delicata can be used interchangeably. If you cannot source either, then look out for onion squash (also called Red Kuri). But in a pinch, delicata soup can also be made successfully with butternut squash for their similar texture.

Tips for Making Delicata Soup 

The skin of delicata squash is thin and edible, so you don’t have to peel it before roasting. It will soften during cooking and blend seamlessly into the soup. If you’d like to add garnish at the end, we recommend a dollop of sour cream or crème fraîche to add richness and a tangy contrast to the soup’s sweetness. And like most soups, delicata squash soup often tastes even better the next day as the flavors have had more time to meld. Make it ahead and store in the fridge for up to 3 days. You can also freeze the soup for up to 3 months. And if you’d like to make it vegan, you can skip the brown butter and use vegetable stock and a plant-based cream alternative.

Print
clock clock iconcutlery cutlery iconflag flag iconfolder folder iconinstagram instagram iconpinterest pinterest iconfacebook facebook iconprint print iconsquares squares iconheart heart iconheart solid heart solid icon

Delicata Soup with Apple, Butter, and Fried Sage


  • Author: Sarah Johnson

Description

Excerpted with permission from Fruitful, a cookbook by Sarah Johnson


Ingredients

Scale
  • 1 Delicata squash or 2 small onion squash
  • Olive oil
  • 1 large onion, diced
  • 3 carrots, peeled and diced
  • 2 garlic cloves, diced
  • 1 bay leaf
  • 2 sprigs of sage, plus 3–4 stems for garnish (optional)
  • Pinch of chilli flakes
  • 1¾oz unsalted butter
  • 1 apple, peeled, quartered and cored
  • 1820 oz vegetable or chicken stock (preferably homemade)
  • Salt and pepper


Instructions

  1. Preheat the oven to 400 degrees.
  2. Slice the squash in half and season the flesh with salt and pepper. Drizzle with olive oil and place the halves, cut-side down, on a roasting tray. Roast in the oven for 25–40 minutes until the skin becomes blistered and the flesh turns tender throughout. Once done, remove from the oven and allow to cool slightly.
  3. In the meantime, take a large heavy-based saucepan and add a drizzle of olive oil, along with the onions and carrots. Sprinkle a pinch of salt over them and cook over a low heat with the lid on for about 10 minutes until the onions become translucent without browning. Stir in the garlic, bay leaf, sage, and chilli flakes then continue to cook for a further 10 minutes.
  4. While the vegetables cook, make the brown butter. Place the butter in a stainless-steel-based (or other light-coloured) pan over a medium heat. Once the butter has melted and started to foam, gently swirl the pan and scrape the bottom where the solids are beginning to settle. After a few minutes, the butter will begin to colour. Reduce the heat so the foam settles and continue to cook until the butter solids are hazelnut brown. Immediately transfer the butter to a heatproof bowl and keep somewhere warm.
  5. Once the squash has cooled enough to handle, remove the seeds and stringy core. Scoop out the soft flesh and add it to the pan along with the apple, stock and half the brown butter. Set aside the remaining brown butter for later. Increase the heat to medium–high and bring everything to the boil, then reduce the heat slightly and continue to simmer for about 20 minutes until the apple is soft.
  6. Remove the pan from the heat and discard the bay leaf. Transfer one-third of the soup to a blender, and purée until smooth. Be careful when blending hot liquids, as pressure can build up and cause the lid to come off unexpectedly. To avoid this, fill the blender jug no more than halfway, and leave the lid slightly ajar, allowing the steam to escape. Placing a tea towel over the top will catch any potential splatters. Once the soup is smooth, pour it into a large bowl and continue with the other two-thirds. Return the blended soup to the pan (it may require reheating), then taste and adjust the seasoning to your preference.
  7. If you wish to garnish the soup with fried sage, take a small frying pan and pour in enough olive oil to cover the base. Place the pan over medium–high heat. Set aside 12 sage leaves. Line a heatproof ceramic plate with kitchen paper and keep it nearby. After a minute or two, test the temperature of the oil by adding a drop of water; if it sizzles, add the sage leaves. Let them fry for around 2–3 seconds, then turn off the heat. Allow the sage to fry for a few more seconds, then transfer it to the prepared kitchen paper to drain. Season the fried sage while it’s still hot, then let it cool.
  8. When you are ready to serve, check to see if the remaining brown butter is still melted, if not, gently warm through. Ladle the warm soup into bowls and swirl in spoonfuls of brown butter. Finish with freshly ground pepper and the fried sage, if using.


 Excerpted from Fruitful by Sarah Johnson (Kyle Books) / Photography by Patricia Niven.

Subscribe to TABLE Magazine’s print edition

Whole Grilled Halloumi with Apricots

0
A bowl of grilled halloumi with apricots on a red background

Reprinted with permission from Georgina Hayden’s Greekish: Everyday Recipes with Greek Rootsthis recipe is a delightfully sharable dish for a family-style dinner or the cocktail hour.

I’m not very on top of things like social media. I’m hopeless at jumping on bandwagons, always late to the party, trend-wise. However, one thing I did share on social media several years ago now, was my method for scoring and grilling a whole block of halloumi with apricots — it took off.

Using the Whole Halloumi Block 

I’d never seen halloumi cooked this way before, and now it’s being recreated far and wide and I do feel a bit proud. While the flavor combination is a family standard, I attribute using the whole block to my dear friend Iain, who would eat an entire block of halloumi in one sitting, because “it looked like a chicken breast.” I thought, well, why can’t it be treated like a chicken breast or any other form of protein…? Score, season and grill! Iain, this one’s for you. This recipe is also vegetarian and gluten-free, so anyone can enjoy it. Grilling can be just as fun without the meat when you use halloumi. The apricots also add an extra touch of Mediterranean flair.

Print
clock clock iconcutlery cutlery iconflag flag iconfolder folder iconinstagram instagram iconpinterest pinterest iconfacebook facebook iconprint print iconsquares squares iconheart heart iconheart solid heart solid icon
A bowl of grilled halloumi with apricots on a red background

Whole Grilled Halloumi with Apricots


  • Author: Georgina Hayden
  • Yield: Serves 2-4 1x

Description

Use a whole block of halloumi!


Ingredients

Scale


  • 1 × 8.8 oz piece of halloumi
  • Olive oil
  • 4 apricots
  • 2 tablespoons honey
  • A few sprigs of oregano or thyme


Instructions

  1. Preheat your grill to medium-high. Carefully score the top of your halloumi in a criss-cross pattern — don’t cut too deep; you want to keep it intact. Rub the cheese with olive oil, in between the cuts, too. Halve the apricots, remove the stones, and halve again into quarters. Place the halloumi in a snug dish (ideally metal) and nestle around the apricots, drizzling them with olive oil, too.
  2. Pop under the grill, not too close, and grill for 8–10 minutes, so that the fruit starts to caramelize and the halloumi is tender and charred on top. The success of this recipe depends on having the right distance from the grill and heat, so check a few minutes into cooking and see if you need to raise the temperature or lower the grill rack. It’s quite a forgiving technique, so take your time and see what works with your grill. When the halloumi is ready, drizzle with honey and scatter over the oregano or thyme. Serve immediately.

Recipe by Georgina Hayden from Greekish: Everyday Recipes with Greek Roots (2024) / Photography by Laura Edwards

Subscribe to TABLE Magazine’s print edition

Smoked Clam Carbonara

0
A pan of smoked clam carbonara with a sprinkling of cheese

Reprinted with permission from Rooted Kitchen: Seasonal Recipes, Stories, and Ways to Connect to the Natural World by Ashley Rodriguez. This recipe is an adventure in flavor. Try it: you are sure to love it!

While far from the classic, this version of carbonara is quite possibly the most satisfying meal to put together over an outdoor fire. All the usual and delicious carbonara suspects are here: rich pancetta, toothsome pasta, and a creamy sauce of eggs, Parmesan, and starchy pasta water. The clams are an added touch to elevate and expand a classic dish into an outdoor cooking experience.

Clam Carbonara Over a Campfire: A Smoked Delight

What makes cooking the carbonara over a campfire so worthwhile are the clams: Set over the coals in a pan with the residual pancetta and garlic, the clams slowly steam over the wood fire, taking on its luscious smoke. I’ve also included instructions for making this dish in a home oven, but we really recommend trying this outside, partially for the delight of the experience. The dish is finished with a bit of lemon for brightness, parsley for color and freshness, and even more cheese . . . no explanation needed.

Print
clock clock iconcutlery cutlery iconflag flag iconfolder folder iconinstagram instagram iconpinterest pinterest iconfacebook facebook iconprint print iconsquares squares iconheart heart iconheart solid heart solid icon
A pan of smoked clam carbonara with a sprinkling of cheese

Smoked Clam Carbonara


  • Author: Ashley Rodriguez
  • Yield: Serves 4 to 6 1x

Description

Far from classic, but enjoyable all the same.


Ingredients

Scale
  • 6 oz pancetta or bacon, cut crosswise into strips ½ inch wide
  • 4 garlic cloves, thinly sliced
  • 1 lb Manila clams or small, sweet varieties such as Cherrystones or Littlenecks, scrubbed
  • 1 lb spaghetti or bucatini
  • 3 oz Parmesan cheese, finely grated (about 1 cup), plus more for serving
  • 3 large eggs
  • Freshly ground black pepper, plus more for serving
  • 2 tsp grated lemon zest, plus more for serving
  • 3 tbsp fresh lemon juice
  • ¼ cup coarsely chopped fresh Italian parsley


Instructions

To Cook Over a Fire

  1. Prepare a wood fire, let it burn to hot coals, and set a grill grate over the coals.
  2. Fill a large Dutch oven or soup pot halfway with water and stir in enough salt to make the water taste of the sea. Cover the pot, set on the grate, and bring to a boil.
  3. Meanwhile, in a large cast-iron skillet set over the coals, cook the pancetta until crisp, 5 to 7 minutes. Add the garlic and sauté until golden and crisp, 3 to 4 minutes. Remove the pancetta and garlic to a plate.
  4. In the same skillet, add the clams and set the skillet over the coals for 1 minute, while stirring to coat the clams in the residual fat. Set the skillet off to the side of the coals, yet still close to the fire. The clams will slowly start to open and take on a smoky flavor. Discard any clams that do not open up in the cooking process.
  5. Add the pasta to the boiling water and cook according to the package directions.
  6. In a large bowl, stir together the Parmesan, eggs, and 1 teaspoon pepper until thoroughly combined. Using a pair of tongs, transfer the hot pasta directly to the egg mixture and stir well and quickly so as not to scramble the eggs. Add a bit of the pasta water, as needed, to create a creamy sauce.
  7. Add the pancetta and garlic to the pasta along with the clams, then stir in the lemon zest and juice.
  8. Transfer the pasta to a serving platter. Top with the parsley and more grated Parmesan, lemon zest, and pepper.

To Cook in a Home Oven

  1. Bring a large pot of salted water to a boil.
  2. Meanwhile, in a large skillet, cook the pancetta over medium heat until crisp, 5 to 7 minutes. Add the garlic and sauté until golden and crisp, 3 to 4 minutes. Remove the pancetta and garlic to a plate.
  3. In the same skillet, add the clams and cook for 1 minute while stirring to coat the clams in the residual fat. Add ½ cup water, cover the skillet, and continue to cook until the clams have all opened, about 5 minutes. Discard any clams that do not open up in the cooking process. Uncover and allow the water to evaporate.
  4. Add the pasta to the boiling water and cook according to the package directions.
  5. In a large bowl, stir together the Parmesan, eggs, and pepper until thoroughly combined. Using a pair of tongs, transfer the hot pasta directly to the egg mixture and stir well and quickly so as not to scramble the eggs. Add a bit of the pasta water, as needed, tocreate a creamy sauce.
  6. Add the pancetta, garlic, and clams to the pasta. Stir in the lemon zest and juice.
  7. Transfer the pasta to a serving platter. Top with the parsley and more grated Parmesan, lemon zest, and pepper.


Reprinted with permission from Rooted Kitchen: Seasonal Recipes, Stories, and Ways to Connect to the Natural World by Ashley Rodriguez, 2024. Photographs by Ashley Rodriguez,  2024. Published by Clarkson Potter, an imprint of Penguin Random House.

Subscribe to TABLE Magazine’s print edition

Puy Lentils with Spinach and Pancetta

0
A bowl of puy lentils with spinach and pancetta, generously topped with feta, in a white soup bowl

Reprinted with permission from The Farm Table by Julius Roberts for the delight of TABLE readers, this recipe will up your lentil game deliciously.

I love puy lentils–they’re healthy, packed with protein and an amazing base for all sorts of flavors. I find they’re particularly good with quality sausages and a mustardy aïoli, but equally so with pan-fried fish and salsa verde, or slow-roast lamb and anchovy. Here they’re pictured with pumpkin roasted in a hot oven until sweet and charred, and finished with goat cheese. It’s a great combo, but this recipe is really all about the lentils.

What Are Puy Lentils? 

Le Puy green lentil is a small green lentil from France, typically sold in America as French green lentils or Puy lentils. Puy is a region of southern France, where these lentils are grown. If you can’t get these lentils at your local grocery store, you can substitute them for green lentils. But we recommend try to find Puy lentils if you can. They can be used in a variety of different types of dishes and last a long time. Any leftovers from this recipe make a great pasta sauce when finished with a drizzle of chile oil and Parmesan, or you can water them down a bit, add some curry powder and turn them into curried lentil soup, an old favorite of my granny’s.

Print
clock clock iconcutlery cutlery iconflag flag iconfolder folder iconinstagram instagram iconpinterest pinterest iconfacebook facebook iconprint print iconsquares squares iconheart heart iconheart solid heart solid icon

Puy Lentils with Spinach and Pancetta


  • Author: Julius Roberts

Description

An easy-to-make, delicious soup dish.


Ingredients

Scale
  • 1 large yellow onion
  • 1 leek
  • 2 carrots
  • 3 celery stalks
  • 4 tbsp olive oil
  • 5¼ oz diced pancetta (optional)
  • A generous glass of white wine
  • 2½ cups Puy lentils
  • 5 bay leaves
  • A few sprigs of fresh thyme
  • 5 cups veg stock or water
  • 1 lb spinach
  • 1 heaped tbsp Dijon mustard
  • A big handful of fresh parsley


Reprinted with permission from The Farm Table by Julius Roberts, 2023. Photographs by Elena Heatherwick, 2023. Published by Ten Speed, an imprint of Penguin Random House.

Subscribe to TABLE Magazine’s print edition

Winter Hot Toddy

0
A set of hot toddy cocktails on a white tablecloth background, garnished with cinnamon

The winter hot toddy is a beverage legendary for healing a host of ailments and for lifting the spirits! At the first hint of a cold or toothache, my Irish great-grandmother put a toddy together for family members of all ages. It took her no time at all: just a shot of this and a dash of that. And she served it with love and a kind word. Small wonder that she was beloved by all!

Is A Hot Toddy Actually Good For Your Health?

Okay, alcohol is definitely not the world’s healthiest substance. But granny is not entirely wrong to dole out hot toddies for all members of the family when the noses start to run. This Winter Hot Toddy isn’t exactly juice cleanse-ready, but it does have some health benefits. Honey has soothing and anti-inflammatory properties, and it can help coat and calm an irritated throat, reducing coughing and discomfort. The warmth of the drink helps to loosen mucus and may ease throat irritation, making you feel more comfortable. Certain spices like cinnamon and cloves also have anti-inflammatory and antimicrobial properties that could offer mild support to your immune system.

Print
clock clock iconcutlery cutlery iconflag flag iconfolder folder iconinstagram instagram iconpinterest pinterest iconfacebook facebook iconprint print iconsquares squares iconheart heart iconheart solid heart solid icon

Hot Toddy


  • Author: Keith Recker

Description

An elixir of health.


Ingredients

Scale
  • ¾ cup  Water
  • 1 ½ oz. Kingfly Blended Bourbon Whiskey
  • 2 tbsp. Bumbleberry Farms honey
  • 3 tbsp. Meyer lemon juice
  • Lemon rounds, cinnamon stick, cloves, star anise


Instructions

  1. Warm the water, honey, and lemon juice in a saucepan with cinnamon, cloves and anise to taste. When the mixture begins to bubble, turn off the flame and add whiskey.
  2. Pour into small mugs or teacups and sip like Prohibition is still on! Don’t be shy about letting the spices continue to soak in the mugs: their fragrance and flavor add to the experience.

Recipe by Keith Recker / Styling by Ana Kelly / Photography by Adam Milliron

Subscribe to TABLE Magazine’s print edition

Mulled Wine

0
A glass of mulled wine on a white background, garnished with fruit

Some history books credit the ancient Greeks with the invention of mulled wine as a way to make the dregs of the winemaking process more drinkable. By adding herbs and spices, the flavor improved. As with architecture, sculpture and so much more, the Romans copied the Greeks, bringing it northward with them as they pushed towards what is now Germany and France. Northern winters brought a new urgency to the affair: mulled wine was a perfect drink to ward off the chill and gloom of the dark season.

How to Pick the Right Wine for Mulled Wine

Look for a full-bodied variety like Cabernet Sauvignon, Merlot, Zinfandel, or Syrah. These wines have enough depth to hold up to the spices. And no need to go too crazy at the wine store. Since you’re mulling it, you don’t need anything too high-end. A mid-range bottle will work fine. Consider Chilean winery Frontera‘s Cabernet or Merlot, which also come in higher-volume bottles great for a recipe like this. For a full bodied bargain Primitivo (the Italian-grown regional variety of Zinfandel), consider Zensa.

Print
clock clock iconcutlery cutlery iconflag flag iconfolder folder iconinstagram instagram iconpinterest pinterest iconfacebook facebook iconprint print iconsquares squares iconheart heart iconheart solid heart solid icon
A glass of mulled wine on a white background, garnished with fruit

Mulled Wine


  • Author: Keith Recker

Description

An ancient remedy for cold days.


Ingredients

Scale
  • 1 bottle of red wine (750 ml)
  • ¼ cup  Paul’s Farm maple syrup
  • 1 small red apple
  • 1 small green apple
  • 1 small red pear
  • 1 tsp ground allspice
  • 1 tsp ground cloves
  • 1 tsp ground sumac berries
  • 2 sticks cinnamon


Instructions

  1. In a clean saucepan, combine wine, maple syrup, and spices. The better the wine, the better the results, but inexpensive options work just fine.
  2. Core the fruit and cut into ¼-inch slices. If you have a bit of orange peel or a slice of pineapple or fresh ginger, feel free to add.
  3. Place the fruit in the saucepan and heat until it boils. Lower the heat and simmer gently for 10 minutes.  Drink while still steaming, but cool enough to sip.

Recipe by Keith Recker
Styling by Ana Kelly
Photography by Adam Milliron

Subscribe to TABLE Magazine‘s print edition

The Appalachian Trail, a Cold Weather Cocktail

0
The Appalachian Trail, a cold weather cocktail, sits on a smoked birch log

Taste and fragrance team up to create a unique sensation with this cocktail from Bridges and Bourbon, a restaurant in downtown Pittsburgh. Their mixologists came to the studio to concoct the brew and fire up the woodchips. While this cocktail is chilled, the smoke and fire had us all warmed up, so we had to add it to our hot drinks assortment since it still makes a great cold weather cocktail.

What Makes a Good Cold Weather Cocktail?

A good cold weather cocktail is all about warmth, comfort, and a bit of indulgence. The key ingredients tend to be rich, warming spirits like whiskey, rum, and brandy, which complement the colder months perfectly. Additionally, the use of spices and citrus helps balance the heaviness of the alcohol, while enhancing the cozy, festive vibe. Citrus, spices, and warming spirits like tequila or bourbon make a cocktail better for the colder months. For cold weather, you want cocktails that have depth—drinks that aren’t just refreshing but full of warmth and complexity. Dark rum, bourbon, dark beer, or even sherry can bring layers of flavor that are perfect for sipping slowly on a cold evening.

Print
clock clock iconcutlery cutlery iconflag flag iconfolder folder iconinstagram instagram iconpinterest pinterest iconfacebook facebook iconprint print iconsquares squares iconheart heart iconheart solid heart solid icon
The Appalachian Trail, a cold weather cocktail, sits on a smoked birch log

The Appalachian Trail, a Cold Weather Cocktail


  • Author: Bridges & Bourbon

Description

If you don’t have a birch log, just get creative with the garnish and presentation!


Ingredients

  • Cognac
  • Rye
  • Bourbon
  • Calvados
  • Apple Cinnamon Syrup


Instructions

  1. Mix equal parts cognac, rye, bourbon, calvados, and apple cinnamon syrup. Put 2 ½ ounces of your batch in a mixing glass with ice. Stir until well diluted and roll the contents into a cognac glass.
  2. Fill hollowed birch log with apple woodchips and torch the chips to ignite a little flame and produce a lovely smoke.
  3. Place glass on top of log and serve.

Notes

This recipe calls for “equal parts” of each ingredient, adjust based on how many drinks you’re making.

Recipe courtesy of Bridges and Bourbon / Styling by Ana Kelly / Photography by Adam Milliron

Subscribe to TABLE Magazine’s print edition

Moonshine Hot Chocolate

0
Moonshine hot chocolate full of baked goods and whiskey delights

‘Tis the season for sensory indulgences. Inspired by the ever-grander garnishes on those brunchy Bloody Marys popping up in restaurants across the country, we dreamed up this Moonshine Hot Chocolate bedecked with delicious sweets. Kim McLaughlin of McLaughlin Distillery, whose moonshine we used, says “Moonshine improves small talk and makes you want to spend time with relatives. Or at least it gets you on the right track.” Share it with your beloved in front of a fire or dazzle your guests with a suite of these delivered on a tray. Special thanks to Casey Renee for the brownies, cookies and whoopie pies. For another boozy hot chocolate recipe, try our Spiked Hot Chocolate.

What is Moonshine? Why Use It in Hot Chocolate?

The name “moonshine” originates from the practice of distilling alcohol at night, under the cover of darkness to avoid detection by authorities. In many parts of the world, particularly in the U.S., moonshine was historically associated with bootlegging during Prohibition, when the sale of alcohol was banned. Moonshine is typically high-proof (sometimes 100-proof or more). Hot chocolate is already a comforting, cozy drink, especially in cold weather. Adding moonshine turns it into a more grown-up treat, with the alcohol providing an additional layer of warmth and relaxation. This makes Moonshine Hot Chocolate a winning choice for chilly evenings or as a fun, festive drink for gatherings.


Print
clock clock iconcutlery cutlery iconflag flag iconfolder folder iconinstagram instagram iconpinterest pinterest iconfacebook facebook iconprint print iconsquares squares iconheart heart iconheart solid heart solid icon
Moonshine hot chocolate full of baked goods and whiskey delights

Moonshine Hot Chocolate


  • Author: Keith Recker

Description

Hot chocolate with an extra kick.


Ingredients

Scale
  • 1 cup  Whole milk
  • 2 oz. Callebaut milk chocolate, grated
  • 1 oz. Callebaut semi-sweet chocolate, grated
  • 1 tbsp. Light brown sugar
  • 1/8 tsp. Cinnamon
  • 1/8 tsp. Kosher salt
  • 3 oz. McLaughlin Distillery’s Loca Double Chocolate Moonshine
  • 1 oz Kingfly Spirits Bliss 1895 Spiced Rum


Instructions

  1. Warm the milk and grated chocolate slowly, stirring constantly. Add brown sugar, cinnamon, and salt.
  2. Just before serving, add spirits. Serve in heatproof glass or tall mug. Garnish with sweets to your heart’s content.

Recipe by Keith Recker / Styling by Ana Kelly / Photography by Adam Milliron 

Subscribe to TABLE Magazine‘s print edition

Create a free account, or log in.

Gain access to read this content, plus limited free content.

Yes! I would like to receive new content and updates.

Table Magazine wants to know your location.

TABLE Magazine operates regional sites - Knowing your location helps us route you to the appropriate site for the best experience.