Tax Day is coming up on April 15, 2025 and just the mention of it can induce a wave of stress. Numbers swirling, forms multiplying, and the ever-looming question: will you owe money or get a refund? But fear not, fellow taxpayer! After a long day of financial wrangling, a cocktail will help ease the stress. You can embrace your feelings of dread with our Black Death Cocktail. Or, you can toast your prospects for a refund with a Classic French 75. Either way, we hope a lovely beverage brings you a little bit of relief on this complicated day.
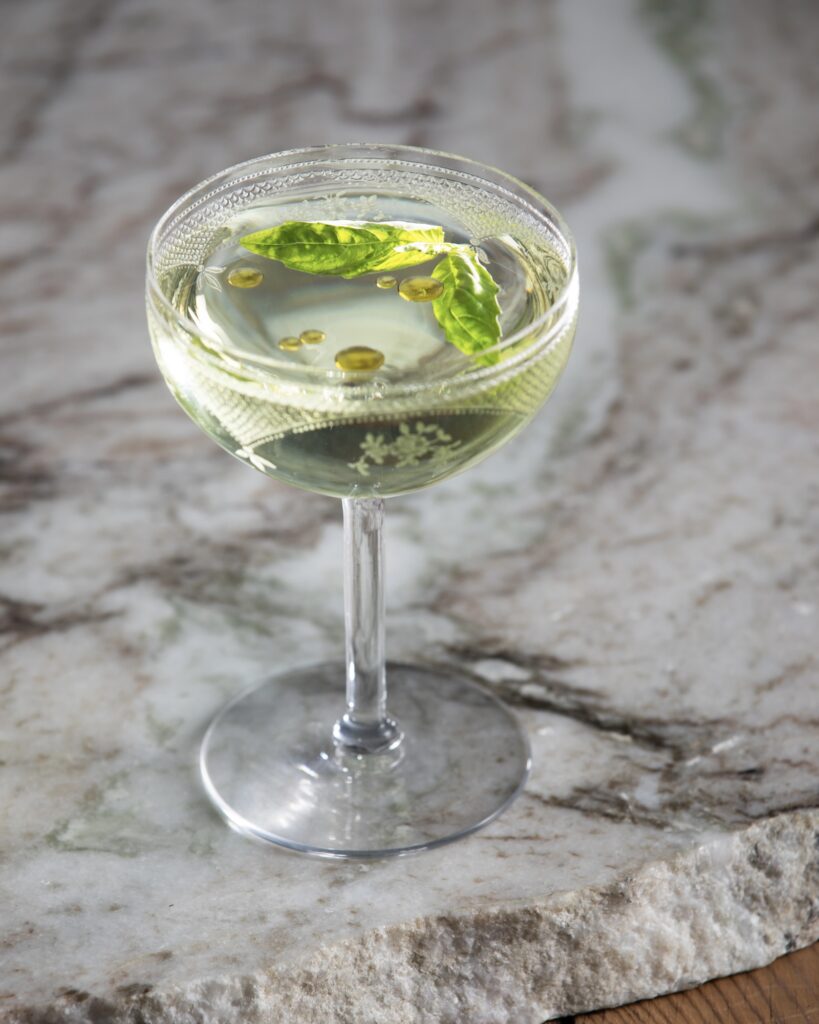
For those who enjoy a bit of herbal sunshine to combat math-induced dullness, the Lemon Basil Martini offers a sophisticated cocktail for your senses. The clean flavors of lemon and basil complement the vodka beautifully, making it an optimistic and satisfying end-of-tax-day drink.
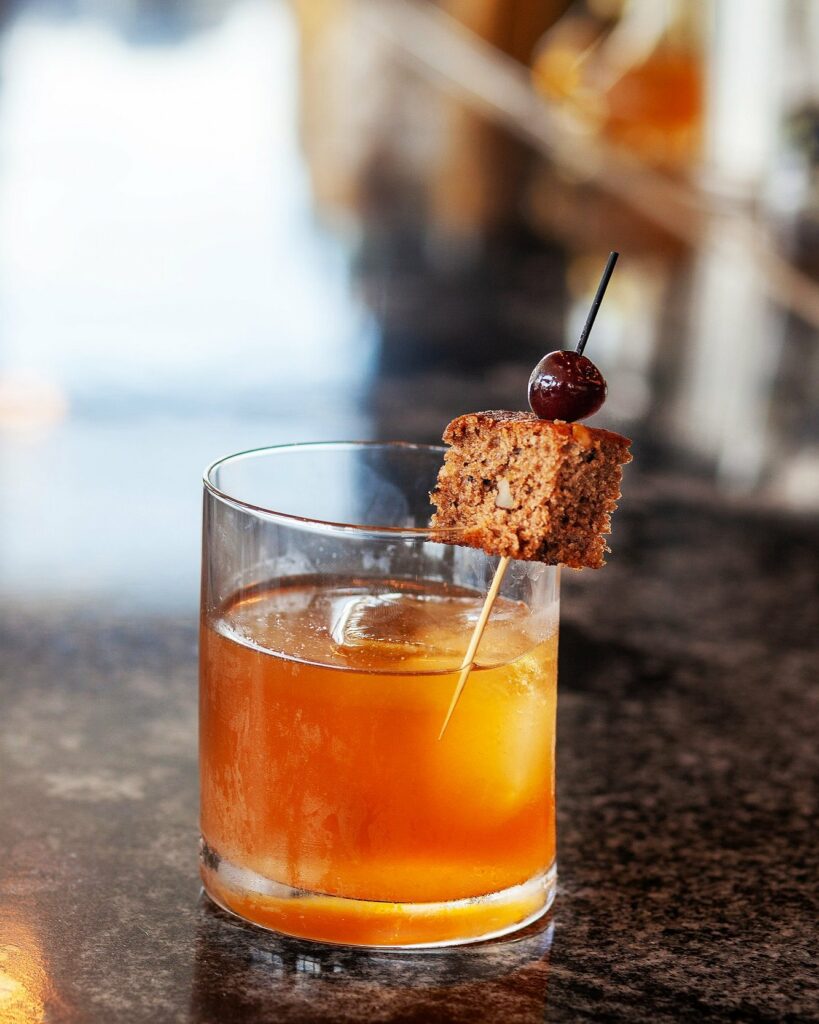
A little bit of comfort goes a long way when you’re stressed out by a maelstrom of numbers. The Banana Walnut Old Fashioned is a unique twist on the classic old fashioned, adding in the flavor of comforting banana bread. Banana liqueur and nutty walnut bitters add unexpected depth to the familiar flavor of whiskey.
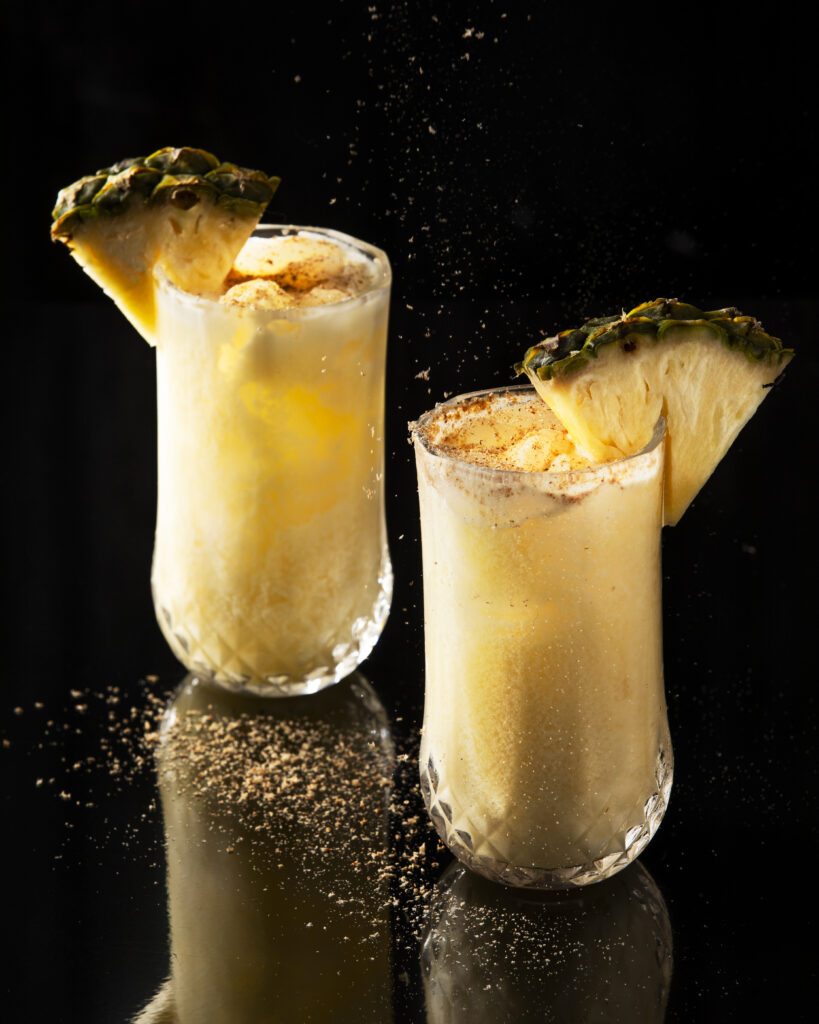
Feeling the tax-day pain? The PainKiller Cocktail, a tropical blend of rum, pineapple juice, orange juice, cream of coconut, and nutmeg, might be the perfect stress reliever or “painkiller”. It’s a bright way to unwind after a day of dealing with endless forms and complicated instructions.
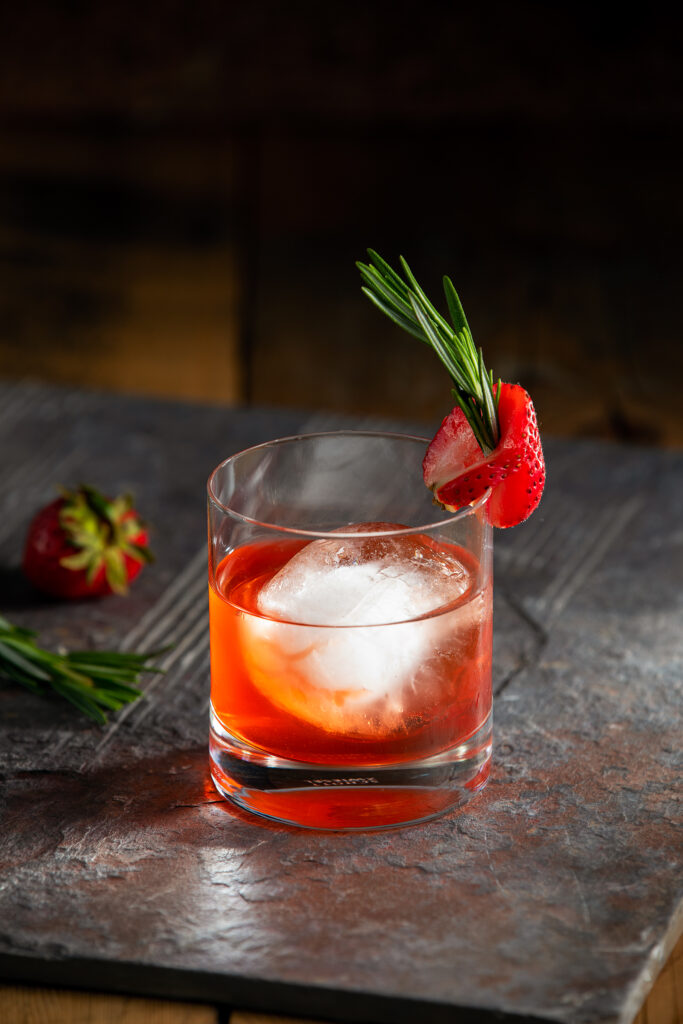
This drink is for when you want something that’s strong and… effective. Our Punch Drunk Negroni uses a fruity simple syrup and a bit of brut champagne combined with traditional negroni ingredients. It’s all too easy to drink so be careful or you might end up with a different kind of non-tax related headache the next day.
While we originally created this cocktail for the 2024 election, when suddenly everyone’s mind was on tiny numerical values and percentage points, Tax Day is one other time of year when margins of error start to seem very important. Maybe your Schedule C business expenses were, shall we say, rounded up by a margin. We won’t tell. Pour this one out to celebrate finishing your forms!
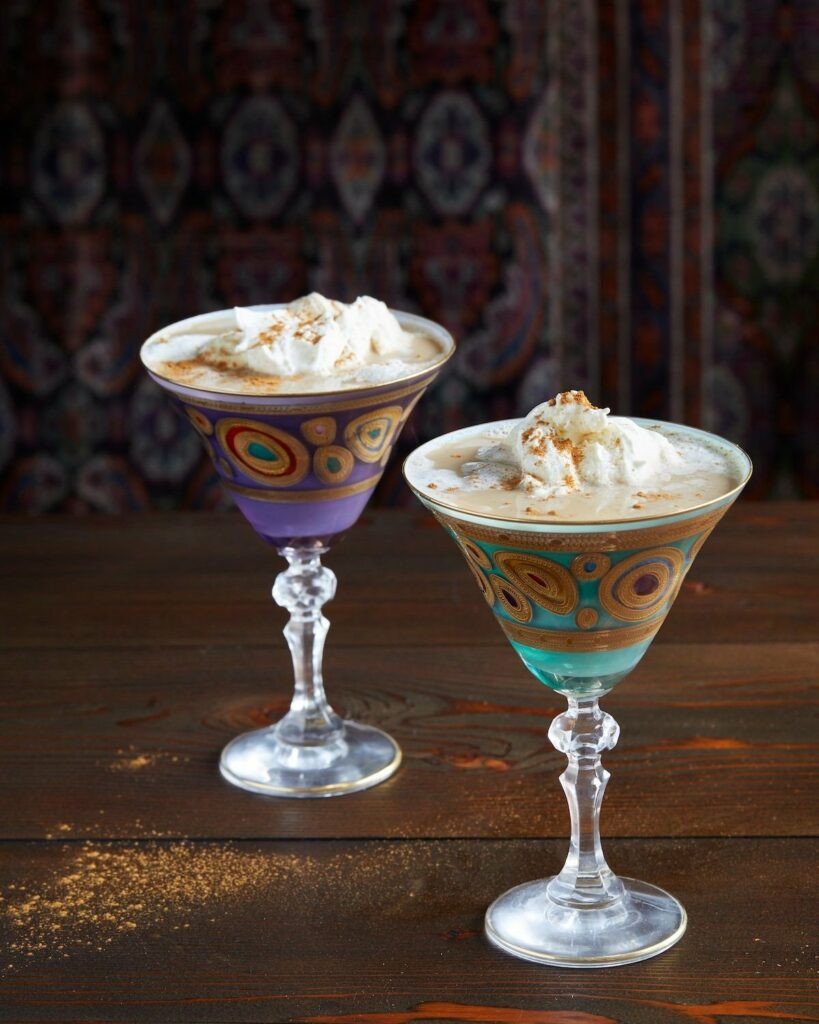
Taxes can be exhausting, especially when you have a full day ahead of you. Get a little energy boost with your stress-relieving cocktail thanks to our Espresso Whiskey Martini. We innovated the usual espresso martini to include whiskey and Frangelico for a sweet, warm sip.
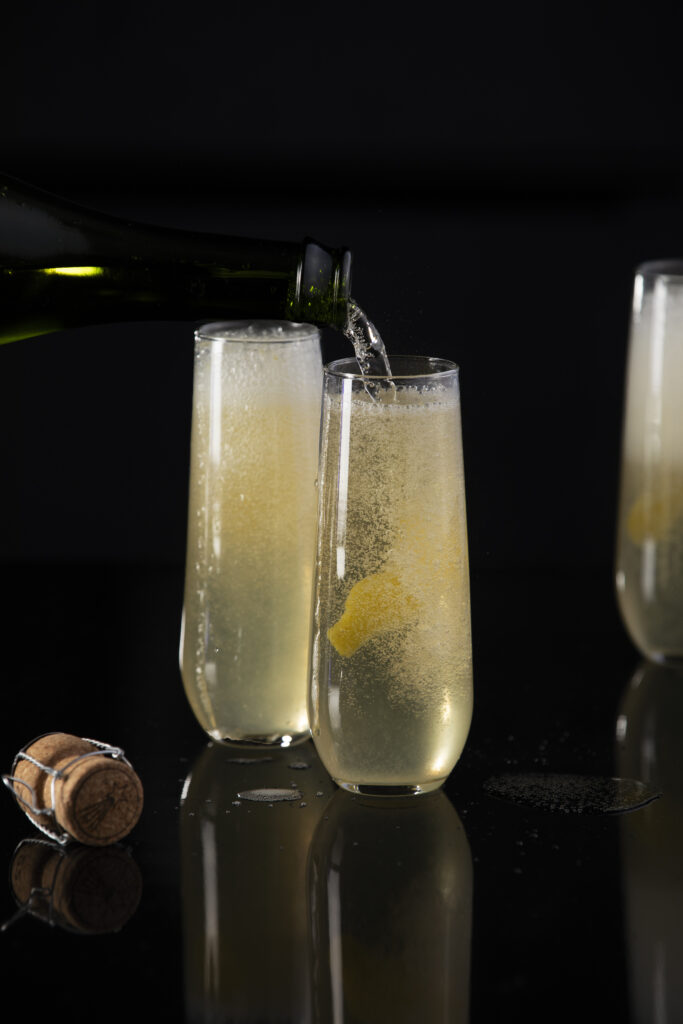
When your forms are complete and you see that big refund hit the screen, celebrate and pop some bubbly with a Classic French 75. This timeless blend of gin, lemon juice, champagne, and simple syrup is as elegant as it is refreshing.
This slow-cooked Lamb Rendang from The Aviary Kinderhook is fork-tender, rich with coconut milk made buttery and smooth in the process, and infused with the indescribably delicious layering of Indonesian flavors. Serve it with sides of sautéed greens and creamy polenta cooked with coconut milk and a bit of salt, and dressed with Indonesian sambal oelek, a ground chili sauce available at many grocers.
How Lamb Rendang Relates to Wine
Rendang is the sort of dish that unfolds as you eat it, inspiring a second helping, another sip of wine, and a long conversation with friends. We open a light but earthy 2019 Beaujolais Château de Fleurie, which plays beautifully with the burnished flavors of the Lamb Rendang.
A bit of coconut milk makes this slow-cooked lamb undeniably buttery.
Ingredients
Scale
2.5–3 whole rack of lamb ribs
3 tbsp canola oil, divided
Kosher salt
Freshly ground black pepper
6 small shallots, peeled and sliced
6 garlic cloves, peeled and sliced
4 oz. fresh red chilies (such as fresnos, red jalapenos, bird’s eye chilies)
1–3” knob fresh ginger, peeled and sliced
3 stalks lemongrass, tender white parts only, smashed
2 tsp ground coriander
1 tsp ground cumin
2 tsp ground turmeric
½ tsp ground cardamom
1 tbsp palm sugar, or more to taste
3 makrut lime leaves
1 cinnamon stick
1 can full-fat coconut milk
1 tbsp tamarind juice
Instructions
To make the rendang paste, process shallots, garlic, chilies, ginger, and lemongrass until finely minced.
In a medium saute pan over med-low heat, add 1 tbsp canola oil and add aromatic paste, spices, palm sugar, lime leaves, and cinnamon.
Cook the spice paste for about 1 hour, stirring occasionally and allowing it to maintain a gentle sizzle as it deepens in color.
Whenever the spice paste starts sticking to the bottom of the pan, add coconut milk a few tablespoons at a time to help dislodge the fond and continue stirring (use up all the coconut milk).
By the end, the rendang paste should be deep brown in color and the coconut oil should have separated from the solids.
Add tamarind juice. Allow paste to cool to room temp before using, or store in the fridge for up to 1 week.
Season lamb rack with kosher salt and black pepper. Heat a large cast iron pan or dutch oven on medium-high and add 2 tbsp canola oil.
When oil just starts to smoke, place lamb rack fat side down in the pan. Turn heat down to med-low and allow fat to render and brown without burning, adjusting heat as necessary (at least 10-15 mins).
Once the fat has rendered, sear the remaining sides until deeply browned.
Remove rack from pan and place onto a sheet tray (cool and save lamb fat for another use). Coat rack generously in rendang paste, and roast at 350F for 15 minutes or until a thermometer probe inside reads 125F.
Rest for 10 minutes before slicing. Serve over coconut milk polenta or jasmine rice, simply prepared vegetables (such as garlic scapes, spring onions, swiss chard), and plenty of sambal.
Aniseed, wormwood, and fennel. When talking absinthe, this is the holy trinity. It’s also what makes our Absinthe Gimlet so delicious.
Every bottle of the spirit contains these three botanicals, which gift the green drink its signature, herb-forward, licorice-y taste. In the case of local absinthe-maker Lawrenceville Distilling Co., this holy trio blends with brandy and distills down, making their signature 1129 Ridge Ave. Absinthe Traditionnelle.
Absinthe Education
Though the spirit has experienced a rise in popularity over the last few years, it’s had an eventful past (to say the least). Absinthe, or, as it’s famously known, the “green fairy,” has been rumored to cause hallucinations; it’s even been banned from the U.S. because of its potency and potentially toxic nature.
But, sorry to rain on your parade, absinthe does not induce madness or visions. According to Lawrenceville Distilling Co.’s FAQ page, we now know these false side effects are from alcohol poisoning and poor product regulation, leading to cheap variations with harmful ingredients.
(Another theory is that the wine industry, frustrated that drinkers were trading wine for the green stuff, started a smear campaign against absinthe. Their propaganda claimed that the spirit was responsible for violence, madness, and other dangerous acts.)
Lawrenceville Distilling Co.’s Absinthe
Lawrenceville Distilling Co., who launched their green absinthe in 2019, has even released a variation: Absinthe Rouge. Instead of absorbing chlorophyll from a bundle of hyssop, melissa, and wormwood for color, the spirit’s vibrant, luscious red comes from hibiscus. It gives the rouge spirit a more approachable, floral taste, rather than the powerful herbal qualities of the verte absinthe.
Both have plenty of uses. Try either absinthe the original way, prepared via La Louche, a process that slowly adds water to the absinthe, diluting the spirit and transforming it into a cloudy, floral-forward beverage. (A sugar cube is often in this method. You can pour water over the sugar cube, or it mix it in.)
You can also use absinthe as a rinse to prime glasses for cocktails. The current TABLE favorite, fully showcasing the spirit’s “big flavor,” is a play on the classic gimlet, using absinthe and lime juice.
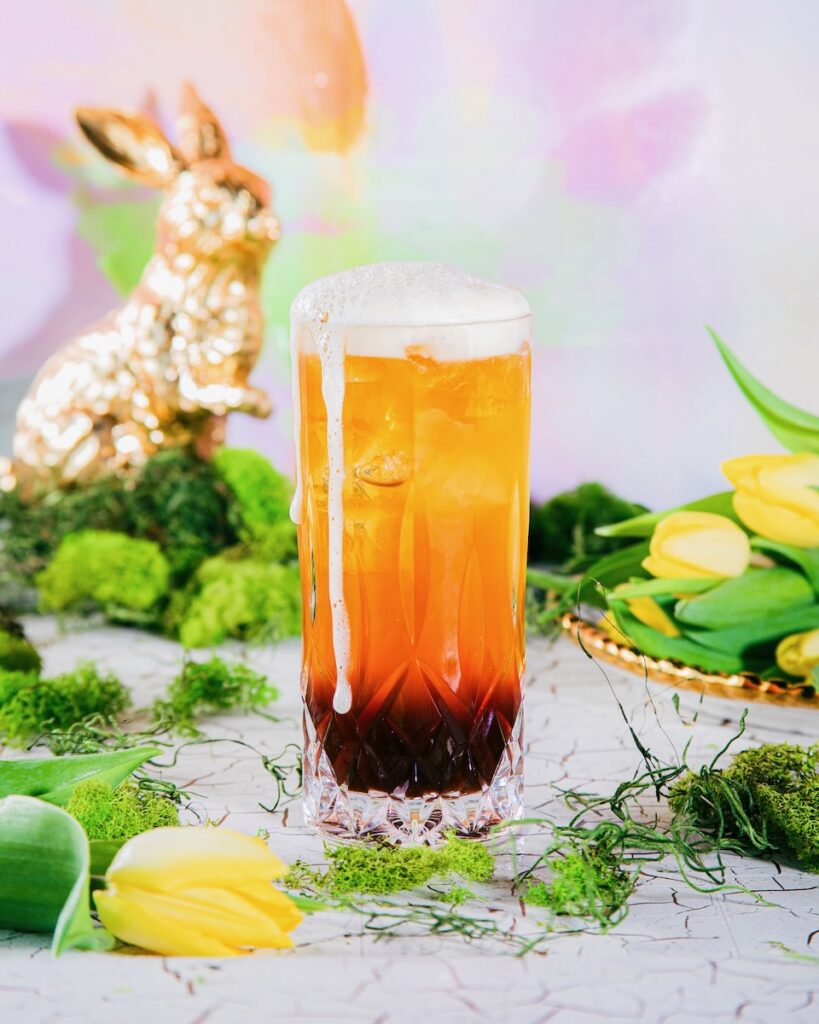
Spring is in the air and Easter celebrations are hopping into full swing, which means you need selection of cocktails and mocktails to match! We asked five local mixologists to help us toast the season with a lineup of festive cocktails and mocktails inspired by the classic song, Here Comes Peter Cottontail! Their delightful concoctions capture the whimsy and joy of Easter, and you and your guests will have fun shaking, stirring, humming, as well as sipping. Enjoy!
Start your Easter brunch off with Here Comes Peter Cottontail, a refreshing cocktail or mocktail bursting with bright notes of strawberry, lemongrass, and grapefruit. But the flavor experience doesn’t stop there. Vallozzi’s mixologists, Laura Karner and Stephanie Yarup, added more to the drink. “We immediately wanted to make a fun cotton candy cocktail when we heard our assigned line was ‘Here Comes Peter Cottontail’. To welcome spring, we wanted a bright sangria with plenty of fruit and botanicals.” They complete their drink with pure fun: a puff of cotton candy garnish goes in the glass before you pour the cocktail.
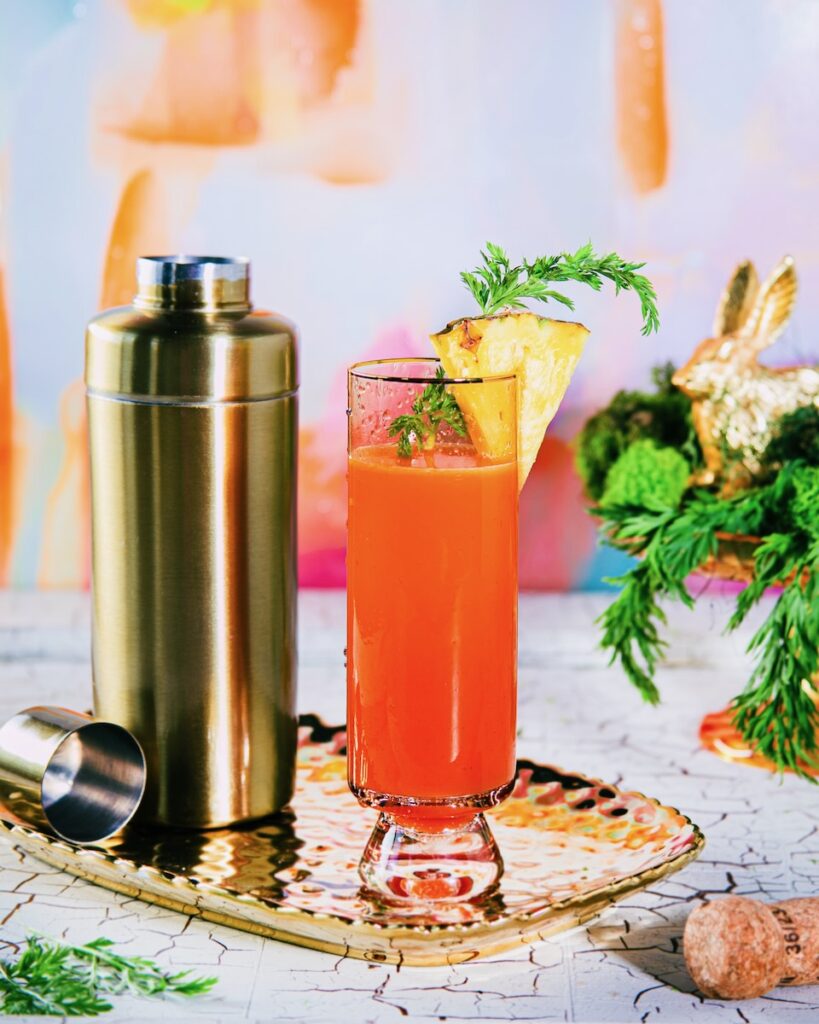
Upon hearing that his assigned lyric involved hopping down the bunny trail, Square Café’s Steven Krall pulled his juicer onto the bar. In it went fresh carrots, ginger, and pineapple. Out came the freshest, most flavorful blend of juices. (Don’t worry; for those who don’t juice, he also specifies store-bought juice equivalents in his recipe.) Then, he adds lime or lemon sparkling water and a healthy dose of prosecco – which, in the mocktail version, is omitted. With or without alcohol, the resulting quaff will have you just as bubbly and jazzed as a buzzed bunny either way.
Collin McNamee’s behind-the-bar genius lit up with the idea of capturing the ineffable, entirely magical quality of hippity in a glass. In his view, no doubt inspired by the hallucinogenic interior of Cobra, hippity is poetically linked to the perfumed qualities of rose hip and lavender, so his recipe starts with a colorful tea made from these floral elements. Add lemon juice and strong honey syrup to complete his mocktail version, and also a glug of the botanical notes of gin to bring a cocktail into being. The taste buds will wander happily through this garden of flavors. And, perhaps, you’ll meet the Easter bunny along the way.
Hoppity evoked the seductive appeal of hops for The Commoner’s Blaise Malandra, so a hoppy IPA-based drink was inevitable. Add to that special tingling of the taste buds drops of hopped grapefruit bitters, Cynar, Sfumato, and strawberry syrup…and you get a treat that has all the appeal of jellybeans and Jolly Ranchers, but with a sophistication that’s entirely grown-up and delicious.
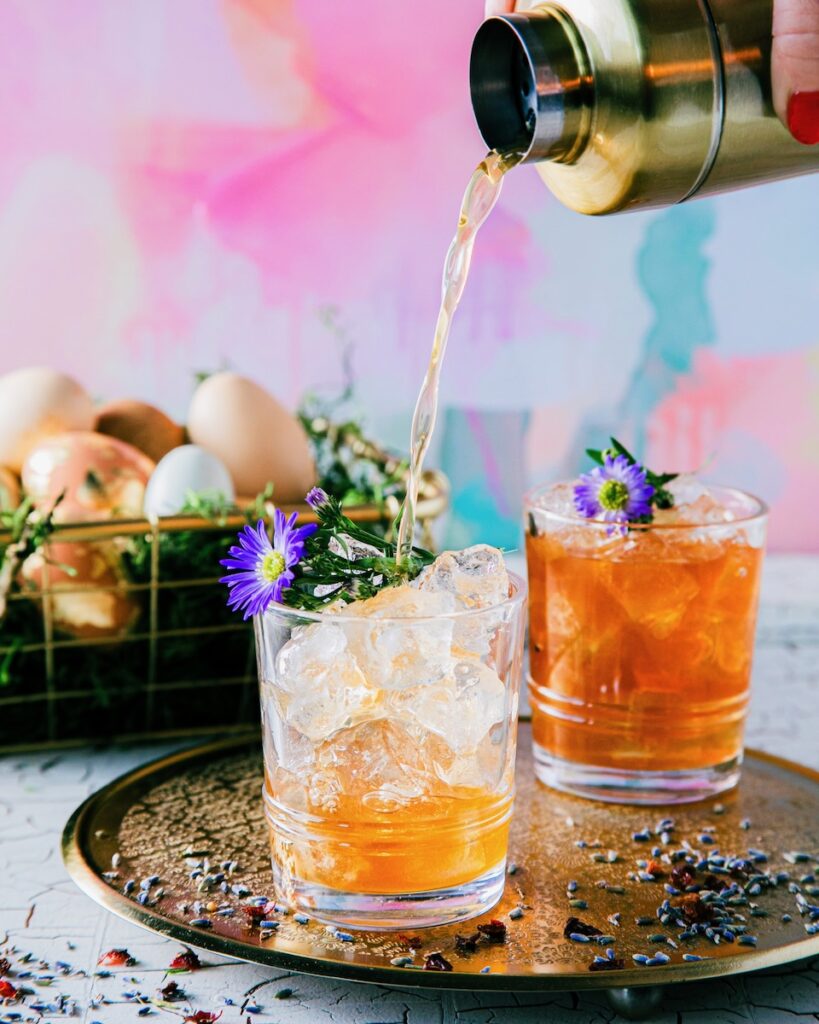
What does Peter Cottontail want when he finally reaches that delightful little bar at the end of the Bunny Trail? Carrot juice, of course. Cam Dickson reaches into his stash at Ritual House to add tequila, lemon and lime juice, vanilla syrup, and an egg white. After a hard shake in a cocktail tin, out comes a frothy, tangy, yet still sweet cocktail that would calm the nerves of even the jitteriest, travel-weary bunny. Swap out the tequila for pineapple juice in the mocktail version. Both will refresh and delight you!
Story by Star Laliberte Styling by Anna Franklin Photography by Laura Petrilla
Drinking sake is a lot of fun, school is not. To enter the world of sake, however, you have to learn a little math, a little science, a little vocabulary, and a dash of history. Sake is delicious, but it requires a baseline level of knowledge to figure out what you’re going to like.
Sake 101
Like wine, sake’s story is a mixture of history and science, and you can approach it from wherever you want to start. If you want to nerd out about fermentation, you can do that with sake. If you want to learn about Japanese history, you can also go that way. There’s an endless amount of access points for it, but we’re going to give you a brief overview of how it’s made, what tasting notes to look for, and why it’s so good. School is in session, so take your seat…
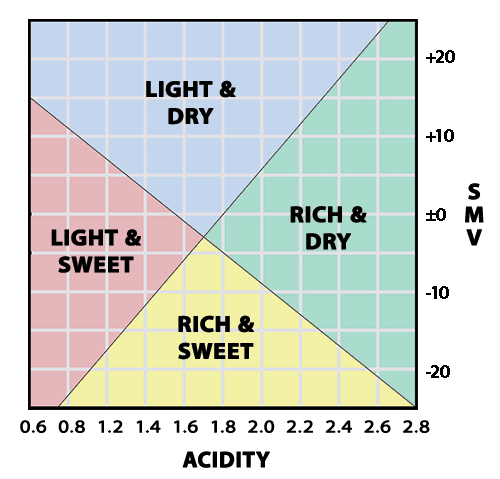
Sake Meter Values & Acidity
There won’t be a lot of math. We promise. You’ll just have to read a graph and remember how x and y axes work. The flavor profile of sake has a special system of measurement—SMV (Sake Meter Value) and then acidity. The graph of these two things gives you the character of what you’re drinking. Will it be dry? Sweet? Light? Heavy? A negative SMV will give you a sweeter character, while a positive one will give you a drier sake.
Courtesy of Sake Hub.
“Nigori, which you’ll find a lot in the domestic market, starts at -10,” beverage director and Skurnik Wines importer Alyssa McGrath explained. This makes it ideal for the end of a meal, since it’s sweeter, like a dessert wine is.
How Do You Make Sake?
As with other types of liquor, producers have to make choices along the way that have far-reaching consequences for what goes into the bottle in the end. Beyond the acidity and SMV scale, the other things that give sake its character are polishing, koji, and whether or not the brewer decides to add in distillate, which is extra alcohol. Adding distillate changes the flavor and consistency of the final brew.
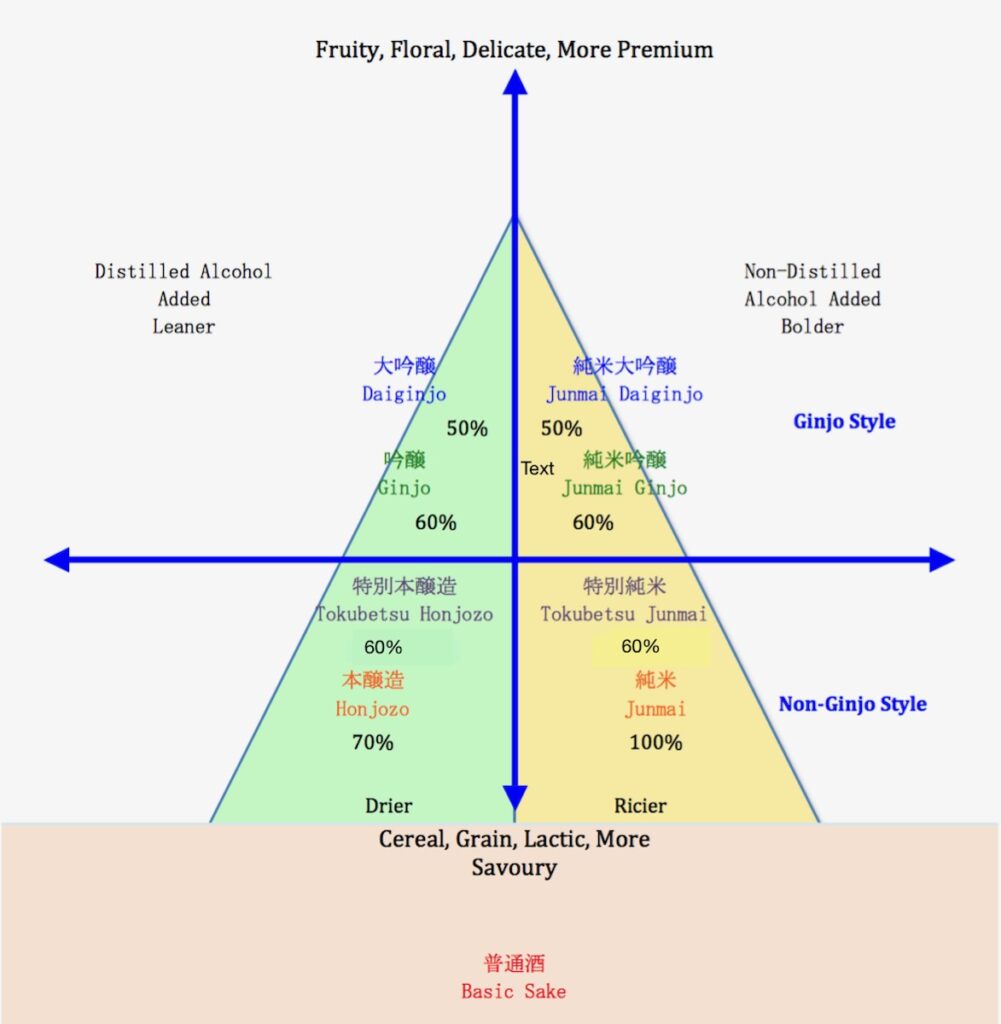
Polishing is the process by which producers mill the rice to get rid of the outer layers. Typically, the higher the polishing rate, the smoother and more delicate the product is. House of Sake produced a diagram to illustrate this concept.
Courtesy of House of Sake.
The percentages refer to minimum rice polishing. The higher up it is on the diagram, the more premium, but the number is lower because it refers to the ratio of un-polished rice to polished rice. So, if you’re looking to impress with sake, you want to look for the lower number, since the lower it is, the more ground-down the rice is. A 50% polishing percentage means the rice is now 50% of its original size.
Along with the math, allow me to break down a brief vocabulary lesson to guide looking at the terms in the triangle:
Junmai means “pure rice.” This indicated that the producer didn’t add any distillate into the sake.
Honjozo will have a bit of distillate added in—so you get a higher alcohol percentage and a leaner body.
Ginjo also has an addition of a distillate, but its polishing is more refined than Honjozo, hence why they are not the same thing. As you go up the pyramid, you see the Tokubetsu (meaning “special”) and Dai (meaning “big”) prefixes to show what’s considered more refined.
There is a sub-style, Junmai Ginjo, that is also a higher polishing level than your typical Junmai but doesn’t have that distillate in it.
Each of the terms tell you how polished the rice is and whether it has distillate. So, looking at all the information nested in the vocabulary words, Junmai Daiginjo is a highly polished, no-distillate sake. Daiginjo is a highly polished sake that does have distillate. Tokubetsu Honjozo will be a 60% polishing percentage with the addition of distillate.
Koji: A Little Mold Goes a Long Way
Koji is a mold, but it’s not the type of mold you’re thinking. It’s what makes sake alcoholic. Normally, the idea of ingesting mold is unappealing. But in this case, koji-kin, a small, harmless to eat mold, is cultivated onto the rice during the sake-making process. All drinks that come from starches require something to break down the starch into sugars, which the yeast in the starch will eat to create alcohol. However, you can’t “malt” rice the way you can with barley. So, something else has to happen in order to create alcohol.
That’s where koji comes in. Producers grow koji is a separate part of the brewery called a koji muro and then sprinkle it onto steamed rice. The koji is in an integral part of the sake-making process and it influences the quality and flavor of the final beverage. Even the material on the walls of the koji muro can make their way into the final beverage’s flavor profile. At the higher end, there’s one more categorization: namazake or unpasteurized sake, which brewers don’t add heat to. That’s the purest form of sake, with the freshest expression of the koji in it.
The History of Sake
Ok, maybe you’re sick of looking at graphs and talking about mold now. What about the history? “Traditions of sake go back hundreds of years. There’s a big focus on the cleanliness and the pristine nature of the water. The water is part of what gives sake its regional character,” McGrath said. The technique of making sake originally came from China but gained prominence in Japan. (There are many such historical and cultural crossovers between Japan and its neighbor, such as the kanji writing system). The first recorded mention of sake in Japan is in the third century, and the first mention of commercial breweries appears in the 1400s.
Sake’s first introduction to the global economy was in 1852, during the Meiji period when Japan opened its borders and entered the international trade market. Sake has taken off from there, and there are now sake producers all over the world. It’s become as prestigious as wine and whiskey, with a separate WSET certification to focus on it.
What is it Like to Drink Sake?
Yeah, yeah, history is cool, science is interesting…but beverages are for drinking. As the graphs earlier showed, sake can be drier or sweeter. Often, you’ll find tasting notes referring to more umami (think mushroom-like savory fullness) or more floral or fruit notes depending on the koji, polishing percentage, and regionality.
Different regions of Japan produce different profiles. Kobe, famous for their beef, also produces a lot of sake. The Kobe style tends to have a fuller-body to stand up to the juicy meats. Sake from Hokkaido, by contrast, will pair well with fish, because seafood is a huge part of that region’s cuisine.
When you see “cloudy” sake, that means it’s Nigori, the sweeter style that has some sediment left over from the brewing process. Nigori sake was actually once banned in Japan, during the Meiji period when the country wanted to modernize. The Japanese government thought the clear style looked classier, so Nigori was out. But now, Nigori is one of the most popular kinds of sake for its sweet taste and relative accessibility.
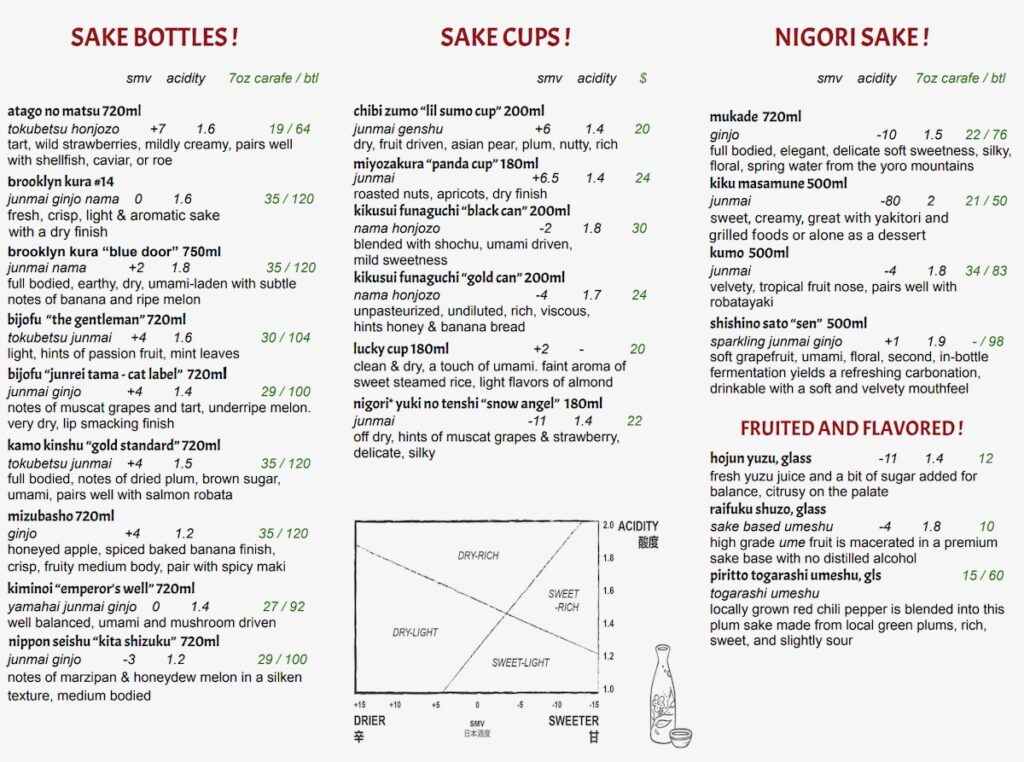
An example menu from Roger Li’s Umami can help you put your knowledge to the test. See if you can recognize the terms and what each one means!
Courtesy of Umami.
A great way to experience sake’s diversity in practice is a sake flight, which most Asian restaurants (including Umami) offer. The differences are dramatic between different cups of sake. McGrath also encourages people to serve sake with non-Japanese food. Often, because the language seems unfamiliar, people don’t make an effort to learn about it. But sake is as versatile as any other liquor. After all of those numbers, I definitely want a carafe of sake. School’s out.
For more, check out the rest of our liquor education series:
If you’re sick of the same old recipe for deviled eggs, try adding a kick of paprika for big flavor in a small package. These hard boiled eggs hold a creamy filling of dijon, lemon, egg yolks, and seasonings in their respective white halves. The final touch is a dusting of paprika that not only adds a pop of color but also introduces a subtle, smoky pepper flavor. It’s a distinct taste that complements the richness of your usual deviled egg filling.
How Do You Get the Smoothest Deviled Egg Filling
Nobody likes lumpy Paprika Deviled Eggs. When cooking your hard-boiled eggs, you want to stop just until the yolks are firm and bright yellow which means that less is more here. To mash the yolks, you can use a fork to thoroughly break up any lumps before you add any other ingredients. If you really want an ultra-smooth texture, you can press the yolks through a fine-mesh sieve to get rid of any extra graininess. As you go to put in the dijon and other liquids, add them gradually and mix vigorously for the best results. Some cooks will also use a food processor or immersion blender to get the filling as perfect as possible.
2 cloves of garlic finely minced or grated on a microplane
½ tsp dijon
Juice of 1 lemon, plus more to taste
½ tbs salt, plus more to taste
1 ¾ cup canola oil
1 tsp hot paprika
6 hard-boiled eggs – see directions below
Instructions
Place 6 whole eggs in a single layer and cover with cold water.
Add 1/2 cup kosher salt.
This seems like a lot of salt but trust me…it will not season the eggs. It simply helps to solidify your egg whites if one breaks in the water.
Bring the entire pot up to a boil. Once boiling, turn the heat down to medium-high and boil between 10 and 12 minutes. If the eggs are smaller, go closer to 10, if the eggs are larger, go closer to 12.
Shock the eggs in an ice bath and peel. Allow eggs to cool completely in refrigeration.
In a medium mixing bowl with a flat base, vigorously whisk together egg yolks, garlic, lemon juice, and salt.
Once the mixture has become frothy, begin to very slowly drizzle in the canola oil while whisking.
As you add the oil in a slow, steady stream, the mixture will thicken. If it becomes too thick to whisk, splash a little cold water to smooth it out.
Once all of your oil has been added, finish the aioli with paprika and taste for salt.
Cut the boiled eggs in half and remove the yolks. In a food processor, combine equal parts aioli and egg yolk puree until smooth. Taste for salt.
Fill the eggs with the mixture using a piping bag, making sure to over fill them slightly. Garnish with a little more paprika.
Recipes by Csilla Thackray Styling by Keith Recker Photography by Laura Petrilla
Csilla Thackray shares a Fresh Pea Puree snack, perfect for happy hour in the springtime. You can use this creamy smooth recipe for on your favorite crackers or crostini. Though, feel free to serve a whole bowlful with an herb garnish on top if you so desire.
Snow Peas vs English Peas in a Fresh Pea Puree
When you make a Fresh Pea Puree, the choice between snow peas and English peas makes a huge in the final flavor and texture. We recommend English peas for this recipe for its overall versatility. You get the classic sweet taste that shines through. Plus their texture, after cooking and pureeing, is typically more smooth and creamy. Snow peas though have a milder, more subtle sweetness and more vegetal flavor. Since you also puree the entire pod with snow peas (after removing the tough strings), the puree carries a fibrous texture in comparison to a puree solely from the English peas. While you can make a puree from snow peas there are setbacks. It will likely have a less intensely pea-like taste and needs to be strained very well to work.
If you’ve never tried a Buckwheat Blini then you’re in for a real treat when you bite into this freshly-fried appetizer or side dish. Think pancakes but somehow softer and even better with the capacity for sweet and savory toppings alike. For our recipe we crown these small rounds with a dollop of homemade creme fraiche and trout roe or caviar. It’s a little luxurious while still having that cozy home feeling. Try it for breakfast, brunch, or alongside a light dinner.
What is a Buckwheat Blini?
A Buckwheat Blini is a small, thin and lighter pancake that traditionally uses buckwheat flour. This special ingredient gives these delicious bites a distinctive nutty and almost earthy flavor. Originating in Eastern European cuisine, mostly Russian, blini are often yeast-risen. This means the result is a lightly spongy texture. Buckwheat flour, despite its name, is actually gluten-free so even those with dietary restrictions can enjoy this dish. If you’re looking for a savory topping we recommend smoked salmon, caviar, and sour cream. But for a sweet effect you can use jams or honey too.
This Russian pancake-like dish is even softer than regular pancakes with a delicious creme fraiche on top.
Ingredients
Scale
2 tsp yeast
1 tsp sugar
2 cups warm milk
1 3/4 cups flour
1/4 cup buckwheat flour
1 tsp salt
4 egg yolks
For the creme fraiche:
1 cup heavy cream
1 tbsp buttermilk
Instructions
Activate yeast in warm milk. Whisk together dry ingredients and add into liquid ingredients. Let ferment lightly in a sealed container for at least an hour. Make sure the container you chose is double the amount of batter because it will expand in size. Whisk one more time before making.
To make, use a nonstick pan and pan spray. Spray the pan and warm over medium heat. Dollop one tablespoon of the batter into the pan – as many dollops as you can fit – and cook as though you are cooking a pancake.
When cooked on one side, flip and allow the other side to cook. Continue until you have used all of the batter.
Serve immediately with trout roe or caviar & creme fraiche.
For the creme fraiche:
In a clean, plastic container, mix heavy cream and buttermilk. Cover with a tight-fitting lid and set aside for at least 24 hours until set. Refrigerate immediately. Use within 7-10 days.
Recipes by Csilla Thackray Styling by Keith Recker
Photography by Laura Petrilla
This dish features flaky, perfectly cooked salmon served alongside tender, sweet English peas, generously drizzled with a brightening dill butter sauce. We’re infusing a rich, buttery sauce with the fresh, slightly tangy notes of dill. It’s a way to dress up your salmon while still letting the natural flavors come through. The sweet, springtime flavor of the English peas as a side complements both the fish and the sauce, adding a touch of seasonality. Every aspect is to balance the flavors and textures, making for a sophisticated yet still comforting meal.
Can I Use Frozen Peas in This Recipe?
If it’s outside of English peas season or you can’t find fresh ones at your local grocer, frozen peas are a perfectly suitable option. Frozen vegetables usually get frozen shortly after harvesting for preservation, so you’ll still get your dose of vitamins and minerals. When it comes to achieving the best flavor and texture, stick to cooking according to your package instructions. But, if you do want a slightly brighter green and crisper texture, you can blanch the frozen peas. Simply cook in boiling water for a minute or two, then immediately plunge them into ice water to stop the cooking process.
The Dill Butter Sauce adds a bit of earthy freshness.
Ingredients
Scale
10 oz English peas boiled for 90 seconds and then placed in cold water bath
1 tbsp + 7 tbsp unsalted butter
5 large cloves of garlic, finely minced
½ cup thinly sliced shallots
½ lemon, juice
4 sprigs of dill fronds
2 tbsp capers with juice
Salt
1 ¼ lb sockeye salmon fillet
Instructions
Preheat the oven to 425 degrees.
To make the butter sauce, melt a tablespoon of butter in a small saucepan and add the garlic followed by shallots, and sauté until softened and very lightly golden.
Place in the remaining 7 tbsps of butter. Once melted, pour in the fresh lemon juice and add the dill fronds, capers, and salt. Adjust seasoning to taste.
Place the salmon on a parchment-lined baking sheet. Cover with the butter sauce. Bake for approximately 20 minutes or until the fish flakes easily. Right before serving, place the peas on top of and around the fish.
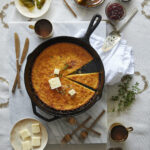
Indulge in a taste of award-winning tradition with Weatherbury Farm’s Buttermilk Cornbread. This recipe uses a consistent prize-winner at the Washington County Fair, their Wapsie Valley Open Pollinated Cornmeal and pastry flour. The result is a moist, flavorful cornbread with a delicate crumb and a touch of sweetness. It’s perfect for pairing with your favorite Southern dishes or enjoying as a comforting snack when you slather it with butter.
What Makes Weatherbury Farm’s Cornmeal and Pastry Flour so Special?
Weatherbury Farm grows its own grains, and in the case of their cornmeal, they use Wapsie Valley Corn, an open-pollinated heirloom corn variety. Heirloom varieties are often prized for their unique flavors and excellent textures. Weatherbury Farm also uses stone mills. Stone-milling grinds the grains more slowly and at a lower temperature to preserve more of the grain’s natural nutrients. Not to mention, all of this is with organic processes which means their grains are grown without the use of synthetic pesticides, herbicides, and fertilizers
Preheat oven to 375. Grease 8” square pan or cast-iron skillet.
Melt butter in a large skillet. Remove from heat and stir in sugar. Quickly add eggs and beat until well blended. Combine buttermilk with baking soda and stir into mixture in pan. Stir in cornmeal, flour, and salt until blended and a few lumps remain. Pour batter into prepared pan.
Bake in preheated oven for 30 to 40 minutes or until a toothpick inserted into the center comes out clean.