Home Blog Page 208

Mushroom Ragout Over Garlic Crostini With Spiced Duck

0
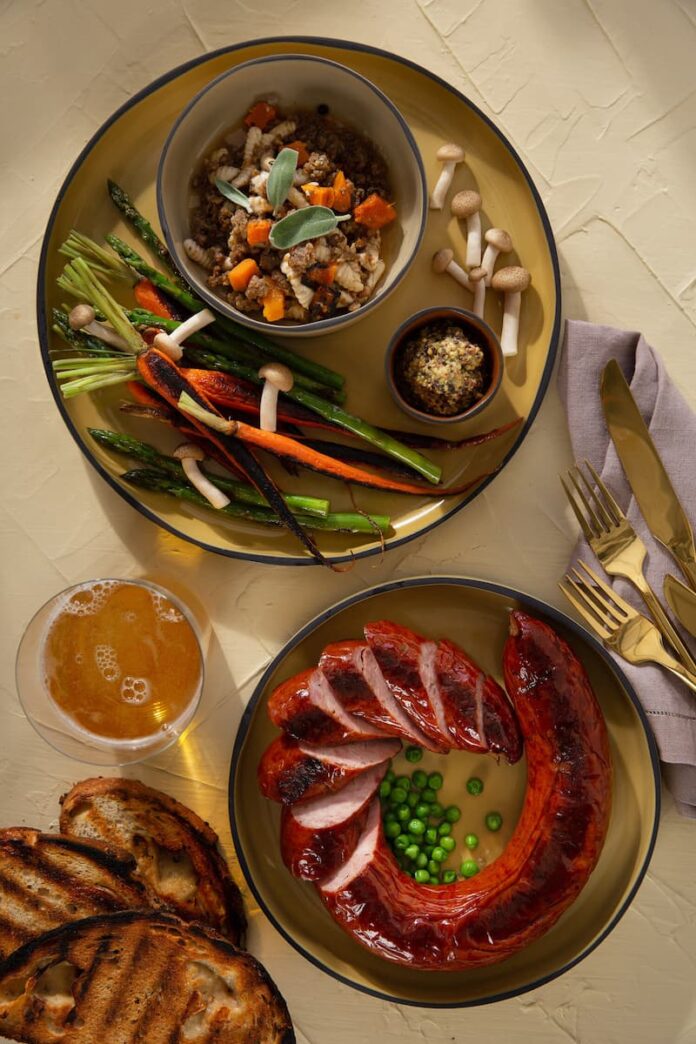
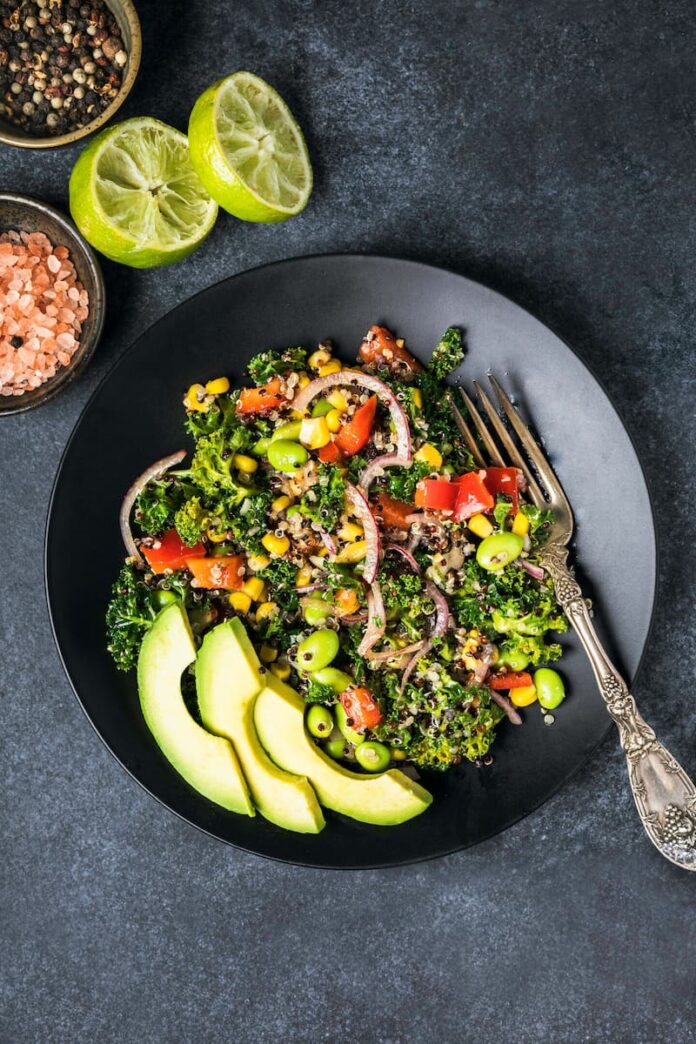
An aerial shot of Mushroom Ragout Over Garlic Crostini With Spiced Duck

Chef Cory Hughes of Fig & Ash sears farm-raised duck breast and plates it with an aromatic mushroom ragout. A party for the palate ensues!

Print
clock clock iconcutlery cutlery iconflag flag iconfolder folder iconinstagram instagram iconpinterest pinterest iconfacebook facebook iconprint print iconsquares squares iconheart heart iconheart solid heart solid icon
An aerial shot of Mushroom Ragout Over Garlic Crostini With Spiced Duck

Mushroom Ragout Over Garlic Crostini With Spiced Duck


  • Author: Cory Hughes

Description

A savory and elegant dinner…


Ingredients

Scale

For the garlic crostini:

  • ¼ loaf focaccia
  • ¼ cup olive oil
  • 3 cloves garlic, peeled

For the mushroom ragout:

  • ½ cup Cremini mushrooms, sliced
  • ½ cup Shiitake mushrooms, sliced
  • ½ cup Oyster mushrooms, sliced
  • 1 tbsp red miso
  • 2 tbsp tomato puree
  • 2 tbsp tarragon, freshly chopped
  • 1 tbsp thyme, freshly chopped
  • 1 clove garlic, minced

For the duck:

  • 1 duck breast
  • 1 tbsp extra virgin olive oil
  • 1 tbsp Dijon mustard
  • 1 ½ tbsp coriander
  • 1 tsp dried thyme
  • 1 tsp black peppercorn
  • 1 tsp kosher salt


Instructions

  1. In a skillet with no oil, toast the coriander. Once it becomes fragrant then add the peppercorns and thyme. Transfer to a coffee grinder and blitz 3 or 4 times. The mixture should be half minced and half chunky. Pour the mixture into a bowl and set aside.
  2. Rub the duck breast with Dijon, salt and coat with the toasted and ground spices.
  3. Place 1 tbsp of extra virgin olive oil into a skillet and place the duck skin side down in a medium heat, lower the heat a touch and cook until the fat has almost rendered out (about 4-6 minutes on one side). Turn off the heat and flip the duck to allow the other side to cool. The internal temperature of the duck should be 135 degrees with most of the fat rendered out. Reserve the fat from the skillet, strain before adding to a small container.
  4. Place the cooked breast on a resting rack and allow to cool to room temperature. Once cool to the touch its ready to slice, thin as possible. The best approach is to lay the fat side down and cut through the meat portion first. You will get cleaner cuts.
  5. In a skillet, take the garlic cloves and oil and lightly cook until the garlic is golden brown and soft. Remove the garlic from the skillet and smash with the back of your knife until it resembles a paste. If it is too chunky add some of the garlic oil. Slice your focaccia into 2 finger wide and 6” long crostini and brush the roasted garlic oil on your focaccia. Bake in the oven at 400 degrees for 5 minutes or until golden brown. Set aside.
  6. In the same skillet you made the garlic oil, add the seasoned duck fat and heat it in a skillet on medium-high heat. Add the minced garlic and cook until fragrant. Add the mushrooms and cook until the moisture evaporates and then caramelization begins. Pour any excess fat out into a metal bowl and save for future use.
  7. Deglaze with 2 tbsp water then add the miso and tomato puree. Cook until the sauce begins to glaze the mushrooms.
  8. Remove the mixture from the skillet and pace on top of the golden brown crostini.
  9. Drape the sliced duck breast over the mushroom ragout crostini and garnish with either fresh chives or a Dijon aioli.

Recipe by Cory Hughes
Photography by Dave Bryce
Styling by Rafael Vencio
Dinnerware and Jars by Crate and Barrel

Subscribe to TABLE Magazine‘s print edition.

Homemade Tomato Soup

0
Sliced cheese bread with a bowl of tomato soup

Everyone we know has a childhood winter-lunch memory of Tomato Soup and grilled cheese sandwiches. Warm yourself with a cup of soup (and a few memories) by whipping up a batch for yourself. Share with kids and grandkids to pay those fond memories forward. You can even experiment with what types of cheese you use in your sandwich to change the way you enjoy this homemade soup.

What Kind of Tomatoes Should You Use in Tomato Soup?

Not all tomatoes were created equal. The best type of tomato to use in a soup like this is a San Marzano or Roma tomato, as they have a fuller, richer flavor and are less watery, making them perfect for soups and sauces. And you can taste the difference in tomato quality if you’re buying farm-fresh plum tomatoes versus a generic brand, believe me. An Italian specialty store will most likely have the most flavorful, but in a pinch, what’s most available supermarket is fine. It’s comfort food, after all. No need to stress yourself out trying to pick out a tomato. But love yourself and pick a good, tasty can of tomatoes. 

Print

clock clock iconcutlery cutlery iconflag flag iconfolder folder iconinstagram instagram iconpinterest pinterest iconfacebook facebook iconprint print iconsquares squares iconheart heart iconheart solid heart solid icon
Sliced cheese bread with a bowl of tomato soup

Homemade Tomato Soup


  • Author: Anna Franklin

Description

A cozy soup for your soul.


Ingredients

Scale
  • 2 tbsp butter
  • 2 carrots, chopped
  • 2 stalks celery, chopped
  • 1 onion, chopped
  • 3 garlic cloves, peeled and left whole
  • 1 qt jar canned tomatoes
  • 1 qt water
  • 1 tbsp salt
  • 1 tsp black pepper
  • 1/4 cup heavy cream


Instructions

  1. In a stock pot, add butter, carrots, celery, onion, and garlic and cook over high heat, letting the veggies get a little brown.
  2. Add canned tomatoes and water, simmering until all the veggies are super soft. Season with salt and pepper.
  3. Transfer everything to a blender and process until completely smooth. Pour back into stock pot over low heat and add heavy cream. Serve hot with your favorite grilled cheese sandwich, crackers, or on its own.

Recipe and Styling by Anna Franklin
Photography by Dave Bryce

Subscribe to TABLE Magazine‘s print edition.

The Many Hats of Pittsburgh’s Staycee Pearl

0
A Black woman, Staycee Pearl, in a white dress, peeks out between a black curtain.

Choreographer, creator, and visual artist Staycee Pearl is the co-founding artistic director of PearlArts and STAYCEE PEARL dance project & Soy Sos. She creates artful experiences through dance-centered multimedia work — alongside her husband and artistic collaborator, Herman Pearl.

Pearl has been a dance and visual artist for many years — in New York, Atlanta, and now Pittsburgh. She began making work and directing dance after moving here in 2000, and received her degree in studio arts from the University of Pittsburgh in 2009.

“Our work is conceptually driven by our lived experiences, relationships, and worldly circumstances,” she explains. “We center Blackness within the human experience, while creating inclusive, thoughtful, and immersively artful encounters.”

two dancers in loose fitting clothing hold their right leg up with their arms facing back

Building upon this rich foundation, what’s next for Pearl? They’re currently working on a new home in Braddock. “And we’re excited to share space with our ever-expanding community,” she adds.

When asked the preferred part of the path she’s pursued, Pearl says, “The entire thing. I wouldn’t change any of it, and I love where I am in life as an older-middle-aged Black Woman. Thankful.”

Upcoming studio presentations, classes, and events can be followed at pearlartsstudios.com, while company happenings (from touring to commissions) are listed at spdpandsoysos.com.

Story by Corinne Whiting / Photography Courtesy of the Pittsburgh Foundation

A footer photo with a white background, one TABLE Magazine and subscribe info and button

Subscribe to TABLE Magazine’s print edition.

Win Tickets to the Sold‑Out Santa Fe Wine & Chile Fiesta

0
A woman pour wine at the Santa Fe Wine & Chile Fiesta's Grand Tasting. Enter to win Fiesta Grand Tasting tickets

Enter for a chance to win 2 tickets to the SOLD OUT Santa Fe Wine & Chile Fiesta Grand Tasting on Saturday, September 30 at Fort Marcy Park.

The Grand Tasting is the only time and place where guests can sample, sip, and savor over 90 world-class wineries paired with more than 50 of Santa Fe’s finest restaurants.

The Fiesta Grand Tasting Ticket Giveaway

Name(Required)
Email(Required)

By entering this giveaway, you are giving TABLE Magazine permission to email you. 

While The Fiesta Grand Tasting may be sold out, there are still plenty of other events available to take part in, like the Sun, Wind and Wine Seminar in the Santa Lucia Highlands and the Reserve Wine Tasting & Silent Auction on September 28. Browse the entire list of festivities here.

Ahead of the Santa Fe Wine & Chile Fiesta, 6 Chefs Share Their Dream Dishes

Subscribe to TABLE Magazine’s print edition.

Pittsburgh Metalsmith Katie Rearick Creates Quality Objects In a Mass Produced World

0
Metalsmith and sculptor Katie Rearick holds up a metal necklace in front of her and smiles

Metalsmith and sculptor Katie Rearick works her chosen medium with precision and sensitivity.

an aerial shot of a metal working station from Katie Rearick

Metalsmith and sculptor Katie Rearick remembers, as a small child, selling painted rocks on the beach in northern Michigan. She feels fortunate to have a family that encouraged her to pursue the arts, and a high school that offered a metals and jewelry class. She went on to receive her Bachelor of Fine Arts with an emphasis in metal/jewelry from Western Michigan University, and then a Master of Fine Arts from SUNY New Paltz.

Steel City Adventures

Rearick moved to Pittsburgh in the fall of 2014 to teach metals and jewelry at Waynesburg University for seven years, before resigning to take care of her newborn daughter. She founded the Allegheny Metals Collective in 2015, is currently running workshops at Contemporary Craft, and also maintains a home studio. Her work ranges from small-scale body adornment to large sculptural installations that utilize personal narrative as a starting point.

on the left, metal pieces in the shapes of 3D triangles. On the right, dark blue metal circles

“Using a jeweler’s saw, I meditatively hand-pierce steel and silver to become sculptures and one-of-a-kind wearable jewelry,” she explains. In addition to solo work, she works collaboratively with her wife, printmaker Rachel Saul Rearick. Their most recent body of work, Sculptural Landscapes, utilizes lines and bold mark-making. The resulting interplay of shadow, light, and pattern is fascinating.

Up Next

Rearick is curating an exhibition titled Archives of the Allegheny Metals Collective, featuring 15 Allegheny Metals Collective members that will run October 12 through November 10 in the Jodee Harris Gallery at Seton Hill University. She’s also developing a new body of artwork focused on motherhood and play.

Rearick greatly appreciates quality objects in a world that heavily focuses on mass-produced items. “A well-crafted item made by an individual can often last a lifetime, and makes up bodies of heirlooms across cultures,” she adds.

BE Galleries also sells collaborative work by Rearick and her wife.

Story by Corinne Whiting / Photography by Laura Petrilla

A footer photo with a white background, one TABLE Magazine and subscribe info and buttonSubscribe to TABLE Magazine‘s print edition

Dreams Cocktail, Inspired by Stevie Nicks

0
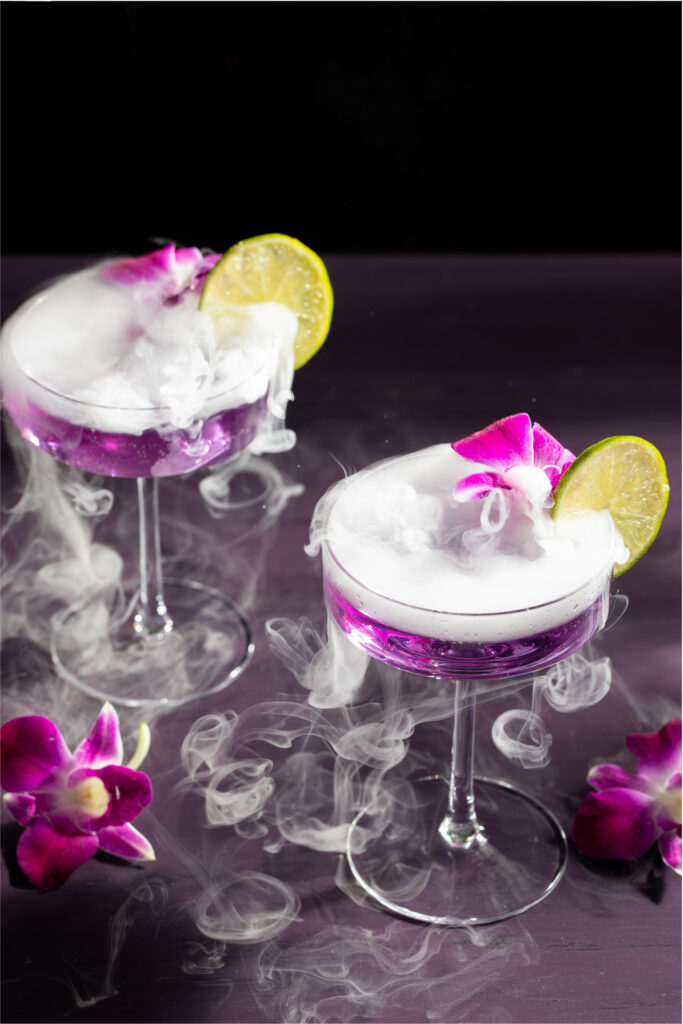
Two glasses with purple liquid inside are topped with little botanical pink flowers and lemon slices with smoke pouring over the cocktail.

Named after the quintessential Fleetwood Mac song, “Dreams,” our Dreams Cocktail, Inspired by Stevie Nicks, is the 19th cocktail in our 2023 Summer Concert Cocktail Series. This beauty is an upscale version of a Gin and Tonic, with a lime simple syrup for a touch of zest.

What Makes this Gin Cocktail Change Color?

The Empress 1908 Gin in this cocktail is a beautiful blue-indigo color, but when you add the tonic into it, it will change into a lighter magenta. The tonic changes the gin’s pH balance, which in turn changes the color of the gin’s pigments. When you mix it with tonic water, which has a low pH, the gin’s color changesy. For example, gin infused with butterfly pea flowers can change from blue to a delicate purple or pink color, like this gin cocktail does. The way gin changes color makes for a fun party trick, and also represents Stevie Nicks’s versatility as an artist. Though she’s changed up her style and musicianship over the years, like gin, she’s never sacrificed quality.

Print

clock clock iconcutlery cutlery iconflag flag iconfolder folder iconinstagram instagram iconpinterest pinterest iconfacebook facebook iconprint print iconsquares squares iconheart heart iconheart solid heart solid icon
Two glasses with purple liquid inside are topped with little botanical pink flowers and lemon slices with smoke pouring over the cocktail.

Dreams Cocktail, Inspired by Stevie Nicks


  • Author: Sarah Cascone

Ingredients

Scale

For the Cocktail

  • 1 ½ oz Empress 1908 Gin, chilled
  • 3 oz tonic, chilled
  • ½ oz lime simple syrup, chilled (recipe below)
  • Garnish: Lime wheel, orchid flowers, and dry ice

For the Lime Simple Syrup

  • 1 cup sugar
  • ½ cup water
  • ½ cup fresh squeezed lime juice (4-5 limes, be sure to pick bright green limes without brown spots)


Instructions

For the Cocktail 

  1. Pour chilled gin into a coupe glass.
  2. Add in tonic slowly (this will change the color).
  3. Now add in lime simple syrup and stir with a bar spoon.
  4. Add a lime wheel to the glass rim and place an orchid against the side of the lime wheel inside the cocktail.
  5. Optional step: Using metal cocktail tongs, add in 1 to 2 small pieces of dry ice to get a bubbling smoke effect. Before enjoying, make sure the dry ice has completely melted or remove any remaining pieces.

For the Lime Simple Syrup

  1. Wash the outside of the limes under cool water.
  2. Juice the limes until you have ½ cup of juice.
  3. Set the lime halves aside as you will use them later.
  4. Place the sugar and water in a small saucepan. Add in the lime juice. Heat the syrup on medium-high heat, stirring until the sugar dissolves.
  5. Remove from the heat and add the juiced lime halves into the lime syrup.
  6. Cover the saucepan with a lid and let the limes steep for 1 hour.
  7. Strain the lime syrup into a container through fine mesh strainer. Let the limes drain and squeeze them to get as much juice out of them as possible.
  8. Let the syrup cool to room temperature, then pour it into a jar. The Lime Simple Syrup will keep in the refrigerator in a sealed container for up to 2 weeks or if you add a tablespoon of vodka or rum it will last longer.

Recipe by Sarah Cascone / Styling by Anna Calabrese / Photography by Dave Bryce / Story by Star Laliberte

Subscribe to TABLE Magazine‘s print edition

Summer Baby, a Low-Carb Cocktail Inspired by The Jonas Brothers

0
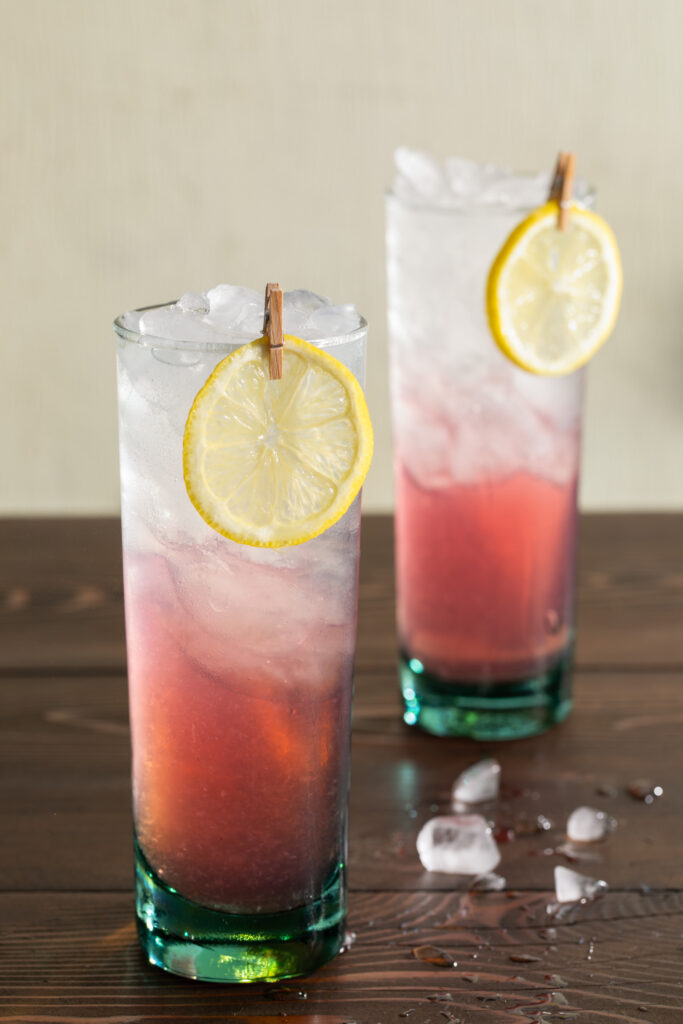
A wooden surface with 2 cocktails in green tinted collins glasses, garnished with a lemon wheel and a tiny clothespin.

Our Summer Baby, Low Carb Cocktail, inspired by the Jonas Brothers’ recent pop hit, is the 18th cocktail in our 2023 Summer Concert Series. An appropriate title for a cocktail that, like the song lyrics state, “feels like summer.”

Tips for Making a Low-Carb Cocktail

We’ve used a zero sugar version of sprite in this cocktail, so if you’re considering making a cocktail a little healthier, look for the no-sugar version of your favorite soda. Also, make sure you’re opting for spirits with no added sugars. Good choices include vodka, gin, tequila, rum, and whiskey. Instead of adding sugary components, consider infusing spirits with low-carb, delicious fruits like raspberries or blueberries. Or, use simple syrup with honey like we have. Low-carb doesn’t have to mean cutting out the fun!

Summer Baby, a Low-Carb Jonas Brothers Cocktail Recipe

Ingredients

Instructions

  1. Add crushed ice to your cocktail shaker.
  2. Pour in the vodkas, honey peach simple syrup, wicked blue, and citrus Mio.
  3. Shake vigorously until ice crystals form on the shaker.
  4. Pour into a Collins glass half filled with crushed ice and finish with zero sugar Sprite. Add your lemon wheel with a tiny clothespin. 

Honey Peach Simple Syrup

Ingredients

  • 2 cups water
  • 3 large peaches
  • ½ cup honey (can add more if you like it sweeter)

Instructions

  1. Cut the peaches, remove the pit, then dice the peaches into small cubes.
  2. In a small saucepan, add the water and diced peaches and bring to a soft boil.
  3. Remove from heat and add the honey.
  4. Allow mixture to steep, covered, for 20 to 30 minutes.
  5. Strain your syrup using a fine mesh strainer to remove all solids. Discard all solids.
  6. This Honey Peach Simple Syrup will keep in the refrigerator in a sealed container for up to 2 weeks or if you add a tablespoon of vodka or rum it will last longer.

Recipe by Sarah Cascone / Styling by Anna Calabrese / Photography by Dave Bryce

A footer photo with a black background and subscribe info and button

Subscribe to TABLE Magazine‘s print edition.

Green Chile Risotto

0
Green Chili Risotto Recipe with Green Chile Purée, Perfect Eggs, and Microgreens

Ask Chef Pablo Peñalosa Nájera (formerly of Bishop’s Lodge) about the ingredients for his signature Green Chile Risotto and the answer is simple: Hatch green chile, poblano, “perfect egg,” and mushrooms. But probe deeper and you’ll discover a huge amount of technique behind this Southwestern riff on a classic Italian risotto. Chef Pablo is from Mexico City and has worked in Colombia, Spain, and England and this immersion in other cultures and cuisines shows in his food. “I try to bring my own experience of traveling to this dish,” he says, and it shows.

How Are Green Chiles Different Than Red Chiles?

Green chiles and red chiles are usually, but not always, from the same chile pepper. Farmers just harvest green chiles at a different stage of ripeness than red chiles. Green chiles are simply the unripened version of the pepper. They tend to have a fresher, grassier, and sometimes more vegetal or slightly bitter flavor profile. When it comes to their heat level, it really depends on the variety of pepper but you’ll find them to be milder than red chiles. Plus, when you cook green chiles, they retain a firmer texture.

Print
clock clock iconcutlery cutlery iconflag flag iconfolder folder iconinstagram instagram iconpinterest pinterest iconfacebook facebook iconprint print iconsquares squares iconheart heart iconheart solid heart solid icon
Green Chili Risotto Recipe with Green Chile Purée, Perfect Eggs, and Microgreens

Green Chile Risotto


  • Author: Chef Pablo Peñalosa Nájera

Description

Learn how to make a green chile purée that you’ll want to use on top of everything.


Ingredients

Scale

For the green chile purée:

  • ½ lb fresh green chile
  • 1 small fresh poblano chile
  • 1 cup whipping cream
  • 2 ½ oz Parmesan cheese, grated

For the perfect egg:

  • 4 eggs

For the risotto:

  • 4 tbsp olive oil
  • 3 garlic cloves, peeled and minced
  • 1 shallot, diced
  • 2 ½ cups arborio rice
  • ¾ cup white wine
  • 8 ½ cups vegetable stock

For the garnish:

  • Burnt leek, optional*
  • Microgreens


Instructions

  1. To make the green chile purée, roast the green and poblano chiles, remove the skin and seeds, and cut them into 1-inch cubes. Heat the whipping cream and Parmesan, and cook over low heat for 20 minutes. Remove from the heat and purée the chiles and cream mixture in a blender or with a stick blender.
  2. To make the perfect eggs, set a thermal immersion circulator at 144 degrees and cook the eggs for 1 hour. Bring down the temperature to 126 degrees to keep the eggs warm until ready to serve. Or you can poach the eggs instead.
  3. To make the risotto, heat a saucepan, add the oil, and gently cook the garlic and shallot. Add the rice and cook for several minutes until the rice is translucent. Add the wine, let the alcohol evaporate, lower the temperature, and add the vegetable broth a bit at a time, allowing the rice to absorb the liquid. Cook until the rice is al dente.
  4. To plate, stir in the green chile purée. Divide the risotto between 4 plates or bowls, and garnish with eggs, microgreens, and burnt leek.

Notes

*Place a leek in the oven on high heat until it’s completely black. Pulverize it in a blender.

Recipe by Chef Pablo Peñalosa Nájera (formerly of Bishop’s Lodge)
Story and Styling by Julia Platt Leonard
Support from Alex Hanna
Photography by Kate Russell

Subscribe to TABLE Magazine’s print edition.
Salmon Poke with Yuzu

0
Exquisite Salmon Poke Infused with Yuzu, Truffled Yuzu Kosho Sauce, Spicy Avocado Purée, and Crispy Rice Cracker

Chef Dakota Weiss’s Salmon Poke with Yuzu is nothing less than a plate of delicious, edible art. The ingredients–from the wafer-thin slices of lotus root and Fresno chile, to the green pops of color from her avocado purée–create a dazzling display of contrasting yet complementary flavors and textures. Artfully arranged gold flake miso sesame cracker shards finish this dish off with the pièce de resistance. To drink? Chef Weiss suggests a dry Riesling or an Albariño as the perfect accompaniment to this work of art.

What is Yuzu?

You may have heard of Yuzu in Asian cooking but did you know it’s actually a fruit? This citrus fruit is native to East Asia. It’s sort of like a cross between a mandarin orange and a citron. Plus, it has a complex aroma that blends the tartness of lemon with the sweetness of mandarin and a hint of grapefruit. Its fragrant, zesty, and intensely flavorful, especially when used for its juice. Add this bright, citrusy burst to sauces, marinades, and desserts.

Print

clock clock iconcutlery cutlery iconflag flag iconfolder folder iconinstagram instagram iconpinterest pinterest iconfacebook facebook iconprint print iconsquares squares iconheart heart iconheart solid heart solid icon
Exquisite Salmon Poke Infused with Yuzu, Truffled Yuzu Kosho Sauce, Spicy Avocado Purée, and Crispy Rice Cracker

Salmon Poke with Yuzu


  • Author: Chef Dakota Weiss

Description

Salmon turns into a delicacy with the citrusy flavors of yuzu.


Ingredients

Scale

For the truffled yuzu kosho sauce:

  • ¼ cup yuzu kosho*
  • 1 cup rice vinegar
  • 1 cup yuzu juice
  • ½ cup mirin
  • ½ cup orange juice
  • 1 cup fish sauce
  • ½ cup truffle oil
  • 1 cup blended oil

For the spicy avocado purée:

  • 2 avocados, peeled and roughly chopped
  • ¼ cup lime juice
  • 1 small bunch cilantro
  • 2 ½ tsp salt
  • ½ a serrano chili, seeded
  • ¼ cup fish sauce

For the rice cracker:

  • 4 rice paper wraps
  • Black and white sesame seeds
  • Sea salt
  • Gold flakes

For the salmon poke:

  • 12 oz sushi grade salmon fillet, diced in ¾ x ¾-inch cubes
  • 1 lotus root, peeled and sliced thinly
  • 2 Fresno chiles, sliced thinly
  • 2 tbsp black and white sesame seeds
  • 4 green onions, sliced thinly
  • Salt
  • 1 cup black rice


Instructions

  1. For the truffled yuzu kosho sauce, purée ingredients in a blender until smooth.
  2. For the spicy avocado purée, purée ingredients in a blender until smooth.
  3. Cook the rice according to the package directions.
  4. For the rice cracker, fry the rice paper wraps in a deep-fat fryer for 30 seconds each side. Sprinkle with sesame seeds and salt. Before serving, break them and sprinkle on the gold dust.
  5. For the salmon poke, mix together the salmon, lotus root, Fresno chiles, sesame seeds, green onions, yuzu kosho sauce, and salt to taste.
  6. To plate, place small mounds of the cooked black rice in a half moon shape. Arrange the remaining ingredients. Add dollops of the avocado purée and then garnish with the crackers.

Notes

  • Yuzu kosho is a paste made from fermented chiles and the Japanese citrus fruit yuzu.

Recipe by Chef Dakota Weiss of Catch Santa Fe Poke
Story and Styling by Julia Platt Leonard
Support from Alex Hanna
Photography by Kate Russell

Subscribe to TABLE Magazine’s print edition.
Teriyaki-Glazed Grilled Octopus

0
Octopus Braised in a Symphony of Flavors with Sticky Rice, Wasabi Emulsion, Teriyaki Glaze, and Yuzu Aioli

Chef David Sellers’s Teriyaki-Glazed Grilled Octopus, like the food he serves at his restaurant Horno, is all about contrasts. Here, there is richness from the teriyaki, balanced by the acidity from the yuzu and heat from the wasabi. To drink, Chef Sellers suggests L’Escale, a Sauvignon blanc from the Loire Valley. It’s juicy, fresh and can hold its own with this dish. Treat yourself on a special evening and be sure to take your time plating. How you present your food can truly make all the difference.

What is Furikake Spice?

Furikake spice is a mixture of nori seaweed, sesame, chile, and other delicious things and is available in most Asian markets. It is a savory Japanese seasoning blend that adds a burst of flavor and texture to our Teriyaki-Glazed Grilled Octopus. The combination of salty, savory, and slightly sweet flavors makes it unlike any American seasoning you can find. You can find many different varieties of furikake and each carries a special element. Some may include dried fish, bonito flakes, vegetables, garlic powder, and red pepper flakes to name a few.

Print

clock clock iconcutlery cutlery iconflag flag iconfolder folder iconinstagram instagram iconpinterest pinterest iconfacebook facebook iconprint print iconsquares squares iconheart heart iconheart solid heart solid icon
Octopus Braised in a Symphony of Flavors with Sticky Rice, Wasabi Emulsion, Teriyaki Glaze, and Yuzu Aioli

Teriyaki-Glazed Grilled Octopus


  • Author: Chef David Sellers

Description

If you want to learn to create an elevated meal, here’s where to start.


Ingredients

Scale

For the octopus braise:

  • ¼ cup canola oil
  • 1 onion, chopped
  • 1 carrot, chopped
  • 3 ribs celery, chopped
  • 5 cloves garlic, peeled and sliced
  • 1 cup white wine
  • 3 lemons, sliced in half
  • 4 bay leaves
  • 3 sprigs fresh thyme
  • Kosher salt
  • 3 ½4 lb octopus

For the sticky rice:

  • 1 cup sushi rice or similar short grain Southeast Asian rice variety
  • ½ cup rice wine vinegar
  • ¼ cup sugar
  • 1 bunch green onion, sliced

For the wasabi emulsion:

  • ½ cup wasabi powder
  • ¼ cup rice wine vinegar
  • ¼ cup granulated sugar
  • ½ cup canola oil

For the teriyaki glaze:

  • 1 cup soy sauce
  • ½ cup orange juice
  • Juice of 3 limes
  • ¼ cup sugar
  • 3 tbsp cornstarch

For the yuzu aoili:

  • 3 egg yolks
  • 2 tbsp yuzu juice
  • 1 cup canola oil
  • Pinch salt

For garnish:

  • Furikake spice


Instructions

  1. Warm the canola oil in a small roasting dish or pot large enough to hold the octopus. Over medium heat, sauté the onion, carrot, celery, and garlic in the oil until translucent.
  2. Deglaze with white wine and add the lemons, bay leaves, thyme, and season with salt. Add 4 cups water, bring to a simmer, and cook for 20 minutes. Turn the heat down to low and add the whole octopus. Cook covered in a 225-degree oven for one hour 45 minutes. Check for tenderness, if not quite ready give it another 15 minutes.
  3. Remove the octopus from the liquid and cool in a refrigerator until completely cold. Cut off the head and discard. Slice off the legs individually.
  4. To make the rice, bring the sushi rice to a simmer in 1 ½ cups of water, cover, and cook until just tender. Turn rice out into a bowl.
  5. In a small saucepan combine the rice wine vinegar, sugar, and green onion and simmer until sugar is completely dissolved. Season with a pinch of salt. Mix gently with rice and set aside.
  6. To make the wasabi emulsion, combine the wasabi powder, rice wine vinegar, sugar, and ¼ cup water. Stir until mixed and the sugar dissolves. Let rest for 15 minutes then whisk in the oil until emulsified.
  7. To make the teriyaki glaze, combine the soy sauce, orange juice, lime juice, and sugar in a small saucepan; simmer until the sugar is dissolved. Mix cornstarch with a small amount of water and whisk into the mixture. The sauce should thicken enough to coat the back of a spoon. Simmer for 2 or 3 minutes and let cool completely.
  8. To make the yuzu aioli, combine egg yolks and yuzu juice in a food processor. Turn the food processor on high and slowly add the canola oil until well incorporated. It should resemble a mayonnaise. Season with salt to taste.
  9. Brush the octopus pieces with oil and season with salt and pepper. Cook on a hot grill until slightly charred all over. Slice the octopus into pieces.
  10. To plate, smear a dollop of the yuzu aioli on six plates. Divide the rice among 6 plates, and place the octopus on top of and around the rice. Spoon wasabi emulsion and teriyaki glaze on and around the octopus. Sprinkle furikake spice over the middle of each dish to your liking.


Recipe by Chef David Sellers of Horno
Story and Styling by Julia Platt Leonard
Support from Alex Hanna
Photography by Kate Russell

Subscribe to TABLE Magazine’s print edition.
Create a free account, or log in.

Gain access to read this content, plus limited free content.

Yes! I would like to receive new content and updates.

Table Magazine wants to know your location.

TABLE Magazine operates regional sites - Knowing your location helps us route you to the appropriate site for the best experience.