A refreshing riff on the classic Venetian spritz, Lo Spritz alla Veneta swaps Aperol’s sweetness for the herbaceous depth of Cynar, an artichoke-based amaro beloved in Northern Italy. Light, bittersweet, and endlessly sippable, this Lo Spritz alla Veneta pairs perfectly with golden hour and a bowl of olives.
What is a Classic Venetian Spritz?
A classic Venetian spritz (often just called a Spritz in Italy) is a light, bubbly aperitivo cocktail. It originates in Venice and the Veneto region of Northern Italy. It’s known for its refreshing character and low alcohol content, making it ideal for sipping in the early evening.
Chef Roger Li’s version of this traditional Chinese dumpling comes with with ground pork and shrimp, ginger and mirin. Choose your own dipping sauce for your Pork & Shrimp Shumai — we’re partial to fiery chili oils — and you’ve got a restaurant-worthy meal ready for dinner.
What is Shumai?
Shumai (or sometimes seen as siu mai) comes in a distinct cylindrical shape with an open top. You’ll at times find a small garnish of fish roe or a pea on top as well. The dumpling’s delicate, pleated wrapper is full of a savory mixture of finely minced pork, shrimp, or a combination of the two, plus ingredients like ginger, scallions, and shiitake mushrooms for seasoning. To cook this delicacy, you’ll want to steam Shumai dumplings only. This gives the wrapper a soft, tender texture and keeps the filling moist and juicy. It is a staple of dim sum cuisine across China, Hong Kong, and in Chinese restaurants worldwide.
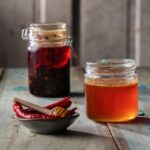
If you’ve ever indulged in the taste of Hot Honey, you know the addictiveness of silky smooth sweetness followed by a wave of heat. There’s only one thing that could make this delectable topping even better; crafting it right in your own kitchen and even saving a buck or two.
The Hot Honey trend really comes from the establishment of Mike’s Hot Honey in 2010. Prior to creating his own recipe, Mike Kurtz was traveling in Brazil when he came across the concoction in a pizzeria. After trying it on his pizza, he went back to Brooklyn to work on his own Hot Honey recipe, eventually bringing it to Paulie Gee’s. The Hot Honey craze that shows no sign of stopping.
A Hot Toddy is the perfect fall or winter drink for winding down and cozying up to the cool air. The combination of warm whiskey, sweet honey, and tangy lemon is familiar and nostalgic. But, what if we upgraded it all with a hint of spice? Our Hot Honey Hot Toddy substitutes regular honey for hot honey. This recipe sends out a short wave of heat over you, adding a special nuance to this cocktail. Serve it along with a thrilling mystery novel, a blazing fireplace, and your favorite blanket.
How Does a Hot Toddy Help a Sore Throat?
The Hot Toddy is actually a remedy for many ailments since different ingredients effect the body in different ways. The hot water generates steam that can help to clear sinus congestion (much like tea) and provide some instant relief to a sore throat. The honey also acts as a natural demulcent, coating the throat and soothing the itchiness. Lemon juice also gives the body a boost of vitamin C and acidity that helps to cut through mucus. Finally, it’s no secret that whiskey can take your pain away. Its effect is almost that of a mild antiseptic, numbing the site slightly.
Pour water, whiskey, hot honey, and lemon juice into a mug and stir until honey is dissolved. You can add 1 more teaspoon of hot honey or 1 more teaspoon of lemon juice if desired.
Use lemon round on rim and cinnamon stick in glass for garnish.
Recipe by Ethan Chmura, Adapted from Cookie and Kate Styling by Keith Recker Photography by Dave Bryce
While honoring the timeless combination of tender asparagus and sweet leeks, this recipe also uses rich, nutty Jarlsberg cheese. This produces a distinctly savory and satisfying flavor that you look for in a brunch item. The buttery, flaky crust and creamy filling produce make it a sophisticated centerpiece for any celebratory brunch or a light, yet indulgent, dinner.
Your brunch takes a delicious turn with a quiche inspired by Martha Stewart.
Ingredients
Scale
For the crust:
1 1/4 cups all-purpose flour (spooned and leveled), plus more for rolling dough
1/2 tsp salt
1/2 tsp sugar
8 tbsp (1 stick) cold unsalted butter, cut into pieces
2 tbsp ice water, plus 2 more, if needed
For the quiche:
2 tbsp butter
3 cloves of garlic, finely chopped
1/2 cup thinly sliced shallots
1 leek (white and light green parts only), halved and thinly sliced, then well washed (about 1 1/2 cups)
1 bunch (1 lb) asparagus, tough ends removed, thinly sliced on the diagonal
1 tbsp chopped chives
1 tbsp chopped thyme
Ground nutmeg
Salt and ground pepper to taste
4 large eggs
1 ¼ cups heavy cream
1 cup shredded Jarlsberg cheese (4 oz)
Instructions
For the crust (store bought pie crust can be substituted):
In a food processor, pulse the flour, sugar, and salt together.
Add the butter and pulse until the mixture becomes coarse with only a few small pea sized pieces left.
Place in 2 tablespoons of the ice water and pulse, adding the additional water 1 tablespoon at a time as needed for the dough to just come together when pressed.
Place the dough onto a work surface, gently pressing the dough to form a ¾ inch disk. Do not overwork the dough. Wrap in saran wrap and place in the refrigerator for at least an hour to chill.
Once ready to bake, place the dough on floured wax paper. Roll out the dough into a 14” round, dusting with additional flour as needed. Gently transfer the dough to a 9” pie dish, pressing the dough to fit the bottom and sides.
Trim the edges leaving a 1-inch overhang. Pinch the sides to crimp the edges of the crust.
For the quiche:
Preheat the oven to 350 degrees.
Heat a large skillet or other flat bottomed pan. Place in the butter. Once melted, add the finely chopped garlic, followed immediately by the shallots. Stir and saute until fragrant.
Next, place in the prepared leeks and asparagus and stir to combine. Sprinkle in the chopped chives and thyme, followed by the nutmeg, salt, and pepper. Stir and cook until the asparagus is tender yet still retains its crispiness.
In a large bowl, whisk together the eggs with the heavy cream and season with a little salt and pepper. (Be careful to not overseason with salt as the vegetables have salt also.)
Place the crust lined pie dish on a rimmed baking sheet. Place in the asparagus leek mixture, spreading evenly. Sprinkle on the Jarlsberg cheese. Then pour the egg mixture on top.
Place in the lower lack of the preheated oven and bake for 30 minutes. Rotate the baking sheet and bake for an additional 20-30 minutes or until the center of the quiche is set.
Remove from the oven and cool on a cooling rack for at least 15 minutes before serving.
Recipe and Styling by Veda Sankaran Photography by Dave Bryce
Martha Stewart knows how to use a slow cooker, and her Tom Kha Gai recipe proves it. Many versions of this soup are made on the stovetop. In this version, however, the slow cooker deepens the flavors. Aromatic lemongrass and kaffir lime leaves fully infuse the broth over a longer cooking time. This patient preparation results in a soup with exceptionally tender chicken as well as a complex, aromatic broth that will transport your taste buds directly to Thailand.
One of Veda Sankaran’s modifications to Martha’s recipes involves heat! Thai cooking embraces the spicy side of life, and Veda’s ingredient list allows for more of that deliciousness to reach your taste buds.
What is Tom Kha Gai?
Tom Kha Gai originates in Thailand as a creamy coconut soup. Much like other Thai cuisine, this soup’s flavor comes from a wonderful layering of ingredients. The name Tom Kha Gai translates to “galangal chicken soup.” The main flavors in the broth include galangal (similar to ginger), lemongrass, and kaffir lime leaves. The soup is also full of chicken, mushrooms, and other vegetables like carrot and scallion, all of which simmer in the coconut broth. While it shares some similarities with Tom Yum soup, Tom Kha Gai is milder and creamier due to the coconut milk.
1/4 cup chopped fresh cilantro plus more for garnish
2 tbsp chopped Thai basil, plus more leaves for garnish
1 scallion, thinly sliced
Chili oil sauce, for serving
Instructions
Prepare lemongrass stalks, then use a mortar and pestle to lightly smash the lemongrass pieces.
Place all the ingredients from lemongrass to mushrooms in a slow cooker. Cover and cook on low heat for 5 hours or on high heat for 2 1/2 hours.
Uncover, add the coconut milk and carrot slices. Stir and cover, cooking for an additional 1 hour on low or 30 minutes on high. Uncover again, and stir in the lime juice, cilantro, thai basil, and scallions.
Serve with additional sides like cilantro, basil, lime wedges, and chili oil. Can be eaten as a soup or over jasmine rice.
Recipe and Styling by Veda Sankaran Photography by Dave Bryce
A star baker, Martha Stewart’s recipes have brought deliciousness into homes for decades now. Veda Sankaran could not help but hop on the Martha Stewart train herself with Martha-inspired Soft and Chewy Chocolate Chip Cookies.
Part of Veda’s exploration of this recipe involved a question: what if rich chocolate is not what you’re craving? Her White Chocolate Strawberry version which is Veda’s own little spin on Martha’s recipe. These cookies utilize white chocolate chips and freeze-dried strawberries for a mixture of fruity sweetness. Or, make a batch of both and let fate decide which bite of tastiness you try.
What Makes These Chocolate Chip Cookies so Soft and Chewy?
For those of you who crave a chewy cookie more than a crisp one, you’ll love the way this recipe keeps cookies on the soft side. It’s really thanks to the quantity of brown sugar in the recipe. Since these cookies use twice the amount of brown sugar and less butter than usual, they have an irresistible texture. They’re also perfect for the tender palates of any wee kids or grandkids wandering about the house!
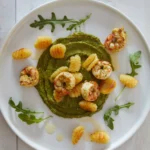
Gnocchi with Arugula Pesto and Shrimp is a dish that proves comfort food doesn’t have to be predictable. It begins with pillowy-soft gnocchi—light yet satisfying—which are pan-seared in clarified butter until golden and slightly crisp on the outside. Skip the traditional basil-Parmesan pesto. This version takes a bold detour with peppery arugula, earthy walnuts, and nutty, melty Gruyère. The result is a vibrant green pesto that’s richer and more complex, yet still fresh and herbaceous.
Argentinian red shrimp, known for their natural sweetness and delicate texture, are lightly tossed with the pesto and seared just until tender. A squeeze of lemon and a pinch of gochugaru (Korean chili flakes). Together, they brighten the whole dish, adding subtle citrus and a flicker of heat that keeps every bite interesting.
This dish strikes the perfect balance between casual and elevated. It’s a weeknight dinner that feels like a restaurant indulgence — unexpected, elegant, and absolutely delicious.
A dish that brings bold, peppery greens and sweet, succulent shrimp together in a deeply satisfying way.
Ingredients
Scale
1 package gnocchi
Clarified butter
½ lb Argentinian red shrimp
2 cups packed arugula leaves
⅓ cup walnuts
2 cloves of garlic
Juice of ½ lemon
¾ tsp gochugaru or other red chili flakes
1 cup grated gruyere cheese
⅓ cup olive oil
Salt
Instructions
To make the pesto, place the arugula leaves, walnuts, garlic, lemon juice, red chili flakes, gruyere cheese, olive oil, and a little salt into a small blender container. Blend in pulses until smooth. Taste and adjust salt as necessary.
Make the gnocchi according to the package directions. Once cooked, heat a skillet and add clarified butter to coat the bottom. Lightly sauté the gnocchi and remove.
Add about 1 ½ tablespoons of the pesto to the shrimp and stir to coat. Add a little more clarified butter to the skillet and cook the shrimp for about 2-3 minutes on each side.
To plate, either place a dollop of pesto on the center of your plate and top with the gnocchi and shrimp or toss the gnocchi with the pesto and serve with the shrimp.
Notes
Pesto is usually made with Parmesan cheese, but this pesto uses Gruyére, definitely non-traditional.
In the province of Limburg, a dark syrup made from organic, heirloom varieties of apples and pears sweetens the long winter days to come. It’s quite a process, with 1200 pounds of fruit yielding 140 pounds syrup after many hours cooking over a wood fire in a copper kettle. You can find a jar of real Dutch appelstroop online…and make a fantastic stew with it! Bon appetite! Simple ingredients, slow cooking, and cozy vibes all in one dish.
Preheat the oven to 350 degrees. Dice the onions and set aside. Cut the meat into 1-inch chunks and sprinkle with salt, pepper, and flour.
Melt the butter in a large casserole on a medium heat. Brown the meat on all sides.
Add the onion and sauté for another two minutes. Add the bay leaves, oregano, beef stock, sundried tomatoes and finally the dark beer. Place the covered casserole in the preheated oven for 1½ hour. Brush some olive oil on the garlic head and place as well in the oven.
Take it out after an hour or when it becomes soft. Cut the top off and squeeze the softened garlic into a bowl.
Mash with the Apple Pear Syrup. Add this to the stew.
Leave in the oven for at least another hour. Serve the beef with French fries.
Recipe and Food Styling by Ingmar Niezen Story and Prop Styling by Marian Flint Photography by Maarten Vanderwal
There are two ways to identify a perfect summer cocktail: the fizziness factor and simplicity. Our take on traditional Ranch Water, dubbed Bet the Ranch, embodies both of these principles with an added splash of zest and tartness underscored by the beauty of a young Blanco tequila.
What is Ranch Water?
Ranch Water is a classic West Texas cocktail that’s as unfussy as it is refreshing. Made with just three ingredients — blanco tequila, freshly squeezed lime juice, and Topo Chico mineral water. It’s a light, bubbly drink that’s perfect for hot weather or anytime you want something crisp and clean. Unlike a margarita, Ranch Water skips the sugary mixers and goes for a more stripped-down, citrusy profile. The drink’s hallmark is its effervescence, thanks to Topo Chico’s famously strong carbonation. This gives it a satisfying fizz and a touch of minerality. Traditionally served in a tall glass over ice, Ranch Water is beloved for its simplicity, low sugar content, and thirst-quenching appeal.
Our take on traditional Ranch Water adds a splash of zest and tartness underscored by the beauty of a Blanco tequila.
Ingredients
Scale
3 ounce, Blanco tequila
3 ounce, Topo Chico
1/2 ounce fresh lime juice
1/2 ounce fresh grapefruit juice
Fresh lime wedge for garnish
Tajin Classic Seasoning to salt the glass rim (optional)
Fresh jalapeno slice for garnish (optional)
Instructions
Season, if preferred, a high ball glass rim with Tajin. Fill glass with ice. Add tequila, Topo Chico, lime juice, and grapefruit juice. Stir gently. Garnish and enjoy!