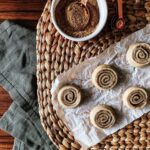
I love cinnamon rolls as much as the next person (maybe even more), but yeasted dough can take a fair bit of work and preparation in advance. I wanted to take the flavors of a cinnamon roll and the beautiful swirl pattern and turn it into a cookie — like a sugar cookie and a cinnamon roll had a delicious baby! This way there’s no more deciding between which to snack on for Christmas morning. Instead, you can bite into a cookie that’s crunchy but carries the same look and flavor profile as a cinnamon roll.
Can I Use Pre-Made Sugar Cookie Dough?
While you may worry that using store-bought, pre-made sugar cookie dough could ruin the flavor of this recipe, it’ll only make the process easier. As long as you use the correct steps to roll out the pre-made dough, there is no reason why a stop at the store can’t take over the usual labor of monotonous baking. Place slightly chilled (you don’t want it to be too cold) cookie dough between the two pieces of parchment paper and form the dough into rectangle using your hands. Using a rolling pin, start at the center and then slowly begin to roll the dough away from your body, You’ll want to continue rotating the dough 90 degrees every few rolls to ensure an even thickness.
Saying Guilt Free Peanut Butter Cups might seem too good to be true. But, prepare to indulge your sweet tooth without the guilt! These little cups are a healthier take on a classic treat. Made with wholesome ingredients like chia seeds and even sugar-free peanut butter, these decadent bites offer a satisfyingly rich chocolate flavor with a touch of sweetness. Perfect for a healthier snack or a guilt-free dessert, these Peanut Butter Cups are sure to become a new favorite. You’ll be pleasantly surprised to just how delicious gluten-free and sugar-free can be.
What is Allulose?
Allulose is a rare sugar that offers several advantages over traditional sweeteners, hence why we use it in this recipe. With a sweetness level similar to sucrose but minimal impact on blood sugar levels, allulose provides a low-calorie option for those watching their weight or managing diabetes. It also has a minimal effect on insulin levels and is not readily absorbed by the body, making it more digestion-friendly as well. Allulose is great for baking as it browns and caramelizes similarly to sugar, adding versatility to its application.
Let your sweet tooth thrive without an abundance of sugar loaded treats.
Ingredients
Scale
1 cup sugar free peanut butter
2 tbsp chia seeds
3 tbsp hemp hearts
4 tbsp Allulose (or your favorite alternative sweetener such as monk fruit or stevia)
1 – 9 oz. bag of dark chocolate chips
Smoked sea salt for garnishing
12 large baking cups or 24 small baking cups
Instructions
Place all filling ingredients in a bowl and mix together with a spoon until everything is evenly incorporated
Place chocolate chips in a double boiler and slowly melt
Line each baking cup with 2 tsp. of the melted chocolate. Be sure to push the melted chocolate up the sides of each cup 1⁄2 inch so the filling has a little cup to sit in.
Chill until chocolate sets.
Place 1 tablespoon of the filling in each cup.
Tap each cup on the counter so the filling flattens and spreads out a little bit -Cover each cup with more chocolate to completely cover the filling.
Sprinkle with smoked sea salt and then chill in refrigerator or let chocolate harden on the counter overnight.
Notes
They can be left at room temperature for up to 1 week or in the refrigerator/freezer for one month.
These cups are gluten and sugar-free and loaded with protein for the addition of hemp and chia seeds.
Recipe and Styling by Anna Franklin
Photography by Dave Bryce
The Peep. People either love it or hate it. There seems to be no in between. And, for those who partake in a little Easter Peep marshmallow indulgence, one must then decide, “To eat them fresh, or to eat them stale?” That is the question. Go team stale! However you like them, this orange cardamom recipe is a fun baking project that will win even the hardest of hearts over to enjoying the Peeps.
How We Stopped Worrying and Learned to Love the Peeps
This orange cardamom recipe is a minor attempt at winning over the TABLE team to team Peep in general. There’s not a lot of marshmallow lovers around here, let alone the embracing of cute little chick and bunny shaped marshmallows coated in colored sugars. Enter Orange Cardamom Peep Crispy Treats. This recipe gives a little grown up flavor to an otherwise ultra-colorful, childish-looking treat by adding the fresh flavors of orange and the herbaceous warmth of cardamom. Kids will love them, and you may find yourself craving them, too. Still skeptical about these icons of 20h century American food culture? Don’t knock ‘em till you try ‘em.
Place 1 1/2 TBSP of butter into a medium sauce pan over a medium heat.
When the butter is just melted, add 1/2 tsp of ground cardamom, 1/2 tsp of orange extract, and one color of your Peeps.
Stir continuously until the Peeps are almost completely melted.
Remove from heat and continue stirring. If you would like to intensify the color, you can add a few drops of food coloring. Note: the cardamom does alter the color slightly, so if you want the colors to be vibrant, do add food coloring. I prefer gel food coloring.
Pour in 1 1/2 cups of Rice Krispies Cereal and stir to coat.
Transfer to your greased pan. You can spread evenly in the pan and layer the next three colors. or if you move quickly enough you’ll be able to incorporate the colors into more of a tie-dye pattern being careful not to blend the colors together.
Repeat steps 3-8 with each of the three remaining colors.
Let cool for at least an hour before cutting into squares.
Recipe and Story by Star Laliberte
Styling by Keith Recker Photography by Dave Bryce
Use two childhood favorites, Jolly Ranchers and Marshmallow Peeps, to create a colorful variety of simple, vibrant adult beverages we call the Peep-a-tini. The jury is still out with the TABLE team when it comes to eating peeps, but this is undeniably a great way to utilize the nostalgic, sugar-coated, polarizing, marshmallow peep.
The History of Peeps
For a deep dive on the history of peeps, you can read Rest in Peeps! But, the brief version is this. Peeps come from Pennsylvania’s Lehigh Valley, where Ira Born was developed machinery to automate the making of shaped marshmallows. From there, he created Peeps, little chicks with smiling faces. Who could hate that? But according to a FinanceBuzz study, Americans disagree on Peeps marshmallow candies: 25% love them and 16% hate them. Our Peep-a-tini celebrates their colorful quirkiness and unique (if polarizing) flavor.
This Parfait Amour Gulab cocktail is inspired by the Indian dessert Gulab Jamun.
This Parfait Amour Gulab cocktail was inspired by the Indian dessert Gulab Jamun. Gulab means “rose” in Hindi, and the dessert is a delicate pastry that is sweetened with rose and honey. The grenadine and Parfait Amour bring out the sweetness, and the neutral base of the vodka as a background really helps to highlight the floral essence.
The first bright days. The first long evenings. Maybe even the first dinner outside on the porch. The luxurious feeling of soft, warm air and light breezes, and the smells of trees and flowers coming alive after their long sleep. This delicious, silky, chocolate mousse pie topped with mint whipped cream is perfect for springtime. TABLE Magazine contributor Rhonda Schuldt shows us how!
That lovely combination of sweet chocolate and refreshing mint.
Ingredients
Scale
For the dough:
2 1/2 cups all-purpose flour
1 cup cold butter, cubed
¼ tsp salt
1/2 cup ice water (more if needed)
For the filling:
6 oz semi-sweet chocolate
6 oz bittersweet chocolate
1 tsp vanilla extract
1/8 tsp salt
3 cups heavy whipping cream, chilled
¼ cup confectioners’ sugar
For the mint whipped cream:
2 cups cream
¼ cup confectioners’ sugar
½ tbsp mint extract
Instructions
For the pie dough:
In a food processor, pulse flour, cubed butter, and salt until ingredients form pea-size crumbs.
Add cold water one or two tablespoons at a time until dough comes together. Remove and form into a ball, then wrap and cool in fridge.
On a floured surface, roll the dough into a circular shape about ¼-inch thick, and transfer to a pie tin or torte pan.
For the filling:
Place chocolate, vanilla, and salt in a food processor fitted with metal blade. Place 1 cup of the cream into a 2-cup heatproof glass measuring cup, place in the microwave, and bring to a boil (approx. 60 seconds). With the lid on the processor, and the processor running, slowly and carefully pour in the hot cream. Process until chocolate is melted and smooth.
Transfer melted chocolate into a large mixing bowl and let cool, stirring occasionally.
Once cool, place the sugar and remaining 2 cups of the chilled cream into a bowl. Whisk into stiff peaks. In batches, gently fold the whipped cream into the chocolate mixture.
Pour into crust and chill for at least 6 hours or until set.
Top with mint whipped cream.
For the mint whipped cream:
Whip all on high into stiff peaks and pipe on top of chocolate pie.
Recipe and Story by Rhonda Schuldt
Photography by Erin Kelly
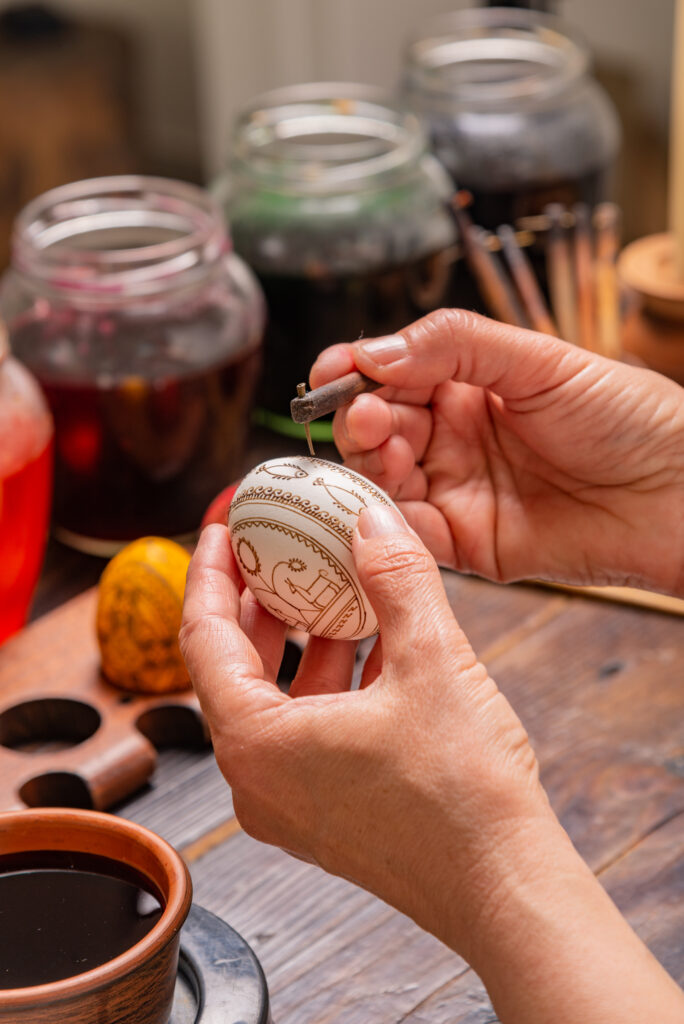
Artist Lesia Pona remembers Easter mornings during her childhood in Lviv, Ukraine, linking arms with her mother, and holding a basket filled with pasqua (Easter bread) and “newly written” pysanky, waiting to be exchanged outside church to see which egg was “brighter, colorful, and more detailed … [a memory] so very sweet.”
The Art of Pysanky
Pysanky––wax-painted Ukrainian Easter eggs––comes from the word pysanty meaning “to write.” Dating back to ancient times, Lesia says, “Our ancestors believed that the fate of the world depends upon the pysankas. As long as the egg decorating continues, the world will exist. With the advent of Christianity, the symbolism … changed to represent not the rebirth of nature, but the rebirth of man.”
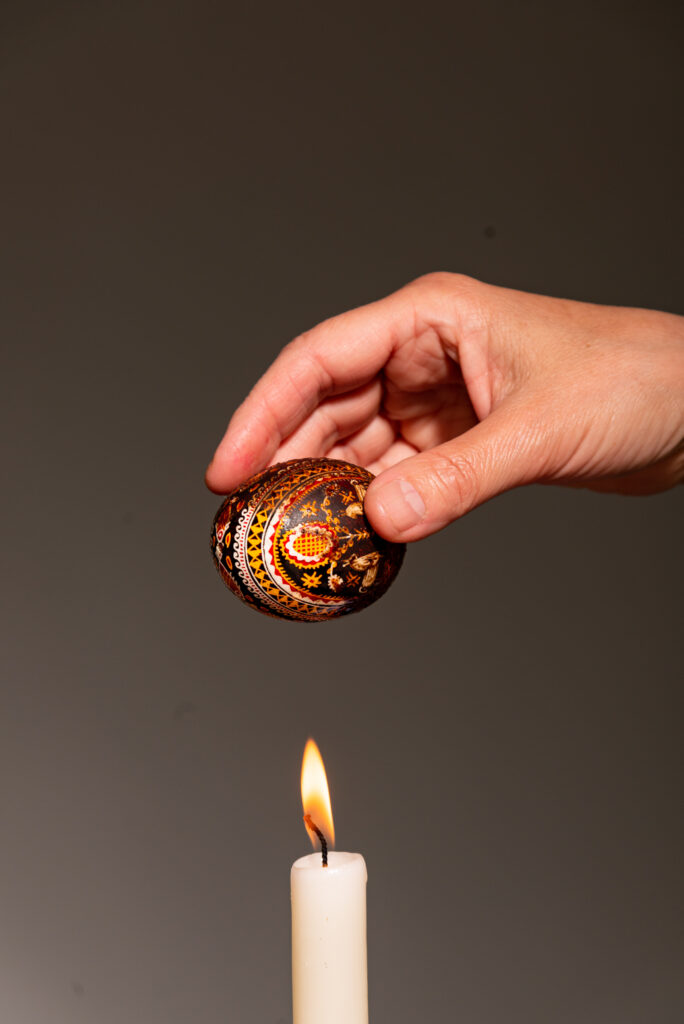
Step 1: Painting with the hot wax. A pysanka is “written” with a pysak, or stylus using beeswax melted over a hot flame.
Traditional colors used to paint the eggs are yellow, red, orange, and green on a dark brown or black background. Typical symbols are “written” in the Pokuttya region where Lesia lives and works are spirals, representing life and death; birds and other animals (spring); and dots, which “once represented stars, but became symbols of the tears of the blessed Virgin.” Before Christianity came to Ukraine, pysanky were believed to bring good luck and fortune to the homes where they were created and received, possessing talismanic powers.
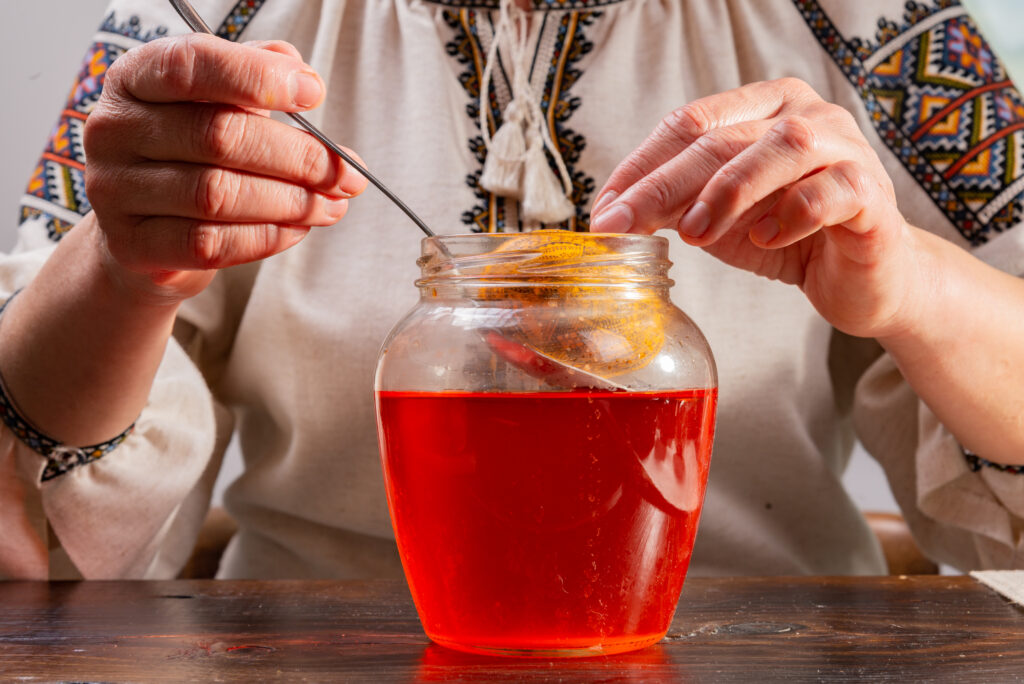
Step 2: The dyeing process. Lesia says, “Today artists mostly use aniline dyes, but sometimes also natural ones made from local plants. Natural dyes have better color saturation and light-fastness.”
How to Make Pysanky
Painting a pysanka involves a wax-resistant method using a pysak or stylus made out of a thin brass piece wrapped around a needle, forming a hollow cone. The pysak is then attached to a small stick with a wire. Next, beeswax is scooped into the pysak and heated over a candle flame (or more commonly now, an electric heater), melting the wax for the designs to be created.
Step 3: The wax is then removed over a candle flame. If kept away from direct sunlight, a pysanka can last for years.
Lesia stresses that this is the most important moment. “The first contours determine the future pattern,” she said. “It is often divided into a number of vertical, horizontal or diagonal stripes. Depending on the option they can create a variety of combinations.” The egg is dyed and more wax applied. In the final step the wax is removed “by holding the egg next to the candle flame, and it’s really kind of magic––when one can see through the disappearing wax [and find a] beautiful, bright ornament.”
Story by Lesia Pona with Lisa Toboz Photography by Dave Bryce
Spring is full of new possibilities with overnight stays and weekend escapes as The Landing Hotel recently opened next to Rivers Casino Pittsburgh. Guests will enjoy 24/7 casino gaming with stellar live entertainment offerings you won’t find anywhere else.
The Landing Hotel
The Landing Hotel
The Landing Hotel Pittsburgh is centrally located along Pittsburgh’s North Shore, down the street from Acrisure Stadium and PNC Park, and just steps away from the North Shore T-station.
The casino’s much anticipated, seven-story hotel addition includes 210 guest rooms and attaches to the existing casino on the east façade, facing Carnegie Science Center and overlooking the Ohio River—with access to the Monongahela Walking Trail.
Making optimal use of its riverfront location, The Landing Hotel features expansive windows on every level with panoramic views of the riverfront, Mt. Washington and Pittsburgh’s famous skyline. Included among the guest rooms are 10 luxury terrace suites, each with private first-floor patios. A contemporary interior and exterior design, consistent with Rivers Casino’s upscale urban aesthetic, integrates beautifully with other North Shore venues.
Having a hotel fulfills the promise of an integrated destination-style casino, making Rivers Casino and The Landing Hotel an ideal choice for weekend getaways, business travelers, wedding parties, conventions and expos, concert goers and sports fans alike.
Live Entertainment
In addition to live bands and DJs every week in Drum Bar, the BetRivers Sportsbook, and Martorano’s Prime, Rivers Casino is welcoming two top-notch acts in April and May.
Skid Row and Warrant
Skid Row and Warrant, best known for their respective hits “Youth Gone Wild” and “Cherry Pie” are teaming up to bring their joint upbeat rock-n-roll show “The Gang’s All Here” to Rivers Casino Pittsburgh on Friday, April 14, 2023, at 7 p.m. Tickets start at $29 and are on sale now.
New Jersey based rockers Skid Row arrived on the scene in the late-1980s during the hard rock craze and quickly became a predominant force in the genre. Their youth, ambition, and knack for writing catchy songs helped attract a worldwide following. Since their debut album, Skid Row has generated multi-platinum success and massive radio hits including “18 and Life,” “Monkey Business,” “I Remember You,” and “Youth Gone Wild.” Skid Row’s career has taken them from their humble beginnings to selling millions of tickets and headlining festivals all over the world.
At its core, Warrant is an American rock band through and through. Hitting it big in 1989, the Hollywood, CA based band rose through the ranks of the local Sunset Strip scene to the level of multi platinum selling, chart-topping success. The band first came into the national spotlight with their debut album Dirty Rotten Filthy Stinking Rich. This album produced radio and MTV chart toppers “Down Boys,” “Sometimes She Cries,” and the massive hit “Heaven” which reached #1 in Rolling Stone and #2 on the Billboard Hot 100 for two weeks in a row.
The Landing Hotel
Australia’s Thunder From Down Under
The sizzling male revue named “Best Male Strip Show” by the Las Vegas Review Journal brings their world-class show to Rivers Casino Pittsburgh on Friday, May 5, and Saturday, May 6. Showtime for both performances is 7 p.m., and tickets start at $20.
The internationally acclaimed show that has appeared on the famed Las Vegas Strip for the past 20 years, takes male revues to a new level of excitement and is “eye candy” for women of all ages who can transform fantasy into reality with the blink of an eye or unbuttoning of a shirt! Dynamic dance routines, gymnastics, break dancing, colorful costumes, humor and hard bodies all add up to Thunder From Down Under being a fun, unique experience.
Spicy Sausage and Greens soup is a tantalizing, nutritious soup perfect for any time of year. Don’t let the short list of ingredients fool you. This delicious recipe is packed full of flavor.
Spicy Sausage and Greens Soup Recipe
INGREDIENTS
1 lb. Parma brand loose hot sausage
1 jar Labriola’s tomato sauce
1 small head escarole, chopped
6 cups fresh spinach, chopped
4-5 medium gold potatoes, peeled and diced
4 cloves garlic, minced
3 quarts mushroom broth
Salt and pepper to taste
INSTRUCTIONS
In a large stock pot, brown sausage until there is no pink left.
Add onion, and garlic and cook until tender
Add tomato sauce, mushroom stock, greens and potatoes. Simmer until potatoes are tender and the leaves are wilted
Serve with shredded cheese\ sausage until there is no pink left.
Add onion, and garlic and cook until tender
Add tomato sauce, mushroom stock, greens and potatoes. Simmer until potatoes are tender and the leaves are wilted
Serve with shredded cheese
Recipe and Styling by Anna Franklin / Photography by Dave Bryce
Curing food with salt is as old a technique as cooking itself and actually ends up making egg yolks even more delicious. By drawing out moisture, these quick cured egg yolks become dense and firm. The result is almost like a jelly and enhances the complex flavor of egg yolks. Try spreading them over toast with butter and some jam for a sweet kick. Or, you can even eat these yolks on their own with a side of fresh greens, or as a topping to avocado toast. Make starting off your morning a little easier by doing the hard work the night before.
How Does Sea Salt Cure Egg Yolks?
Curing egg yolks in salt is a technique that involves drawing out the moisture from the yolks, resulting in a concentrated, umami-strong product. The salt acts as a natural preservative, inhibiting the growth of bacteria while the egg yolks sit in it. As the yolks cure, they develop a firm, almost rubbery texture and a salty, savory flavor. This process is similar to salting fish or meat, and the resulting cured egg yolks can be used in a variety of dishes, from pasta to even just on their own.
Using a spoon, make 6 little dips in the salt so the yolks will fit inside them. Gently push salt around each yolk making sure to cover each yolk completely with salt. Cover with lid or plastic wrap and keep in the fridge for 24 hours.
After 24 hours, remove the yolks from the salt. They should be dark in color and have a jammy texture. Rinse with water to get the excess salt off the surfaces of the egg yolk.
Spread the quick cured egg yolk on toast with butter, or use on pasta for a salty, rich flavor.
Recipe and Styling by Anna Franklin
Photography by Dave Bryce