Our longtime Kids Table contributor Kelly Kinsey created this fun fruit sammies recipe featuring fresh fruit and creme cheese. Bring the kids in to participate in the making of these good foods. The fun is part of the process!
Fun Fruit Sammies Recipe
INGREDIENTS
Sliced strawberries
Sliced pineapple
Sliced oranges
Slider buns, Hawaiian buns, pretzel buns, or slices of Italian bread
8 oz package of Philadelphia cream cheese
1 cup Fresh or Frozen blueberries (if frozen, thaw to room temp and drain off excess liquid)
1/2 tbsp sugar
1/2 tbsp orange zest
INSTRUCTIONS
Slice fresh fruits. Depending on the appetites involved, estimate per kid (or adult!) 2 large strawberries, half an orange, 1 slice of pineapple.
Choose your bread. Salty pretzel buns are fun and tasty, but better for older tastebuds and dexterities. Soft breads like slider buns, Hawaiian buns, and slices of Italian bread are great for younger kids.
In a food processor or with a mixer, blend an 8 oz package of cream cheese with the blueberries, sugar, and zest. This will keep, covered in fridge, for about a week after making.
Toast the bread if you like a little bit of melting in the cream cheese.
Spread cream cheese mixture generously on both sides of your bread. Layer sliced fruits on one half of the bread, and top with the other.
Recipe by Kelly Kinsey / Story, Styling, and Photography by Keith Recker
Fresh strawberries and Aperol bring fruity, bittersweet flavors to the classic Negroni in this riff crafted by hip, Downtown gastropub, The Commoner. The four-ingredient recipe is easy to blend up at home — give it a quick stir with some ice, and you’re ready for cocktail hour!
Traditionally speaking, the Negroni uses equal parts Campari, gin, and sweet red vermouth and always comes with an orange wheel garnish.
What is Carpano Bianco in This Strawberry Negroni?
Carpano Bianco is one of Carpano’s many vermouth styles, which has been making Italian vermouth since 1786. This specific type one is considered the most aromatic and elegant. This Carpano Bianco has a slight yellow hue and an exotic, citrus flavor. You’ll find light notes of cocoa beans and almonds plus a subtle hint of wine beneath its bold taste. It’s a great choice for our Strawberry Negroni Bianco, adding a floral touch to this already tasteful traditional cocktail.
Blend all of the ingredients in a high-powered blender (like a Vitamix/better to do in a batch), and strain through a fine-mesh colander lined with cheesecloth.
Once strained, add 3 oz of the cocktail in a mixing glass with ice and stir 40-48 times.
Strain over fresh ice in a double rocks glass and serve with a half of a strawberry as a garnish.
A twist of a peel of lemon is always a great idea when using strawberry and gin… salud!
Recipe by The Commoner Photography by Brittany Spinelli
Is there anything more satisfying than sinking your teeth into a meticulously cooked rack of these succulent babyback pork delicacies? Hell’s bells, I doubt it. This outstanding recipe is bound to transport you to a state of finger-licking bliss and leave you craving for more.
Babyback Ribs Recipe
INGREDIENTS
1 rack baby back pork ribs
2 cups homemade barbeque sauce (see recipe below)
½ cup chile powder
¼ cup white sugar
¼ cup brown sugar
¼ cup paprika
¼ cup salt
1 tablespoon ground black pepper
1 tablespoon ground cumin
1 teaspoon mustard powder
INSTRUCTIONS
Mix chile powder, white sugar, brown sugar, cumin, dry mustard, paprika, and salt in a small bowl until combined.
Generously dry rub to all sides of the rib rack
Preheat grill to 250 degrees
Add ribs directly to the grill. Make sure to maintain consistency and even heat throughout the entire cooking process. Cook for two hours, approximately. The internal temperature should be 145 degrees.
Once the ribs are at temperature, baste the ribs with half of the BBQ sauce. Leave them on the grill for five minutes.
Remove from heat. Let ribs rest for 10 minutes. Cut and serve. Add extra BBQ sauce for dipping.
Savor the sweet, summer flavors of strawberries and rhubarb in this riff on the classic negroni from bartenders Cat Cannon and Cecil Usher of Mindful Hospitality Group. The sweet infusions of fresh, summertime fruits blend seamlessly with smooth, sexy spirits into a delicious cocktail.
What Does Rhubarb Add to a This Negroni Recipe?
This springtime ingredient is fantastic for adding a new flavor to cocktail recipes you’re used to making over and over again. Rhubarb is usually pretty tart, almost with a sour undertone. Though, when combined with sweet elements like in our Strawberry Rhubarb Negroni, it becomes the perfect balance of both ends. Not to mention, spirits that you infuse with rhubarb gain this gorgeous light pink color.
We’ve all had it: Strawberry Jell-O Pretzel Salad. It’s sure to show up at every summer picnic pot luck. And, whether you want to admit it or not, you love it. We can’t quite figure out how or why salad became part of its original title, but apparently, it is now referred to as Strawberry Jell-O Pretzel Bars, and that seems to be more appropriate.
However, don’t settle in on that title too quickly. We’re taking this beloved traditional dessert to an elevated status and giving it a new name: Elevated Strawberry Gelatin Pretzel Cake (if you can think of a shorter title, please chime in).
Disclaimers About Our Elevated Strawberry Gelatin Pretzel Cake
This recipe is not meant to swap out the full-fat ingredients. Nothing low-cal here. You can expect a very rich and delicious experience with every bite. Think cheesecake, without the baking, and use the freshest strawberries the summer season has to offer. If you want to get a little creative, try using a different berry in place of the strawberries for a whole new dessert.
Place the pretzels in a zip lock bag and crush them into small pieces using a rolling pin.
Melt the stick of butter.
Mix the pretzels, melted butter, and sugar in large mixing bowl until well combined.
Press the mixture into the bottom of a 9”springform pan, leaving the edges slightly higher than the center.
Bake in a preheated 350° oven for 10 minutes.
Let cool to room temperature before adding the filling.
For the strawberry “juice”:
Place all of the ingredients for the gelatin top, minus the gelatin, in a heavy bottom saucepan, and bring to a boil over a medium heat, stirring constantly.
Boil for 3-4 minutes, then remove from the heat and let steep for 30 minutes.
Using a fine mesh strainer, strain out the strawberries and any seeds, you should yield 2 cups of juice.
Chill in the refrigerator while you prepare the rest of the cake.
For the filling:
Place all of the ingredients for the filling into the bowl of your electric mixer.
Using the whisk attachment, whisk on high speed for 3-4 minutes until well incorporated.
Spread the mixture over your cooled crust, again making sure the sides are slightly higher than the center.
Chill in the refrigerator for 20-30 minute, minimum, while preparing the gelatin.
For the gelatin top:
Take 1 ½ cups of your strawberry juice and bring it to a boil.
While doing that, take the remaining ½ cup of cold juice and pour it into a large bowl.
Sprinkle two packets of KNOX gelatin over the cold juice to let it soften for 1 minute.
Pour the hot juice over the gelatin mixture and stir for 5 minutes or until completely dissolved.
Let this mixture sit on the counter for 15-20 minutes to rest and cool.
Begin arranging the sliced strawberries to cover all of the cream center.
Once you have a solid layer of berries layed, slowly pour the gelatin mixture over the berries.
Now you can add the remaining sliced berries being careful to evenly distribute.
Cover and chill for 3-4 hours or overnight.
Carefully remove the sides of your springform pan.
Garnish the top with some fancy cut strawberries and mint leaves before serving. Enjoy!
Recipe, Food Styling, and Story by Star Laliberte Prop Styling by Keith Recker Photography by Dave Bryce
Photo by Emily O'Donnell, Courtesy of Children's Theater Festival
Dare we say it… the beautiful weather seems to be here to stay. Capitalize on the gorgeous Pittsburgh days while we have them the local events below.
Photo by Deneka Peniston
Made Local with Leon Ford Carnegie Library Lecture Hall, May 18
At 19, new father Leon Ford was shot five times during a traffic stop by a Pittsburgh police officer, leaving him paralyzed from the waist down. Ford discusses his discovery of the power of forgiveness while offering a thought-provoking look at the future of policing in the United States in his new memoir, An Unspeakable Hope.
Photo by Tom Little, Courtesy of the Mattress Factory
As Below, So Above Mattress Factory, Running until May 19, 2024
Mattress Factory’s newest exhibition comes from Japanese American artist Shohei Katayama. The solo installation draws inspiration — and its title — from “As Above, So Below,” an ancient Greek phrase that explores interconnectedness throughout higher and lower realms of existence. Katayama invites viewers to consider and challenge their reality and place in the world.
Photo by Emily O’Donnell, Courtesy of Children’s Theater Festival
EQT Children’s Theater Festival Pittsburgh Cultural District, May 19 to 21
Find over 50 free activities and performances throughout the Downtown area this weekend during the annual EQT Children’s Theater Festival. Whether the little one in your life enjoys magic, gaming, or crafts, the lineup featuring musicians, magicians, storytellers, street artists, art stations, creative learning workshops, face-painting Leggos, and more is sure to please any particular kiddo (and adults!).
Photo courtesy of the Pittsburgh Ballet Theatre
The Sleeping Beauty Benedum Center, May 19 to 21
You’ve most likely read the book or seen the movie, but what about the ballet version? Drama and romance take center stage in this production, choreographed by Ronald Hynd and set to an iconic Tchaikovsky score.
Artist Princess Nostalgia, photo by Vondre Clark
Millvale Music Festival Millvale, May 19 and 20
The largest gathering of free performances by local musicians returns this weekend for two days of rockin’ entertainment. Get ready for the festivities with the festival’s 2023 Spotify playlist below.
Photo courtesy of Square Cafe
Square Cafe 20th Anniversary Party Square Cafe, May 20
Did you know Square Cafe has been providing Pittsburgh with delectable bites for almost two decades? In honor of 20 magical years, the East Liberty eatery invites the entire family for breakfast, brunch, or lunch to dance with DJ Cake and enjoy Square Cafe’s famous mini biscuits on the house. Alongside a photo booth, balloon art, prizes, and more, the cafe is offering exclusively made 20th-anniversary merch featuring a special Square Cafe unicorn created by Baron Batch. But there’s more! Throughout the day, this custom-made merch will be gifted to customers while one lucky patron gets to take home a piece of Baron Batch’s artwork.
I’m not one to sugarcoat things. Life can be tough, and sometimes we gotta deal with the hand we’re dealt. But when it comes to food, that’s a different story. This world is far from perfect. We try our best to make sense of it all, to find the good amidst the chaos, but sometimes it’s a losing battle. That’s why it’s so important to grab onto the things that bring us joy, even if only for a moment.
And for me, Mesa Provisions is one of those things. I’ve written about Mesa Provisions before, and I recently had the pleasure of dining there again with my beautiful wife. We sipped from their curated wine selection, nibbled on a radish salad, chatted up their lovely staff, and then went for the crown jewel: two Mesa Burgers.
Let me break it down for you: This burger is a work of site-specific art. It’s got all the usual suspects: beef, green chile, grilled onion, sharp white cheddar, and American cheese. But what really takes it to the next level is the marrownaise. Chef Steve Riley is a genius for coming up with this bone marrow spread – it’s as decadent and delicious as it sounds.
The Mesa Burger is a damn good green chile cheeseburger, and like many of Chef Riley’s creations, the Mesa Burger is an act of restraint where top ingredients meet adept skill and inspiration. What all food aspires to be.
Recipe by Gabe Gomez / Photography Courtesy of Elliot Archuleta PhotographySubscribe to TABLE Magazine‘s print edition.
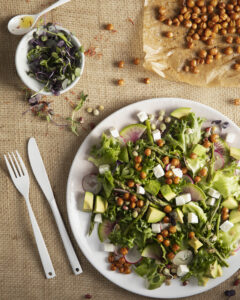
Don’t let appearances deceive you. These vegetarian squash tacos are bursting with an abundance of flavors and packed with all the goodness your body craves. Whether it’s Taco Tuesday or any other day of the week, these babies will hit the spot like no other.
Here’s the secret to taking these beauties to a whole new level of indulgence. Picture this: crumbled feta or goat cheese delicately sprinkled on top, lending that luxurious richness. And remember the roasted pumpkin seeds, adding a delightful crunch and a touch of creaminess.
So, if you’re searching for a meat-free marvel, look no further. These vegetarian squash tacos will have you rejoicing with every mouthwatering bite. Trust me, my friends; this is a culinary experience you won’t want to miss.
Why Use Both Yellow and Butternut Squash?
Yellow squash offers a mild, slightly sweet flavor, while butternut squash brings a richer, earthier taste to the table. The combination of the two creates an interesting and complementary flavor profile. This only continues when it comes to their texture. Roasted yellow squash cooks to a tender-crisp while butternut squash is going to be slightly firmer. This play on flavors and textures makes sure not a single bite is a boring one.
Ditch the chicken and try these meatless tacos made with delicious roasted squash.
Ingredients
Scale
1–2 yellow squash
1 green zucchini
1 1/2 cups butternut squash, peeled and cubed
1 small red onion, thinly sliced
2–3 tbsp extra-virgin olive oil
2 limes
1 + 1 tsp chili pepper
1/2 tsp garlic powder
1 tsp Mexican oregano
1/4 tsp smoked paprika
1/4 tsp cayenne pepper
Salt and pepper, to taste
1 1/2 cup purple cabbage, thinly sliced
1 cup green cabbage, thinly sliced
1 1/2 cans black beans
1 green onion, thinly sliced
1/3 cup cilantro, minced
1 cup mayonnaise
2–3 tbsp Sriracha
2 tbsp fresh lemon juice
Salt and pepper, to taste
8 corn tortillas
1 avocado, sliced
1–2 jalapeños, seeded and sliced
Instructions
Preheat the oven to 400 degrees.
Cut yellow squash and green zucchini into same-size chunks, then spread them onto a baking sheet along with the butternut squash and the red onion. Drizzle with 1 1/2 tablespoons olive oil and the juice of one lime, and sprinkle with chili pepper, garlic powder, oregano, smoked paprika, cayenne pepper, salt, and black pepper. Toss to coat and then roast in the oven for about 30 minutes, stirring halfway through.
Meanwhile, prepare the cabbage slaw: in a medium-sized bowl, combine the purple and green cabbage, black beans, green onion, cilantro, juice of the other lime, 1 1/2 tablespoons olive oil, chili pepper, salt, and black pepper. Toss to combine, and set aside to marinate.For the Sriracha mayonnaise, place mayonnaise, Sriracha, and lemon juice in a small bowl. Stir to combine and season with salt and pepper.
Warm the tortillas on each side on a small skillet over medium heat, transfer to a plate, and cover with a towel to keep warm. Repeat with each one, stacking them on top of each other.
To assemble the tacos, place a spoonful of cabbage slaw in the center of each taco, top with some roasted squash and a few slices of avocado. Garnish with jalapeño slices and some cilantro leaves, and serve immediately with the Sriracha mayonnaise on the side.
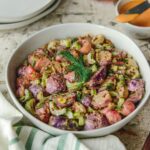
The beauty of a Community Sponsored Agriculture (CSA) program is investing directly in a local farmer and reducing the stamps in your dinner’s passport. The beast of a CSA is being bombarded with vegetables you don’t love or simply don’t know how to use. Radishes, for example, are a polarizing root vegetable that frequent Pittsburgh farm stands and farm shares.
Ways to Eat Radishes
My dad would eat them like grapes as he worked the garden. I mostly tolerate them in a salad from time to time, while others avoid them with the disgust of a petulant child. The French, as the French are wont to do, eat their radishes with butter and salt. Let that principle guide your CSA resourcefulness this summer: butter, salt, and bread make almost everything better, even bitter radishes.
The second guiding principle is hiding the less-than-desirable vegetable in a familiar, comforting picnic staple like potato salad. Think potato salad with more colors. Radishes with less bitterness. Old Bay seasoning and conjuring the feelings of a beach vacation. The radish starts to be more appealing, right?
Making even the pickiest of eaters enjoy radishes.
Ingredients
Scale
2 lbs (4 bunches) radishes, ends trimmed and halved
2 shallots, coarsely chopped
3 garlic cloves, minced
2 tbsp avocado oil
2 tsp Old Bay seasoning
1/2 tsp sea salt
1/4 tsp pepper
1 heart of celery (8 oz), sliced
2 tbsp chopped fresh dill
Sprigs of dill, to garnish
For the dressing:
⅓ cup mayonnaise
2 tbsp whole grain dijon mustard
1 tsp lemon juice
1/2 tsp black pepper
1/4 tsp fine sea salt
Instructions
Preheat the oven to 425 degrees.
In a mixing bowl, toss the radishes, shallots, and garlic with the avocado oil.
Season with the Old Bay, salt, and pepper. Mix thoroughly, then spread the mixture in an even layer on a sheet pan.
Bake for 20-25 minutes, tossing halfway through, until radishes are golden brown and tender. Set aside to cool.
Meanwhile, prepare the dressing. Combine all the dressing ingredients in a bowl, and stir until combined.
Transfer the cooled radish mixture to a bowl. Stir in the sliced celery and chopped dill. Add the dressing, and stir until evenly coated.
Garnish with a sprig of fresh dill and enjoy.
Wrap Up
When you have a supply of radishes but are not sure how to incorporate them, let our Roasted Radish Salad. With fresh picked veggies, a homemade dijon mustard dressing, and the perfect seasoning, you might just fall in love with radishes after all.
Mother’s Day is just around the corner, and what better way to celebrate the special occasion than by treating Mom to a delicious brunch? Whether you’re hosting a small gathering at home or showing up at Mom’s place with something special, we’ve gathered some mouthwatering recipes that are sure to impress. So, let’s get cooking and make this Mother’s Day a memorable one!