Long a fixture in Pittsburgh’s foodie scene, Kate Romane of Black Radish Kitchen knows where to toss her lettuce. This spring, she’s tossing it into a Veggie-Friendly Caesar Salad, and we couldn’t be more excited to eat our greens. Plate it up, bring her Garlic Knots to the table and…Buon Appétit!
What’s in this Veggie-Friendly Cesar Salad?
This Veggie-Friendly Caesar Salad swaps the traditional anchovy base for a bold mustard, garlic, and lime dressing. Tossed with gem lettuces, radicchio, Parmesan, and finished with crunchy toasted breadcrumbs, it’s a fresh, vibrant twist on a classic.
Blend mustard, garlic, and lime juice in a food processor. Add salt and pepper. Slowly add blended olive oil first, then Parmesan cheese and olive oil. This makes a big batch that will keep in the fridge for a few weeks.
Toss fresh gem lettuces and radicchio with a couple of tablespoons of dressing and top with breadcrumbs.
Recipe by Kate Romane Styling by Ana Kelly Photo by Adam Milliron
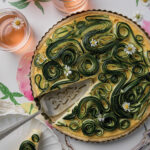
Do you have a spectacular “secret weapon” recipe that looks as if you invested dozens of hours, but is really quite easy? Impress family and guests with this artful Zucchini Tart. It’s built around a simple cheese, cream and egg custard, which we made with farm-fresh ingredients. Swirls of glossy, dark green farm stand zucchini, sliced into thin ribbons, complete the picture-perfect composition.
Tips for Making the Zucchini Ribbons
The precision of the zucchini ribbon swirls are what will really make this recipe stand out, so don’t skimp on them. Go slowly and cut the zucchini into thin strips, but not so thin that they totally lose their density. We made curlicue shapes, but you can also do a different pattern like the spiral shown in this Zucchini swirl tart. And if it comes out less than ideal, just roll with it. Being pretty is just as important as being delicious when you’re making your secret weapon recipe!
A gorgeously designed tart that’s surprisingly easy to make.
Ingredients
Scale
1 cup mascarpone cheese
1 cup ricotta cheese
1/2 cup grated Parmesan cheese
2 eggs
1/2 cup heavy cream
1 tsp salt
1 tsp black pepper
1 zucchini, sliced into thin ribbons
1 store bought pie crust, or homemade
Instructions
Preheat oven to 400 degrees.
Using a tart pan or pie pan, place the pie crust in the pan and crimp the edges. Bake the empty shell at 400 degrees until it is about half cooked. You do not want the crust to brown during this step. Remove the half baked crust from the oven and set aside.
In a large bowl mix together the mascarpone, ricotta, eggs, Parmesan, heavy cream, salt and pepper.
Fill the pie shell with the cheese mixture and arrange the ribbons of zucchini on top, rolling them into fun shapes. Have fun with it!
Lower the oven down to 350 degrees and bake for roughly 35 minutes. The filling should be completely set.
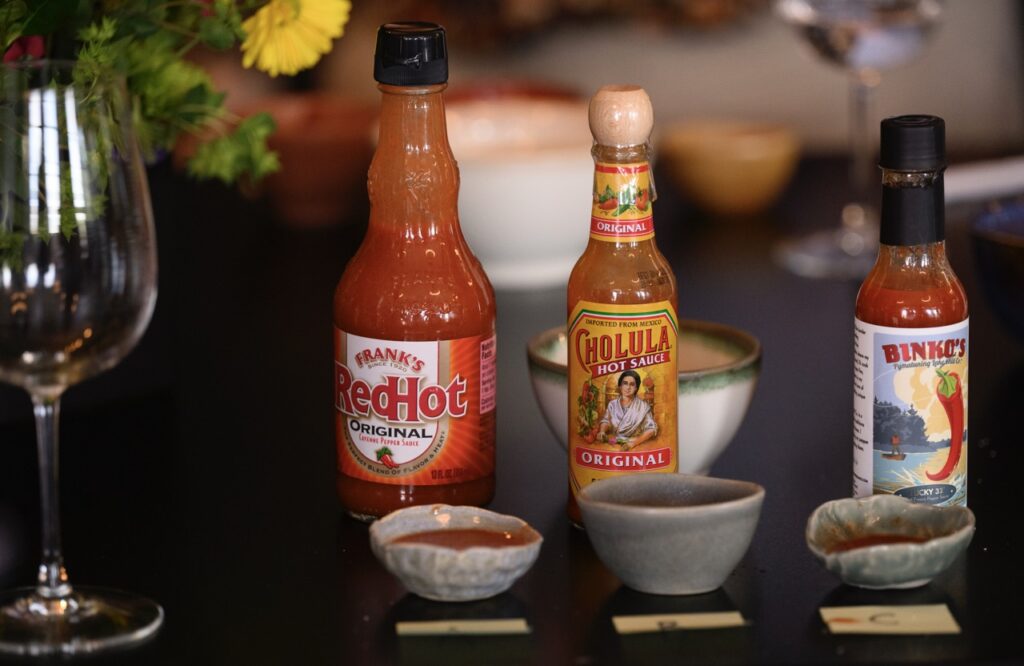
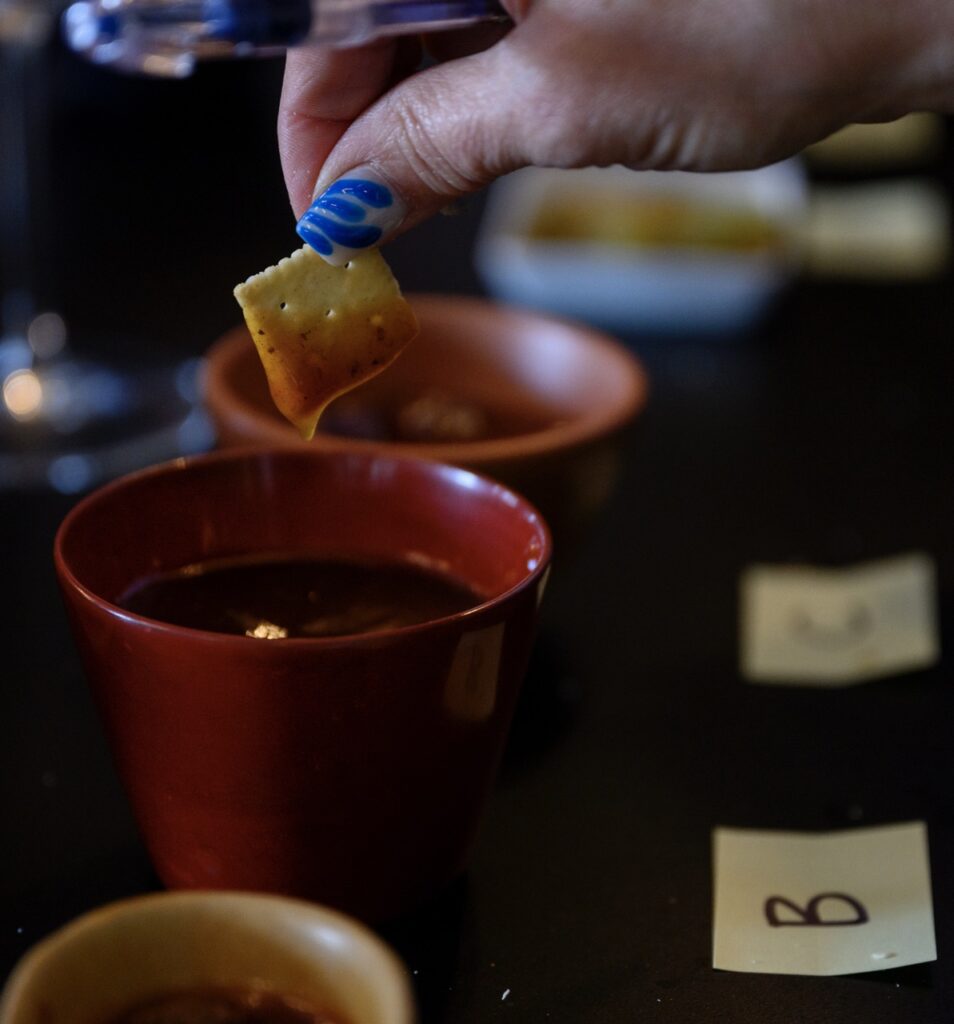
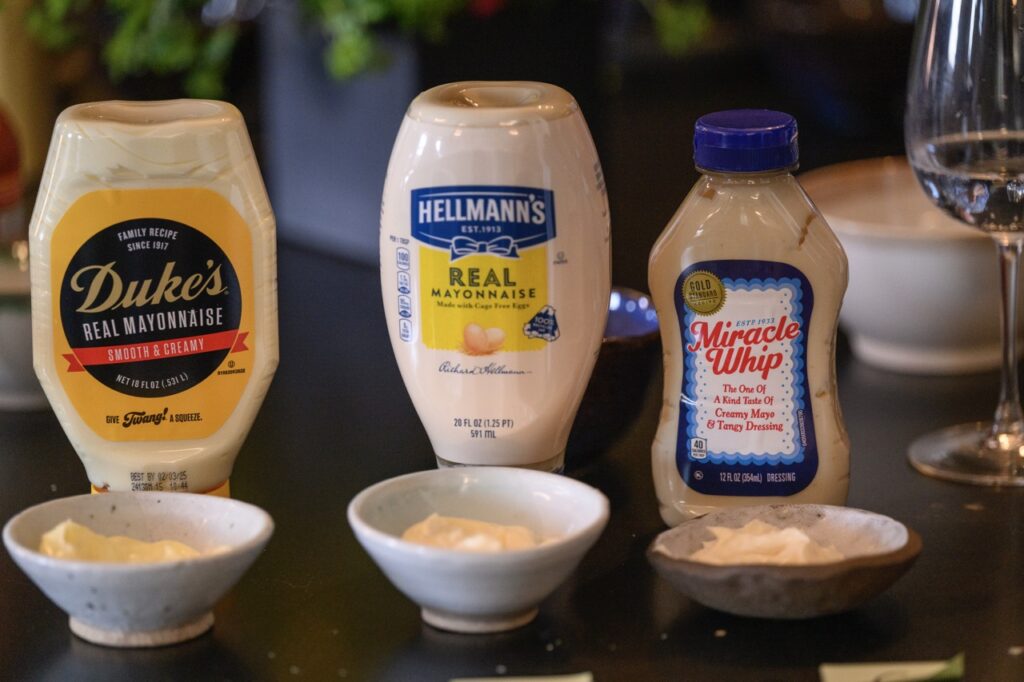
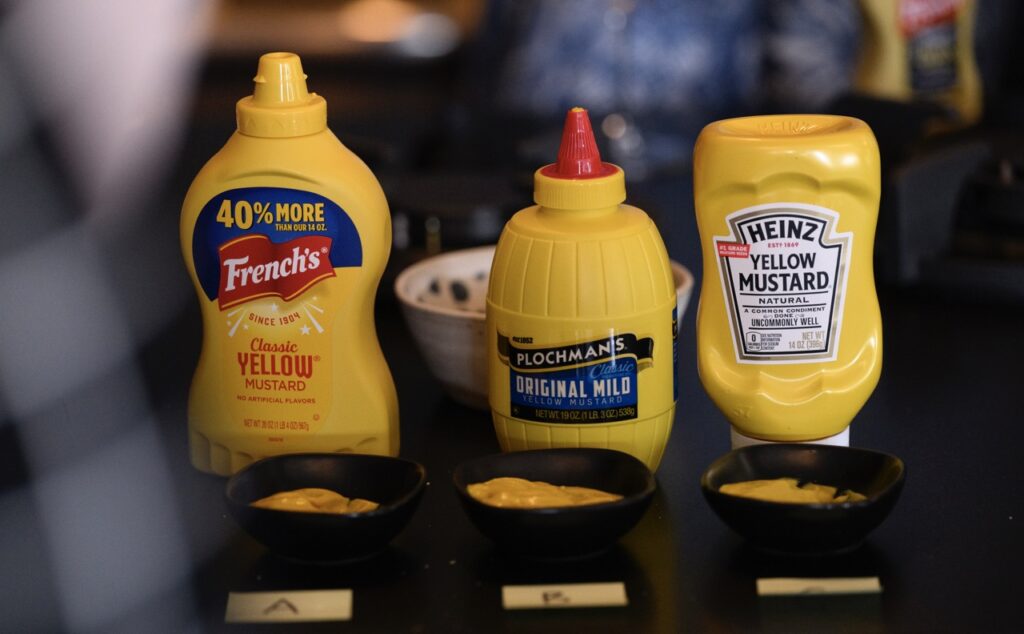
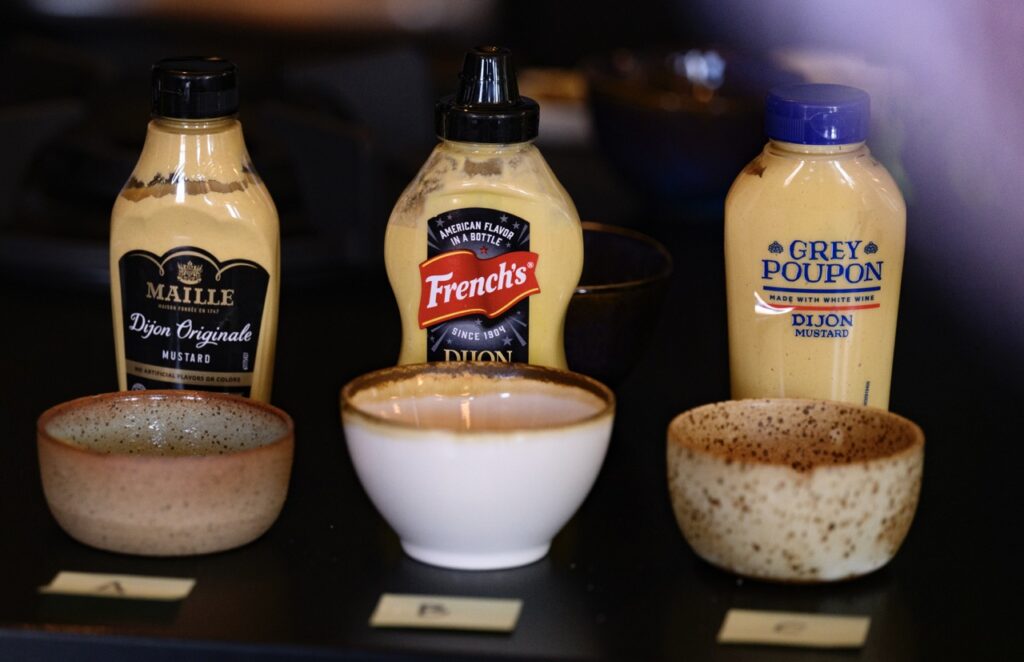
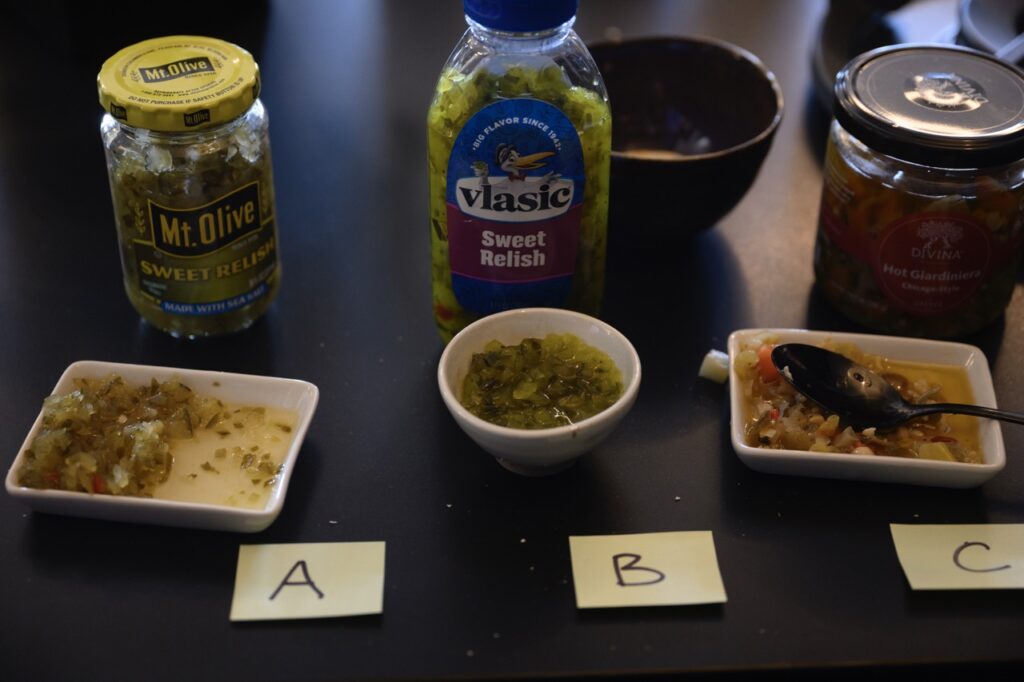
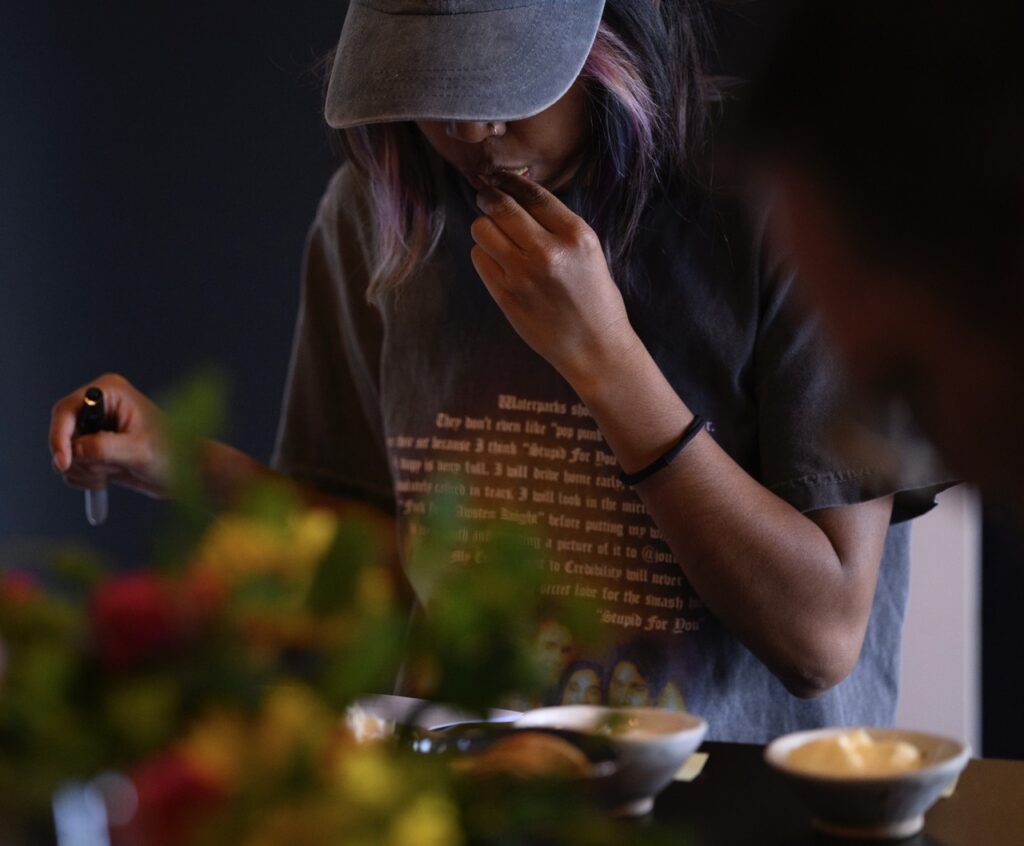
What is the best condiment, anyway? Ketchup, mustard, mayo, BBQ sauce, and beyond, condiments are one of the pinnacles of enjoying food. We slather them on hot dogs and burgers, dip our fries and chicken nuggets in them, and even use them to add a kick of heat to everyday lunches. But, when we go to purchase a condiment, what are we considering? Do we pick our go-to just because it’s a popular name brand (like ubiquitous Heinz Tomato Ketchup)? Do we believe that organic is simply better no matter the condiment? Or, is our purchase based solely on the reaction of, “Ooh, that bottle’s the prettiest”? Well, we at TABLE Magazine asked ourselves these same questions and came up with a way to declare the best brands of condiments once and for all… a blind taste test.
What is the Best Brand of Condiment?
We chose some of the top condiment brands that you said were your favorites on social media and put them to the test against one another. Each type of condiment had three different brands delivered in a letter-marked bowl beside a dish of plain water crackers. All of our participants (8 in total) took turns trying each type side by side and marking down the qualities on a rating scale. Some condiments like ketchup had questions about acidity and sweetness while dijon mustard asked about viscosity and pungency. Now, we’ve tallied the results and are ready to bring you the top condiments that you’ll want to stock your kitchens with. And, we have to say, there are some surprises!
While a local, small business is bound to have a deeper, more complex flavor than the basics of Cholula Original and Frank’s RedHot, a win wasn’t guaranteed going into the tasting. In fact, as our Director of Operations Star Laliberte put it, “I’d use all three of these hot sauces for different things.” Binko’s ended up being an obvious choice for its smokey-sweet taste and higher heat level. But, even though this hot sauce would be great dribbled onto your burger, you’ll probably want to opt for Frank’s RedHot when making a big-batch dip for a party. Then, there’s Cholula, whose milder heat level and consistent flavor profile make it an everyday essential. What we learned about hot sauce is that there is no “bad” hot sauce per se, rather there are different tones of sweetness, acidity, and heat that makes each a contender.
So, this one was a bit of a shocker to, well, all of us. Never in a million years would we ever have thought to pick Kraft when faced with the other choices of Sweet Baby Ray’s Barbecue Sauce and Jack Daniel’s Original BBQ Sauce. Though after tasting all three for the first time, Publisher Justin Matase did note, “These all taste like brown sugar.” Which he wasn’t wrong about… However, in a blind taste test, Kraft’s tangy base along with a balancing dose of sweetness and a slightly thick viscosity easily out won. Even those who have been die-hard Sweet Baby Ray’s purchasers realized that it carries a harsher taste than the others and maybe they don’t like the brand as much as they had thought.
This one was a little closer than we’d like to admit, especially because the other two brands were Hellmann’s Mayonnaise and Miracle Whip. That’s right, two of our attendees chose Miracle Whip over two real mayonnaise choices. Our own Editor-in-Chief, Keith Recker was one of the culprits, declaring that the lighter texture and nostalgic taste just went better on a cracker than the other two. Matase then bit back stating, “Miracle Whip tastes like supermarket pasta salad.” We pull no punches at TABLE!
The ones who chose Duke’s noted that it had more flavor than the rest but Hellmann’s is a close second with its clean simplicity and neutral flavor.
While Heinz Tomato Ketchup is the royalty of ketchups, no one ever really mentions anything about Heinz Mustard. However, it was nearly a unanimous decision in our office that Heinz Mustard is a go-to. Something about the balance of pungency and tanginess with a thicker consistency makes this brand our favorite. Then there were French’s and Plochman’s which were both just fine. They are what you’d expect in a mustard with a bit of a tart taste but nothing exactly special about them. In fact, this is probably the category we talked about the least because everyone was in agreement.
The kick of dijon mustard is more of an acquired taste with its blend of acidity, sweetness, and spice. This could be the reason we had mixed results. Some of our attendees preferred a strong dijon mustard like Grey Poupon that hits you with its high content of spices. But, others enjoyed the smoothness of Maille Dijon Original Mustard and the mild pungency of French’s Dijon Mustard. With this condiment, you might just have to conduct your own blind taste test to see what you like best. Is consistency important to you? Or, do you shoot for flavor over texture? There’s only one way to find out: try them all.
For relish, we have two different top picks since Divina’s gourmet Hot Giardiniera is not similar to standard pickle relish. Its chunky vegetable texture in a spicy oil makes Divina stand out from the rest. However, when it comes to your basic, essential green relish destined for a hot dog, Vlasic Sweet Relish takes the prize…even if most of us noted it’s electric, neon green color is very off-putting and makes it seem like you’re putting alien food into your mouth. Its crunchy texture and highly acidic flavor, however, make it a winner, as long as you don’t pay attention to the hue. It’s important to note that our third option, Mt. Olive Sweet Relish, is not a terrible choice in relish. It just can’t compete with Vlasic’s classic taste and Divina’s unique take.
You knew it was coming. Even outside of Pittsburgh, Heinz Tomato Ketchup reigns supreme. Its tangy and sweet balance along with a smooth, dare we say perfect, consistency wins every time. Well… almost every time. We actually had two participants who broke the golden rule of Pittsburgh and chose Hunt’s over Heinz. It was even our own Justin Matase and Keith Recker who broke our hearts and thought Hunt’s was better, with a broader flavor profile and a better after-taste. At least we can all agree that Primal Kitchen’s Organic Unsweetened Ketchup, our third option, is too chunky to even be considered ketchup and instead belongs with the tomato paste. Though, it does carry the natural flavor of tomatoes if that’s the thing you’re looking for. So, what is the best brand of condiment? It depends on who you ask.
Story by Kylie Thomas / Photography by Jeff Swensen
The 4th of July or Memorial Day are all about sunshine, good company, and of course, delicious food. This year, ditch the store-bought treats and impress your guests with a spread of homemade delights that are both festive and flavorful. Whether you’re craving a sweet treat to end the evening or a refreshing side dish to complement your barbecue, we’ve got something for everyone. Taste nostalgic childhood favorites, show-stopping centerpieces, and simple skewers. No matter what you choose to make, we’ve got you covered with a variety of recipes that are perfect for your Independence Day or Memorial Day celebrations. Or, really for any hot, sunny summer day.
Celebrate Memorial Day and 4th of July with Red, White, and Blue Recipes
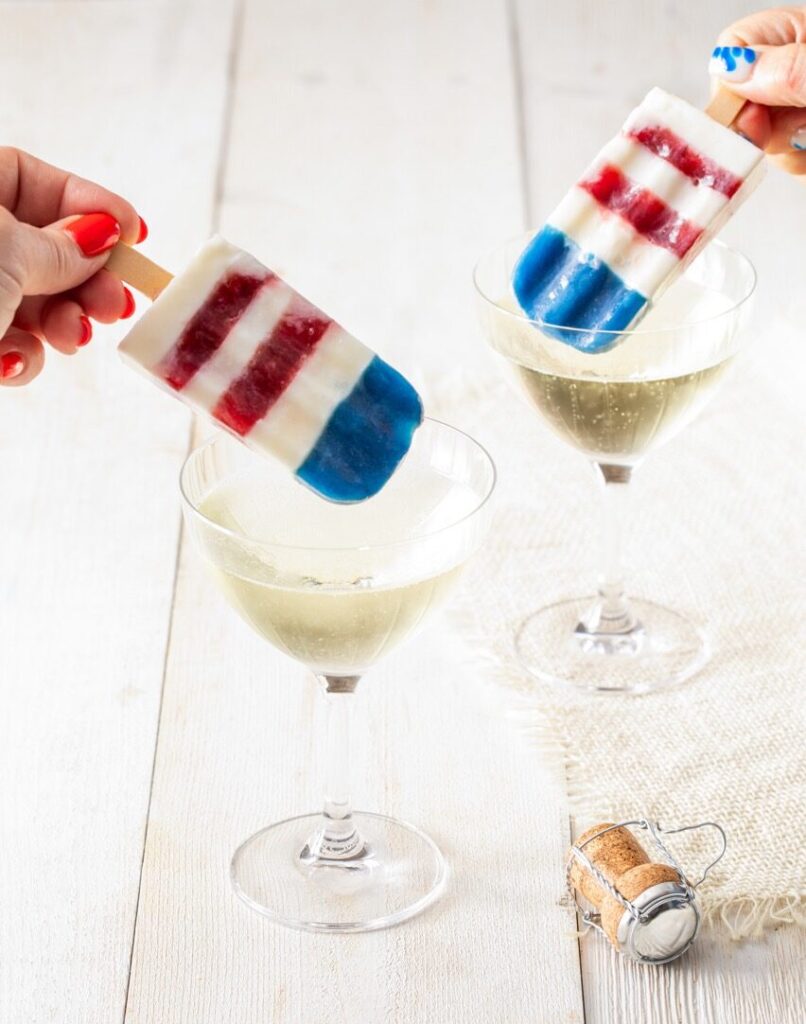
What would the 4th of July be without a brightly colored red, white, and blue popsicle? Let our Homemade Bomb Pops take you back to your childhood nostalgia. The best part? They’re made from fresh fruit and yogurt so you can feel comfortable letting your child get some sticky fingers without the overly sugary side effects.
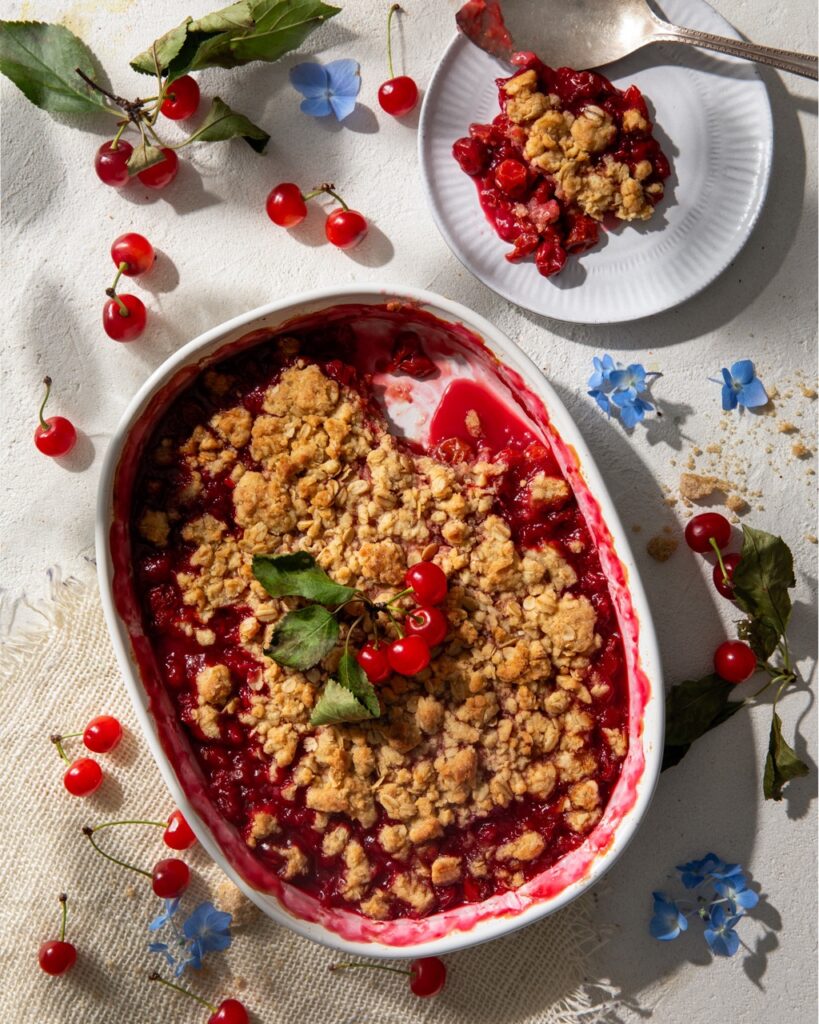
Not every dessert on your holiday table has to be so sweet. A Sour Cherry Crisp takes advantage of cherry season while creating a tangy fruit crumble. But, if a full plate of this sour crisp isn’t quite your thing, try serving it with a scoop of vanilla ice cream to balance out those flavors.
Bite into a moist, decadent cake made with Tres Leches’ famous three milks. We break this classic recipe down into simple steps to make the cake mix, Tres Leches, and whipped topping. While the design choice is up to you, we recommend an American flag shape made with strawberries, raspberries, and blueberries for an extra bit of flavor.
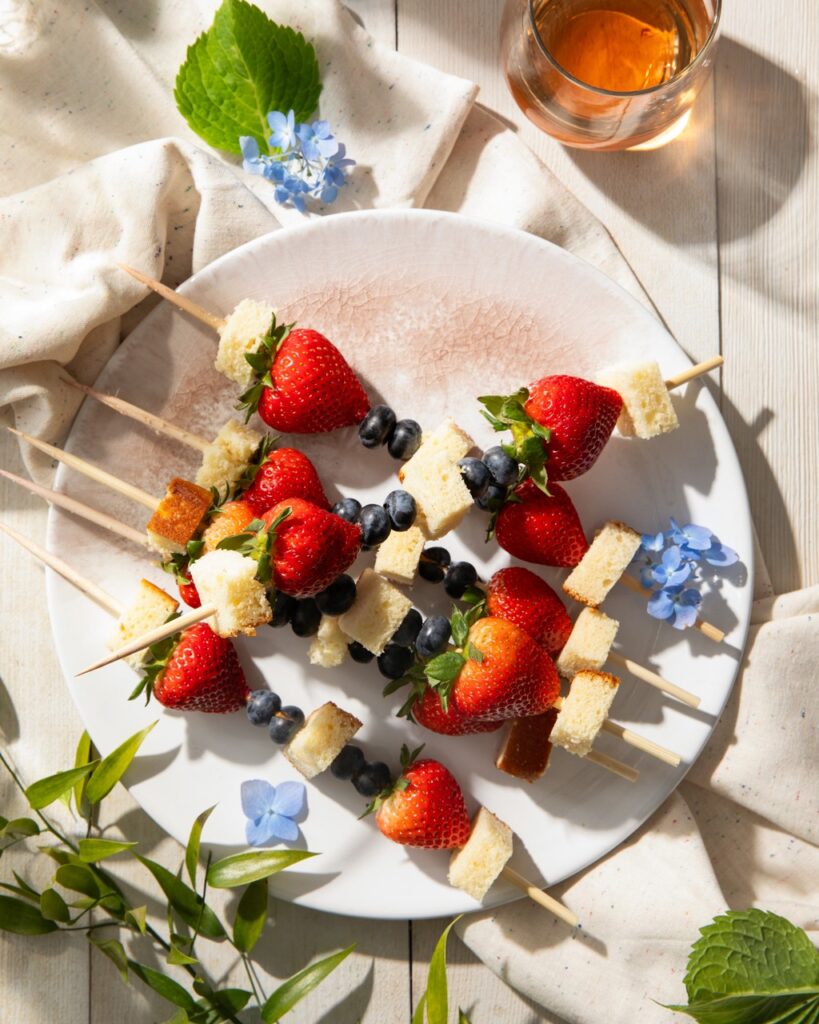
Looking for a quick, last-minute recipe that even the kids can help make? These 4th of July Dessert Kabobs leave plenty of room for customization and creativity. Start off with a pile of strawberries, blueberries, and sliced pound cake. Then, feel free to add in powdered donut holes, watermelon, raspberries, blackberries, or whatever else your red, white, and blue heart desires.
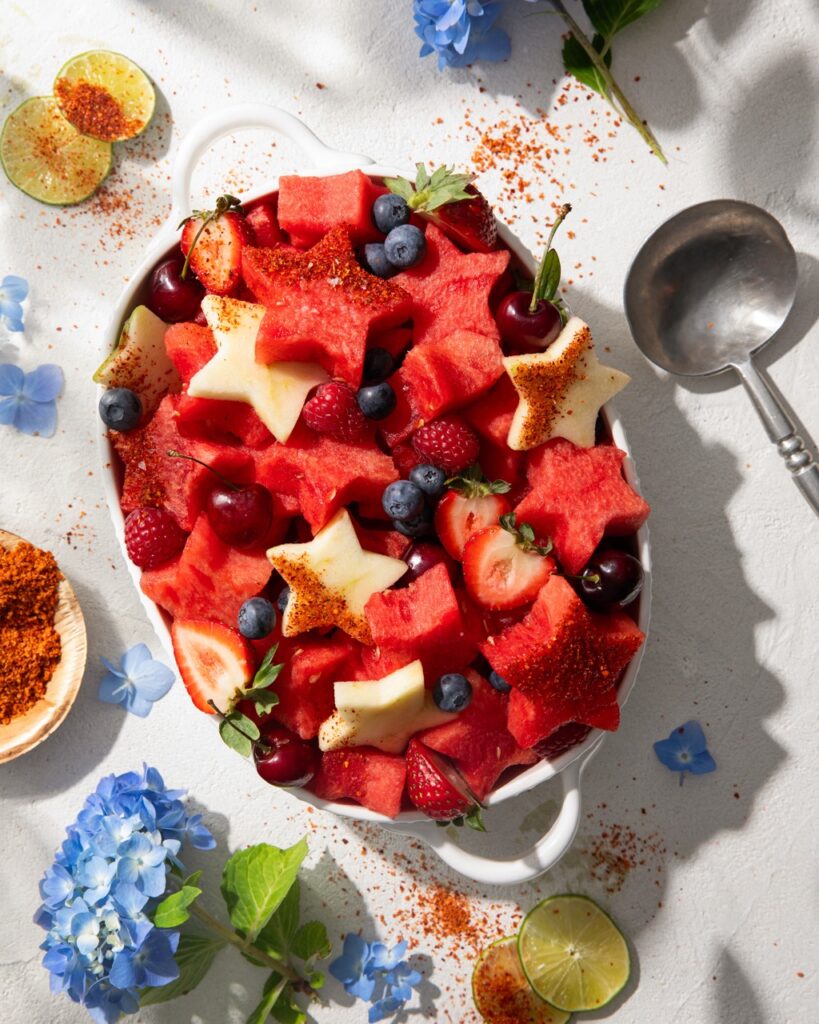
The use of star-shaped cookie cutters can elevate any side dish into a beautiful display. We use this little tool to cut stars out of watermelon and apples then fill the rest of the bowl with blue and red fruits like cherries, strawberries, and blueberries. Complete our Fruit Salad with a drizzle of hot honey, lime juice, and a sprinkle of Tajín for a tangy twist.
Who knew gelatin could turn out so stunning? Our Red, White, and Blue Stained Glass Gelatin Cake requires virtually no baking, other than setting the crust, making it great for a hot summer day. Plus, you can really bring out your artistic skills to make a dazzling mosaic of red, white, and blue gelatin.
Over the years, people have asked what you can do with melons besides just bite into them and eat them. Syrups and shrubs are a great way to preserve melons and they make such refreshing drinks during the summertime! This blush pink syrup in a beverage looks great with a sprig of fresh basil as a garnish. You can always set aside the rinds and use them for pickled watermelon rinds or even add them to your compost bin. Plus, store this syrup up to a year for use in cocktails, mocktails, desserts, and more.
More Watermelon Recipe Ideas
Watermelons are a surprisingly versatile fruit that are great for more than just a Watermelon Syrup. They’ve been used as meat substitutes for grilling because of their texture. If you’re looking to experiment with watermelon, there’s a lot of ways to do it. We have a watermelon mocktail that’ll put your Watermelon Basil Lime Syrup to good use, a delicious watermelon salad, and even watermelon sandwiches.
A delightful inclusion to cocktails, mocktails, and more.
Ingredients
Scale
8 lb watermelon (about 1 medium-size watermelon, any color)
3 cups fresh lime juice
1 bunch basil leaves, finely chopped
1 or 2 jalapeños, sliced into thin rounds (optional)
3 cups organic cane sugar
Instructions
Wash and dry the watermelon. Remove the rind from the melon, cut the melon into bite-size chunks, and put the fruit in a large pot. Drizzle the lime juice over the fruit, add the basil and jalapeños, if using, and toss. Add the sugar, toss, and let the fruit sit at room temperature for 3 hours or up to overnight.
Place the pot over medium-high heat and bring to a boil. As soon as the fruit comes to a boil, remove it from the heat and strain out the syrup.
You can bottle the syrup and keep it in the refrigerator, or process the syrup in a hot water bath canner. To do so, prepare ten-8 oz jars for storing the finished syrup. Remove the syrup from the heat and fill the jars, leaving ½ in of headspace at the top. Wipe the rims, apply the lids, and process in a hot water bath canner for 10 minutes. Jars will keep for up to 1 year.
Beets are killer, especially when added to a soup. They can easily be the star or play a supporting role in a dish depending on how they are prepared. They’ve got friendly, fruity sweetness and earthy complexity. Plus, if treated the right way, they can even lend awesome acidity to a dish.
What is Chlodnik?
Chłodnik, chilled summer borscht, is the best thing you can do with beets in the summer. The chłodnik we make at Apteka is somewhat complicated. It involves our own cultured yogurt, made from cashews and almonds, a fermented beet kvass that is the acidic building-block of the soup, a borscht, sour pickled beet tops and kohlrabi, along with fresh radish, cucumbers, and herbs that help finish the dish. But a simpler version built off one trip to the farmers’ market is also lovely. The recipe we’re sharing here is a version that can be done in an afternoon instead of the six days it takes for all parts of the Apteka version.
1 qt of plain dairy-free yogurt or a mix of two you like (Kite Hill or Forager are fine)
1/2 cup chopped chive
1/2 cup chopped dill
Instructions
For the chilled beet top stock:
Find fresh young beets with nice green tops. Separate bulbs, wash and dry them whole and unpeeled, and dress with a little oil, salt, and pepper. Wrap them tightly in foil and roast them at 350 degrees until they’re tender, 2 to 3 hours. Peel and grate.
While the beet bulbs are roasting, prepare the tops by washing and cutting them into 1-inch pieces – stems and leaves.
Sauté the stems and leaves on high heat using just a little oil, seasoning as soon as the tops are in the pan. After the leaves start wilting when being tossed in the hot pan for a minute or so, add a little garlic and lemon juice, toss, and cover the pan for 1 minute. Uncover, cook for one more minute, and flood the pan with 2 cups of stock. Bring to a light simmer, (and if available) add 1 cup of beet kvass, and immediately take off heat and let cool. Our aim is to cook the beets, but preserve their bright color with a soup that will eventually be somewhere between a deep pink to magenta in color.
For the soup:
Grate your trimmed radishes. Peel your cucumber, remove the seeds if it’s a large or mature cucumber, and grate.
In a bowl, add 1 quart of plain yogurt, 2 cups of your cooled grated beets (and any beet juice or roasting jus left in the foil), 2 cups of your chilled beet top stock, the radish and cucumber, a small bunch of chopped chive and dill, 2 freshly minced garlic cloves, salt, pepper, sugar if it’s not yet slightly sweet, and lemon juice.
Balance the soup so that it remains fairly thick, sweet, sour, and refreshing. Let it marry together in the fridge for at least an hour.
Finish in small soup bowls with more chopped chive and dill on top. Serve chilled. Great for up to 3 to 5 days.
Recipe and Story by Kate Lasky and Tomasz Skowronski, Apteka / Food Styling by Veda Sankaran / Prop Styling by Keith Recker / Wallpaper: Guermantes by Manuel Canovas, Courtesy of Cowtan & Tout
Are summer wines from beautiful vines more delicious? In sharing a list of eminently enjoyable summer wine, TABLE’s wine expert Adam Knoerzer also provides a few unique vineyards that deserve a place on your travel destination bucket list.
Does Wine Grow in Ugly Places?
I can’t remember where I first heard it, but the veracity of the statement stands the test of time: wine does not grow in ugly places.
Photo Courtesy of Ken Forrester
Go ahead: do a quick inventory of wine regions with which you’re familiar, and I bet you’ll quickly come to the same conclusion. Napa and Sonoma? Gorgeous mountains and valleys aplenty. Burgundy? Lovely gentle slopes in pristine countryside. Mendoza? The Andes create quite a dramatic backdrop for vineyards. Name a wine-growing area, and I’m confident this precept will remain intact.
With that in mind, where might one find the best and most beautiful grapes and regions for summer sipping? The sun is shining, the temperatures are warm, and you’re craving something to quench your thirst while providing maximum vinous enjoyment. Having had the fortune to visit over 30 wine regions in a dozen countries on five continents, here are two favorite destinations that combine maximum gorgeousness with gulpability.
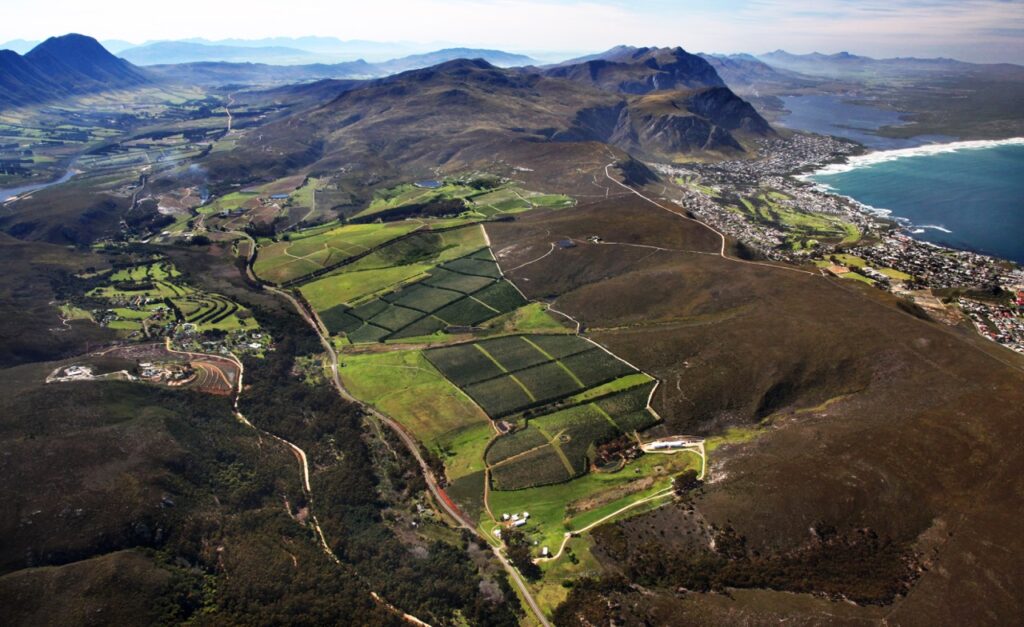
Making Wine in South Africa
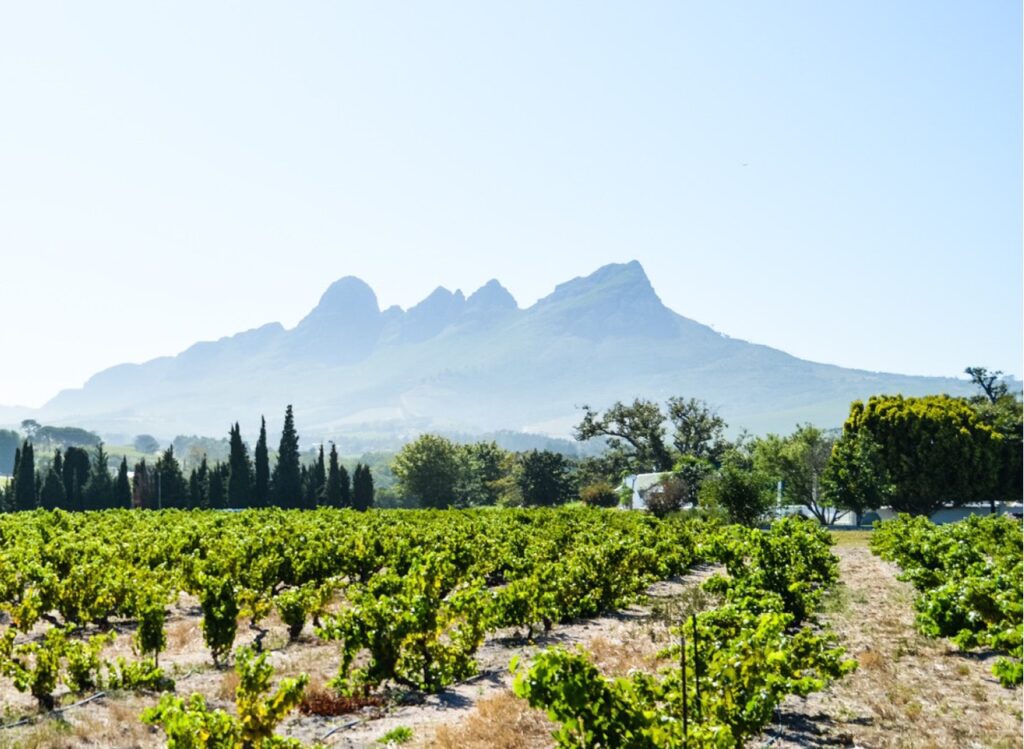
While it’s true that wine always comes from a beautiful place, I don’t think I’m alone in suggesting that the winelands of South Africa are quite possibly the most stunning anywhere on earth. Most vines are planted within two or three hours of central Cape Town, and the landscapes vary from rugged, almost desert-like conditions in the Swartland and Cederberg Mountains to lush, green lake country in Elgin that reminds you of the Adirondacks.
Photo Courtesy of Ken Forrester
South Africa’s Chenin Blanc
South Africa’s signature white grape, Chenin blanc, also happens to be the perfect grape for summer enjoyment. Thought to be one of the first grapes planted in South Africa in the 1650s, it occupies roughly 18 percent of all South African vineyards and is the most-planted grape variety to date–and more is planted here than anywhere else in the world, even its native France.
Ken Forrester, known as “Mr. Chenin,” offers several iterations of the grape, and all are seasonal sensations from his Stellenbosch property. He picks his Petit Chenin early to offer budget-friendly flavors of pear, crunchy apple, and citrus. His Old Vine Reserve offers deeper, richer notes of melon, wax, and honeycomb. But, his FMC is the star of the show. It’s a blend of Chenin with harvest grapes at varying stages of ripeness for a truly bombastic flavor explosion of orange marmalade, honeysuckle, tropical fruits, spice, and a kiss of sweetness. Some say it’s the best Chenin in the world.
Photo Courtesy of Hamilton Russell Vineyards
Hamilton Russell Wine in South Africa
The South African story doesn’t end with Chenin blanc, though. Continuing south and east from Stellenbosch along the coast, you’ll eventually find yourself in the quaint fishing town of Hermanus, best known for whale watching. Hang a left from the town center, and you’ll find yourself entering the cool-climate, maritime Hemel-en-Aarde valley, which is Afrikaans for “heaven and earth.” Here you’ll find Hamilton Russell Vineyards and their adjacent property, Southern Right Vineyards, which offer stellar examples of summer-friendly Sauvignon blanc (Southern Right) and one of the most pristine Chardonnays (Hamilton Russell). Though, red-wine are not alone. The Hamilton Russell Vineyards Pinot Noir is consistently regarded as one of the best outside of Burgundy (and, really, anywhere in the world), and Southern Right’s smoky, brambly Pinotage is handled in a lighter style that is great to chill and pair with everything from your grill this summer.
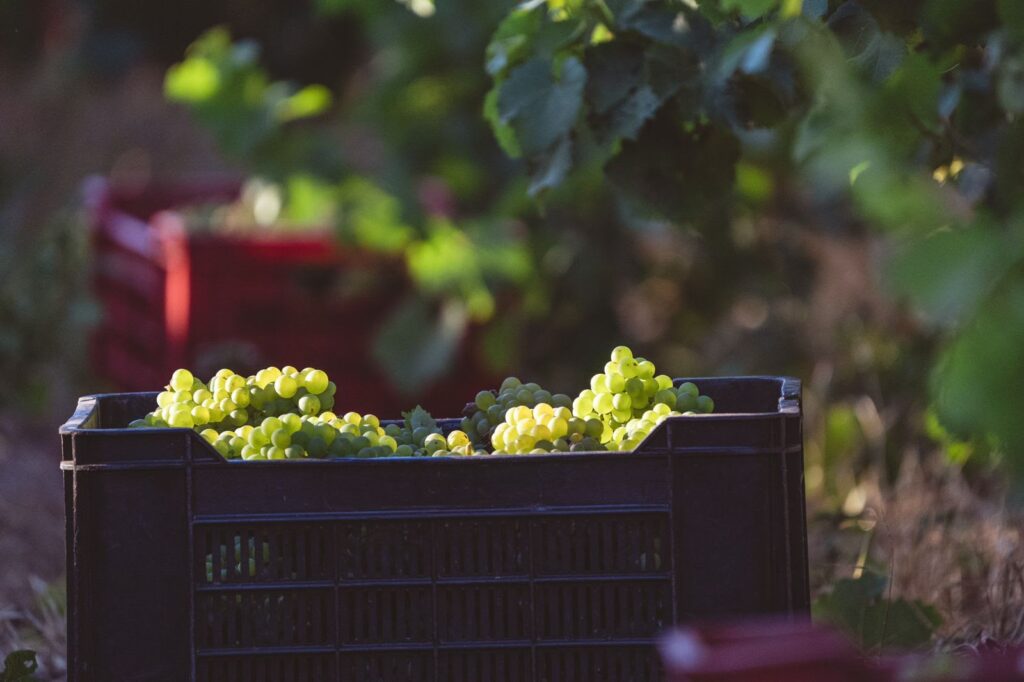
Making Wine in Chile
Another star in the Southern Hemisphere, Chile’s long, narrow shape allows for wine to grow from north to south thanks to the Humboldt Current that keeps the Pacific’s waters cool. The east-west valley pulls in the cool air to create ideal conditions for growing grapes of all kinds.
Perhaps the best of those areas are a short 45-minute drive to the west of Santiago, Chile’s capital, in the Casablanca Valley. Cool-climate, summer-friendly varieties like Sauvignon blanc, Chardonnay, Pinot noir, and others thrive in these fog-laden conditions that insulate the grapes from the abundant sunshine.
Photo Courtesy of Matetic
The Best Vineyards in Chile
One property making especially delicious wines is Matetic. This 100-percent organic and biodynamic producer, along with their Corralillo line, offer an excellent value, particularly their Riesling and Gewürztraminer, which are best known in Alsace, France, but offer regal refreshment from these ancient granitic soils.
Kingston, another producer in the valley, is noteworthy for their Sauvignon blanc and Pinot noir, but it’s their cool-climate Syrah that will be a pleasant surprise for your summer soirées. Though a full-bodied grape, their take on Syrah is lean and restrained with a meatiness that’s begging for steaks or a juicy burger.
In Chile’s far south, Itata is one of the oldest growing areas in the country dating back to the 1500s, well before places like Bordeaux had a single vine in the ground. Here you’ll find red wines made for summer with light body, low tannins, and high acidity: Cinsault and País, the oldest grape in all of Chile. Pedro Parra is an excellent producer of both, and his lineup offers everything from entry-level elegance to high-end hedonism to enjoy all season long.
In November, I embarked on a two-week trip to Antarctica with Viking Cruises and it was, to say the least, epic. Even before leaving home, the flurry of disclaimer forms, medical questions, and doctor approvals made me appreciate the gravity of it all. After a long flight, and a sea passage through mist and cloud, we finally caught sight of an incredible land of snow, ice, gorgeous light… not to mention penguins. Lots of penguins.
The Journey to Antartica
Shortly after boarding the ship in Ushuaia, Argentina (the southernmost city on earth), I took a long stroll to check out the ship. There were miles of decks, floor-to-ceiling windows everywhere, vast numbers of comfy couches and throw blankets, and tons of stocked bookshelves (many on topic). The ship, designed by Richard Riveire of Rottet Studio, has a luxe, residential, Scandinavian-inflected appeal throughout.
We began by crossing the fabled (or dreaded) Drake Passage, one of the deepest parts of the ocean and one known for particularly rough waves—and seasickness. On the way out, we were told we were lucky, with swells of “only” 15 to 20 feet. I was grateful not to get seasick, although I took many precautions, including nibbles of Dramamine.
Making Use of Viking Cruises’ Resources
On the bottom deck, near the front of the ship, there was a place called The Hide, which didn’t appear on any of the maps. During the day, it was usually empty, a great place to curl up and watch the waves; in the evenings, members of the crew would tell tales of their adventures at sea while people sipped Scotch.
The ship had a gigantic hangar filled with watercraft of all sorts, including zodiacs, 12-person boats, kayaks, and two submarines. I went out on all of them except the submarines (that darned claustrophobia!) Riding around in a low rubber boat in the bracing wind or climbing on snow-covered hills looking out over miles of white, it was impossible not to be awed by the enormous scale, the isolation, the extreme quiet. In addition to thousands of penguins, we saw a few seals and a great many whales, who often swam alongside the ship.
Life inside, when you weren’t staring at the jaw-dropping landscapes, was about as cushy as it gets. After my daily adventures outside, I’d run to the spa for a sauna, steam, and cold plunge (in a pool with one wall open to the outside), followed by a nap. (I’m only human.) Eating took up a lot of the day (this was a cruise after all) and the surprisingly robust Wi-Fi meant I could keep up with my work (sigh). The crew remembered our likes and dislikes and cared for us wonderfully.
Taking Science Into Consideration
Viking takes science very seriously, and on board were a chief scientist, an ornithologist, a PhD student doing seaweed research, plus historians, geologists, and various other scientists. There were daily lectures on birds, geography, aquatic life, and history of the region. The scientific staff collected myriad samples of water (which, sadly, I was told always contains micro-plastics), phytoplankton, and various other readings that are sent back for analysis.
One day on a rocky beach I had a long chat with the bird guy while watching a (probably) male penguin build some sort of trial-run nest about 30 feet away. (The sexes are largely indistinguishable in penguins, but it’s the males that generally build the nests, showing their prowess to potential mates.) He made a point of telling me that not very many people ever get to see such a thing.
Antarctica’s Color Palette
One of the things you first notice in Antarctica is that what appears to be a limited palette of whites, grays, and blues develops, over time, into an astounding array of colors. Many days were overcast and often snowy, bathing everything in an eerie gray light with a muting effect. On others, clearer skies would produce variations of white, gray, and blue you’d never believe possible.
Stephen Treffinger
The journey was, in a word, overwhelming. Almost too much to take in, a set of new information so intense that it was difficult to process. And while estimates vary as to how many people have actually set foot on Antarctica since its discovery roughly 200 years ago, the generally accepted range is only around 300,000 to 350,000. I feel extremely fortunate to have been among them.
Story by Stephen Treffinger / Photography by Stephen Treffinger and Viking Cruises
The hallmark of a good Fourth of July celebration is––let’s be honest––the food. Yes to fireworks, yes to some good music, yes perhaps to bug spray, but be sure the table is full to groaning with food. Don’t drop the ball after the barbeque: everyone wants a sunset sweet.
This Vegan Berry Macadamia Cheesecake is the perfect end to the perfect July Fourth celebration. Created by Chefs Damian and Amy Herrera of Juicy Foods 505, it’s ever so perfectly patriotic in its red, white, and blue. Because it’s vegan, you’ve got all of your guests covered. Best of all, it tastes as good as it looks. Save party-time stress by making it ahead of time. Prepare for oohs and aahs.
What Makes A Vegan Cheesecake?
Macadamia nuts are the secret weapon for a luxurious vegan cheesecake. Their buttery richness creates a creamy filling that rivals its dairy counterpart. Soaked macadamia nuts blend beautifully into a smooth base with the addition of cashews. Their subtle sweetness complements tangy flavors like lemon or lime for a perfectly balanced cheesecake. Plus, a sprinkle of chopped macadamia nuts on top adds a delightful textural contrast.
Even those avoiding dairy can still enjoy a macadamia nut cheesecake.
Ingredients
Scale
For the crust:
1 cup cashews
1 cup pecans
1/3 cup raisins
½ teaspoon sea salt
For the filling:
2 cups macadamias (soaked in purified water for at least 2 hours)
1 cup cashews (soaked in purified water for at least 2 hours)
½ cup maple syrup (any liquid sweetener of choice will work)
Juice of 1 lemon
1 tbsp vanilla extract
Pinch of sea salt
¾ cup melted coconut oil
1/4 cup of purified water
To create the berry swirl and topping:
1 cup frozen strawberries, thawed and drained
2 tbsp maple syrup
Juice of 1 lemon
¼ cup melted coconut oil
1 cup fresh raspberries
1 cup fresh blueberries
Instructions
For the crust:
Process cashews and pecans in a food processor to fine meal.
Add remaining ingredients until combined. The mixture should be slightly oily but crumbly.
Press the mixture into a parchment paper-lined 9-inch springform pan.
For the filling:
Drain macadamias and cashews.
Blend all ingredients except the coconut oil and the ¼ cup purified water in a high-speed blender.
Slowly add the water if needed to keep processing if still chunky. Once smooth, add the melted coconut oil slowly until combined. Pour filling into crust and refrigerate for 20 minutes or until slightly firm.
To create the berry swirl and topping:
To make the berry swirl, blend frozen strawberries, maple syrup, and lemon juice in a high-speed blender until smooth.
Slowly add melted coconut oil until combined.
Pour the berry swirl on top of slightly firm filling and use a chopstick to swirl through. Be careful not to disturb the crust.
Chill for 1 hour until more than slightly firm, but not hard. Top with the fresh raspberries and blueberries and place back in the refrigerator until completely set, about 2 hours.
Recipe by Chefs Damian and Amy Herrera, Juicy Foods 505
Story and Styling by Julia Platt Leonard
Photography by Tira Howard
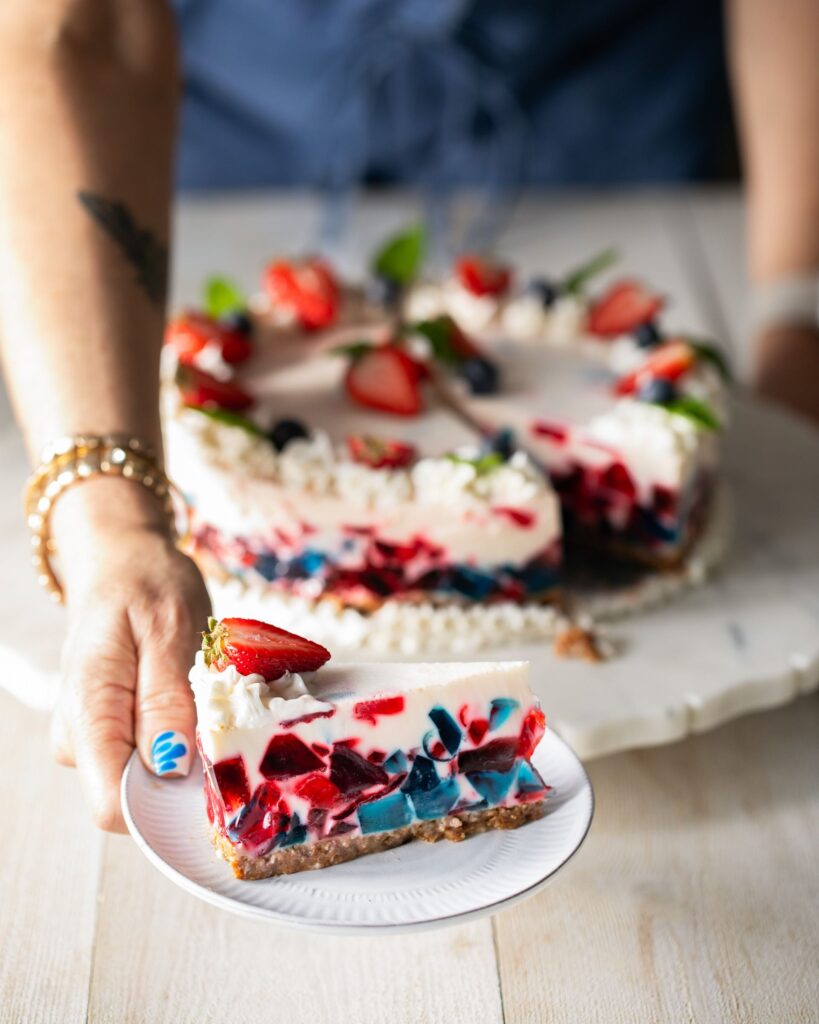
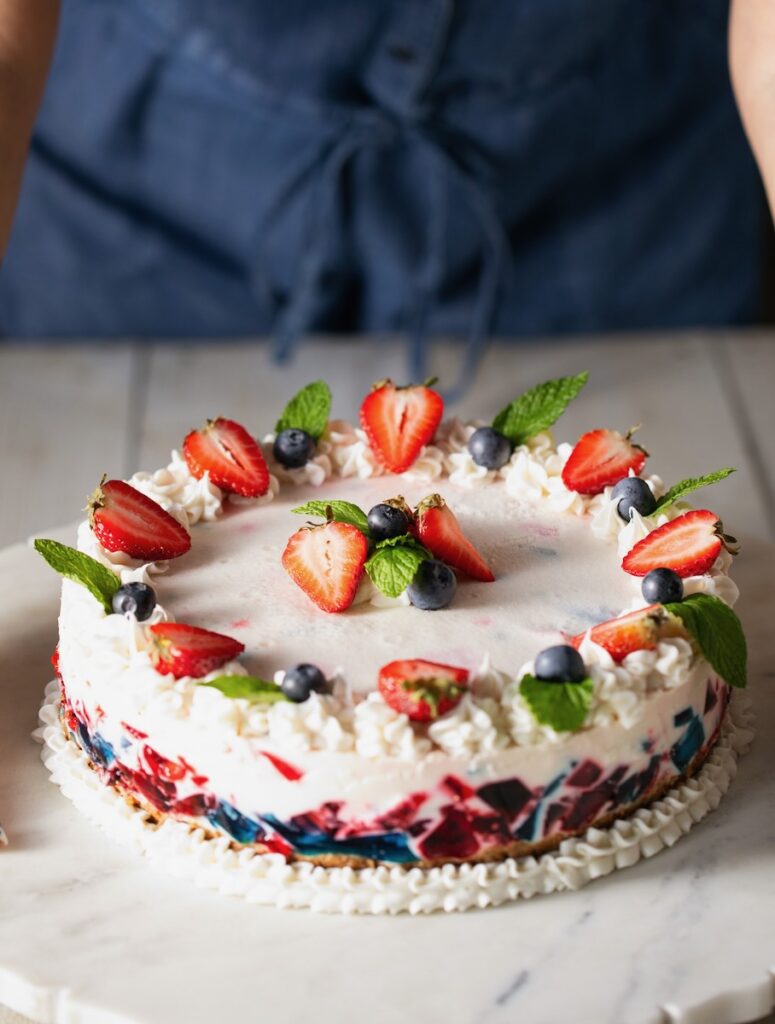
Celebrate Independence Day with a dessert that’s as dazzling as fireworks! This Red, White, and Blue Stained Glass Gelatin Cake is a stunning centerpiece for your 4th of July festivities. Layers of vibrant red and blue gelatin peek through a creamy white base, creating a beautiful mosaic effect. It’s surprisingly easy to make and requires virtually no baking, perfect for a hot summer day. You could even use star-shaped cookie cutters to add another special 4th of July touch. Get ready to impress your guests with this festive and flavorful treat!
What Flavors Can You Use in a Gelatin Cake?
The best part about a gelatin cake is that the customization is up to you. Rework this red, white, and blue gelatin cake to make any occasion. For Halloween you can combine orange and lime green gelatin for a spooky, eerie colored treat. Or, use a flavor combination of lemon and lime to make a summer themed gelatin cake perfect for a pool party. It may even take the place of your regular birthday cake due to its aesthetic inside and ability to pick out the person’s favorite flavors.
A stunning cake that’s almost too beautiful to eat.
Ingredients
Scale
For the crust:
1 1/2 cups graham cracker crumbs ( approximately 11 whole cracker sheets)
1/4 cup granulated sugar
1/2 tsp salt
6 tbsp unsalted butter, melted
For the gelatin cake:
5 (3 oz) pkgs. Jell-O® mix in your choice of red and blue flavors
3 1/2 cups boiling water, divided
3 1/2 cups cold water, divided
1 1-oz pkg Knox® gelatin (use all 4 individual packets in the box)
1 14.1-oz can of sweetened condensed milk
1 1/4 cups heavy whipping cream
1 tsp vanilla extract
Instructions
For the crust:
Preheat the oven to 350 degrees.
Use a food processor or place your graham crackers in a gallon size freezer bag and use a rolling pin to crush the crackers.
Combine the crumbs, sugar, salt, and the melted butter in a medium sized bowl. Mix well, making sure the ingredients are well incorporated.
Pour into a 9 inch springform pan (ungreased), and press evenly on the bottom and about a 1/4 inch up the sides of the pan. Use the base of a measuring cup or a flat-bottomed glass to create a nice even crust.
Bake in a 350 degree pre-heated oven for 8-10 minutes.
Cool completely.
For the gelatin cake:
Prepare each package of flavored gelatin in a separate bowl (if using multiple packages of the same flavor, they can be prepared together in one bowl). Pour 1/2 cup of boiling water per package into each bowl, stirring until gelatin is completely dissolved (approx. 2 minutes). Then add 1/2 cup of cold water per package and stir. Refrigerate 4-6 hours or overnight.
Prepare your crust, cool completely and place in the freezer for 1 hour.
Remove the gelatin from the refrigerator and cut into small pieces of varying sizes, but no larger than 1/4 inch cubes. Place all together in a bowl, toss, and return to the refrigerator while preparing the unflavored gelatin mix.
Pour 1 cup of cold water into a bowl and sprinkle the unflavored gelatin over the top. Use all 4 packages in the 1 oz box. Let sit for 2-3 minutes. Add 1 cup of boiling water and stir until the gelatin is completely dissolved.
In a blender, add sweetened condensed milk, cream, unflavored gelatin mixture, and vanilla and blend until well combined.
Remove the cut gelatin pieces from the refrigerator and your crust from the freezer.
Spray the sides of your springform pan with cooking spray, transfer the gelatin pieces to the pan, and pour the mixture over the gelatin pieces. Gently use a spatula to make sure things are evenly distributed.
Refrigerate at least 4-6 hours or overnight (8 hours preferred).
Remove from the refrigerator and gently run a knife along the sides of the pan before removing the sides.
Decorate with top with your favorite store bought or homemade icing and fresh berries and mint, or edible flowers.
Enjoy!
Recipe and Styling by Star Laliberte Story by Kylie Thomas Photography by Dave Bryce