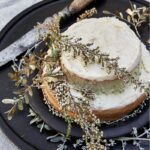
Here’s an almost-effortless suggestion for dessert: a Naked Buttercream Cake. It looks casual, tastes delicious, and will be the hit of a happy party.
Naked cakes can be made with any cake and any frosting. It’s about letting the cake shine and letting the frosting provide mere back-up. Here we use a basic vanilla cake and buttercream frosting, but use your imagination! For instance, we suggest brushing elderflower syrup, or other flavored simple syrup, over the tops and around the edges of each cake layer before you assemble and frost it.
What’s the History of Naked Cakes?
Naked cakes have exposed sides and minimal frosting, but surprisingly, these cakes are actually a newer venture in baking. While bakers have been layering cakes for a long time, the trend of intentionally leaving the sides visible did not come till the early to mid-2010s. At the time, rustic, bohemian, and minimalist aesthetics in weddings and events were on the rise. In order to meet that aesthetic, the heavy frosting went away and in its place a more formal, light option came to light. It also gives bakers a chance to dress their cakes with natural decor like flowers, herbs, and other worldly ingredients.
Print
Naked Buttercream Cake
Description
Let the beauty of a simple, all natural cake shine!
Ingredients
For the cake:
You can used boxed cake mix, but if you wish to make this rustic beauty from scratch, you can’t go wrong with this one adapted from a perennial favorite… Betty Crocker herself.
- 2 2/3 cups all-purpose flour
- 3 tsp baking powder
- ½ tsp salt
- ¼ tsp baking soda
- 1 ½ cups butter or margarine, softened
- 1 ¼ cups granulated sugar
- 2/3 cup butter milk (or regular milk)
- 1 ½ tsp vanilla
- 4 eggs
For the buttercream:
Buttercream frosting is one of the easiest things to make. The simplest form includes only 2 ingredients – butter and confectioner’s sugar. The trick is sifting the confectioner’s sugar and not over-beating!
Other recipes add in flavorings, such as vanilla, liqueur, or other flavor extracts, as well as dairy to enhance the texture.
- 1 cup butter cold butter (2 sticks), preferably unsalted, cut into 1-tbsp pieces
- 3 cups confectioners’ sugar
- 1 tsp vanilla extract
- 1 to 2 tbsp whipping cream
Instructions
For the cake:
- Heat oven to 350°F. Grease bottoms and sides of 3 (9-inch) round cake pans with shortening; lightly flour. In small bowl, mix flour, baking powder, salt and baking soda; set aside.
- In large bowl, beat 1 1/2 cups butter and the granulated sugar with electric mixer on high speed, scraping bowl occasionally, until fluffy. On medium speed, beat in flour mixture, milk, 1 1/2 teaspoons vanilla and the eggs until blended. Beat 2 minutes longer. Pour evenly into pans.
- Bake 25 to 30 minutes or until toothpick inserted in center comes out clean. Cool 10 minutes; remove from pans to cooling racks. Cool completely, about 1 hour.
- Wrap cake layers individually in plastic wrap; freeze for at least 1 hour, but ideally 4 to 6 hours. Frozen layers are easier much easier to work with and helps keep crumbs from breaking off into the icing.
For the buttercream:
- In a standing mixer fitted with a whisk or paddle, mix together sugar and butter. Mix on low speed until well blended and then increase speed to medium and beat for approximately 3 more minutes.
- Add vanilla and ½ of the cream; continue to beat on medium speed for 1 more minute, adding more cream as needed to reach your desired consistency.
To assemble:
- When ready to frost the cake, remove layers from freezer and unwrap. Level any uneven layers with a serrated knife if necessary.
- Place 2 tablespoons of frosting in the center of your cake plate (this will keep your cake from sliding!). Put the first cake layer on top of frosting.
- Spoon a little less than 1/3 of the frosting directly on top of first layer; using an offset spatula, spread the frosting evenly over the top and just past the edges of the first layer.
- Place the second cake layer upside-down on top of the first layer and repeat frosting with another scant 1/3 of the frosting.
- Place the third cake layer on top and spread the remainder of the frosting over the top layer and slightly over its edge. Using the offset spatula, barely frost the sides of entire cake utilizing the frosting that you left over the edges of each layer. The idea is to have the sides almost “naked”, with just enough frosting to leave the layers largely exposed.
- Put the fully assembled and frosted cake back in the freezer for 20-30 minutes to allow the icing to set before serving.
Recipe and Story by Rhonda Schuldt
Subscribe to TABLE Magazine’s print edition.
